Submission: Programming theory in action
Exercise
·
foundational
·
+60XP
·
30 mins
·
Unity Technologies

Now that you understand the pillars of object-oriented programming and how they are implemented, you’re ready to apply them in a brand new project. This is also a good opportunity to practice branching and merging in a version control repo.
Languages available:
1. This mission has been updated!
Just in case we refreshed this mission while you weren't looking, please be sure you have completed this content before attempting this submission:
2. Overview
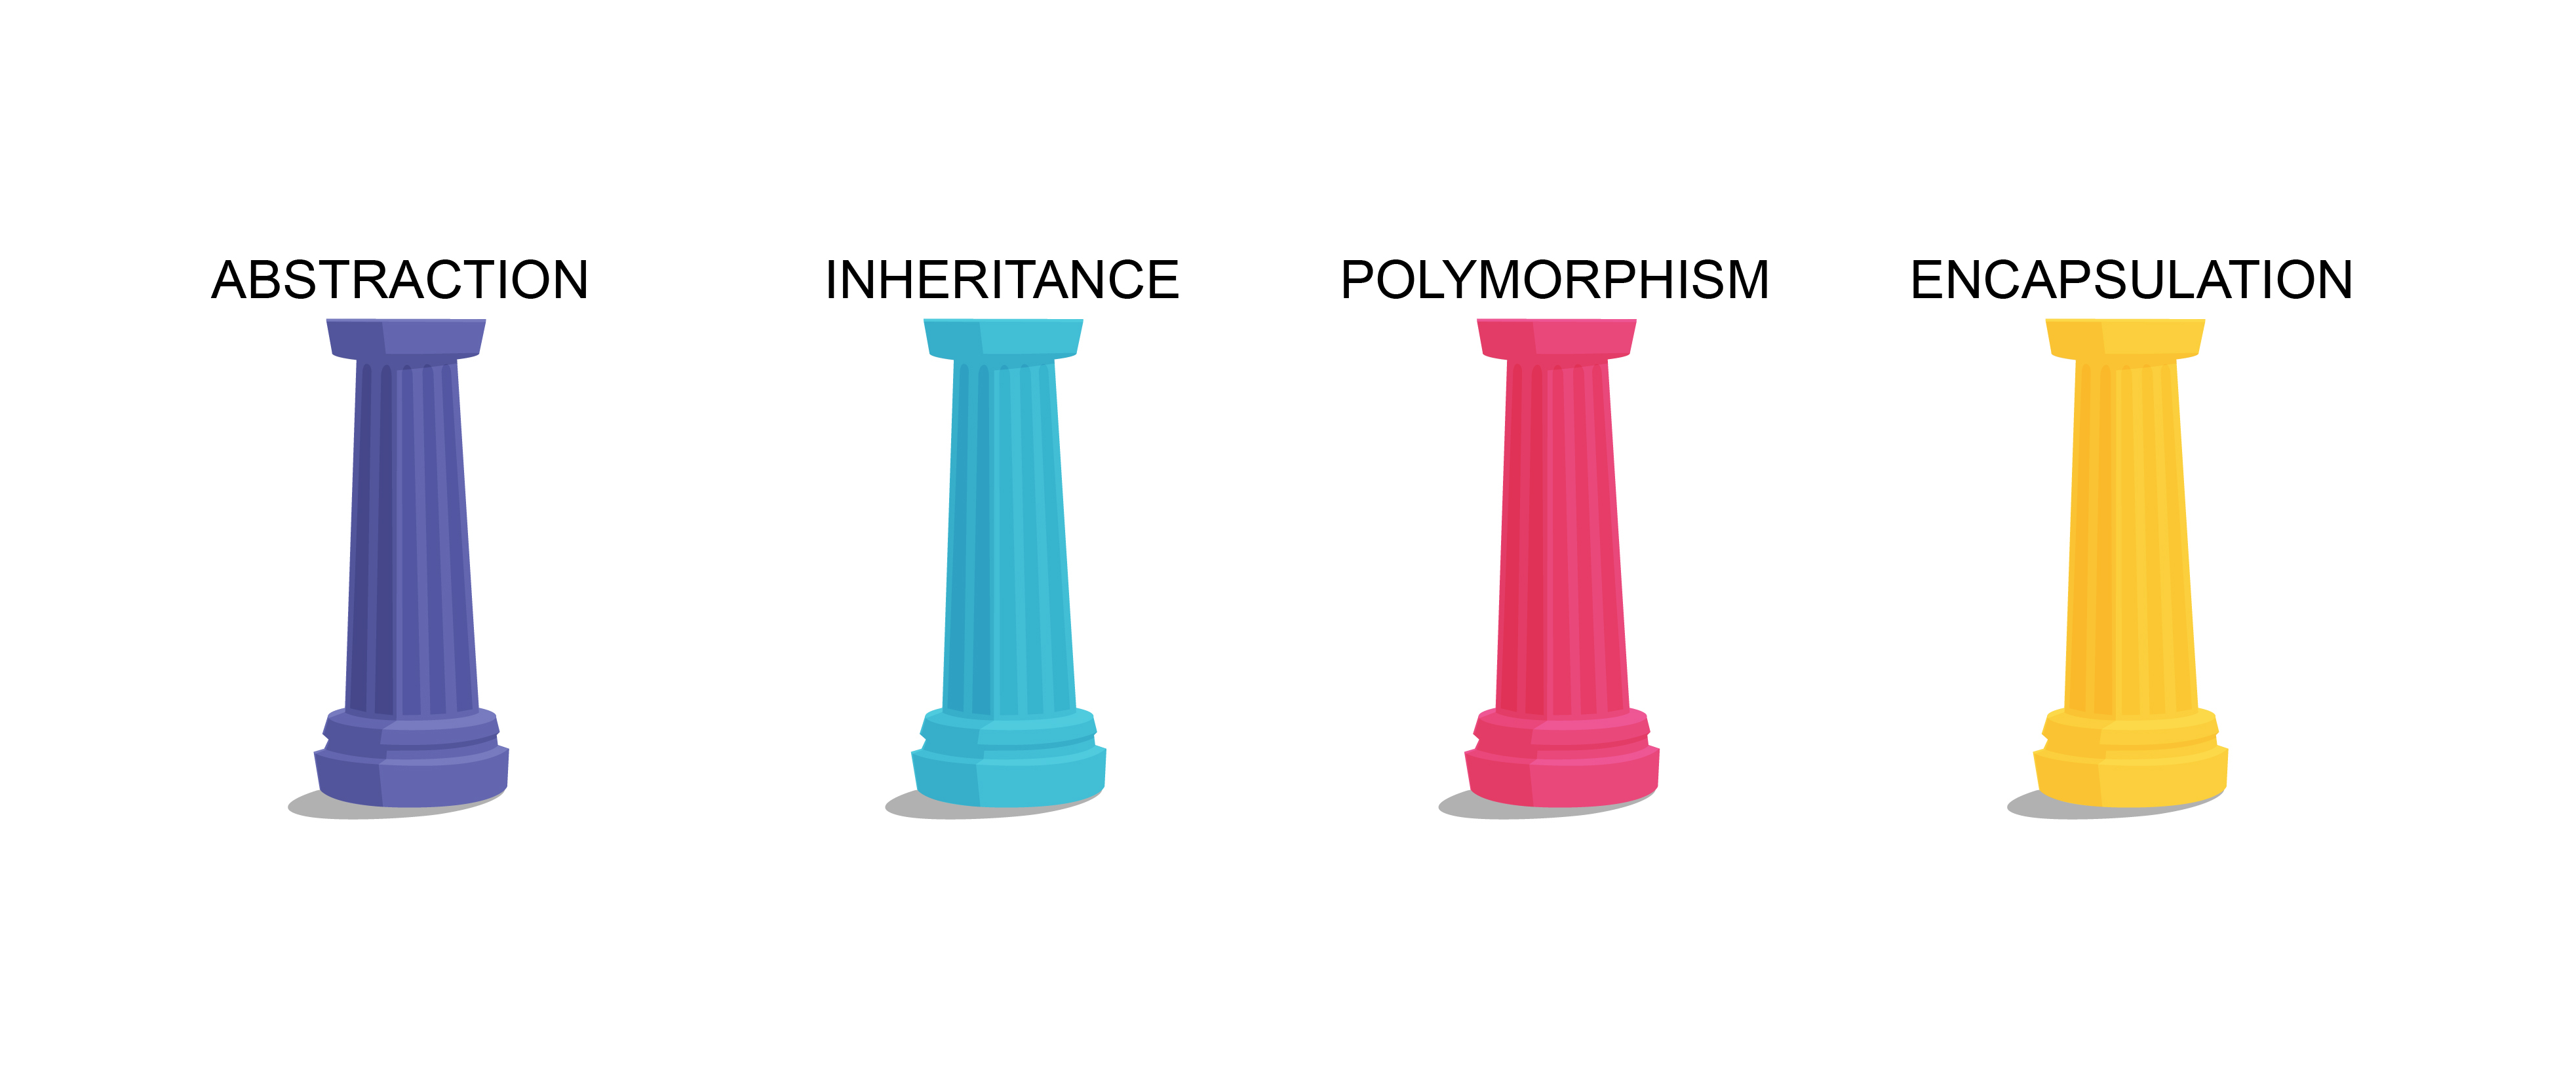
In the previous tutorials, you learned about the four pillars of object-oriented programming and how they are applied:
- Abstraction: reducing duplicate code by “abstracting out” repeated details or information.
- Encapsulation: “encapsulating” data and the methods that manipulate that data together in a class, protecting it from misuse by other classes.
- Inheritance: child classes deriving (or “inheriting”) behavior from parent classes.
- Polymorphism: changing (“morphing”) methods into many (“poly”) forms (i.e., method overloading and method overriding).
In this submission challenge, you will create a new project from scratch, demonstrating each of these pillars in the code.
Carefully plan your program’s architecture at a high level before you begin coding. Along the way, you’ll have an opportunity to practice branching and merging code using version control software.
This challenge is not going to be easy, but you’ll be a more thoughtful, strategic programmer by the time you complete it!
A successful submission will include:
- A link to your project’s GitHub repo, showing multiple commits with commit messages and at least two branches
- Demonstration of abstraction (higher-level methods that abstract unnecessary details)
- Demonstration of inheritance (parent/child classes)
- Demonstration of polymorphism (method overriding or overloading)
- Demonstration of encapsulation (getters and setters)
3. Create a new repo and do your initial commit
Before you get too involved in theoretical programming constructs, make sure your project is set up properly for version control.
1. Create a new repo configured for Unity named something like “Programming-Theory-Repo.”
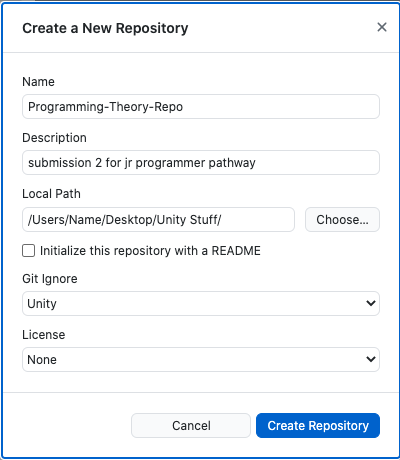
2. Create a new empty 3D Unity project in your repo named something like “Programming Theory Project.”
3. After your project is created, do an initial commit to the repo.
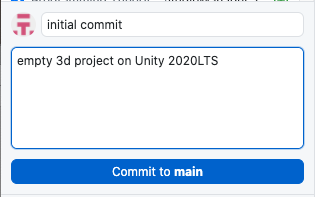
You should now have an empty Unity project backed up in a new version control repo.
If you need a reminder of how to do any of the above tasks, refer to the more detailed steps in the previous submission.
4. Design your project
With your project and repo ready to go, spend some time coming up with a concept for your project that will allow you to demonstrate the four pillars of object-oriented programming.
Keep in mind that this project can be a prototype rather than an actual full-fledged project. It can use primitive shapes or even be entirely text-based. You don’t have to start with a blank canvas either — if you completed Create with Code, you can repurpose the assets from one the prototypes or challenges. The goal is not to create a visual masterpiece from scratch — just to come up with something creative that demonstrates the OOP pillars: abstraction, encapsulation, inheritance, and polymorphism.
As you develop your concept, outline and track of your ideas in a design document or project brief. If you completed Create with Code, take inspiration from the template you used during your Personal Project labs. You could also draw from the design brief of the Resource Management project you just worked on. Your document can include a bulleted outline, sketches, diagrams — whatever best allows you organize and iterate on your ideas.
Of course, in the normal course of project development, you would never base your project features on the need to demonstrate programming concepts! It would be the reverse: the need for programming concepts would be driven by the project features. However, reversing the priorities does present a fun design challenge! How can you design a project that makes use of these four programming concepts? It might be most helpful to think through the pillars in the following order:
1. Inheritance - choose your objects
To begin your brainstorming, what objects can you think of that derive behaviors from a more generic object? What objects can you think of that are subtypes of other objects? For example:
- Animal → Cat / Dog
- Vehicle → Plane / Car / Boat
- Toaster → Basic toaster / Deluxe toaster / Premium toaster
These are just a few examples of parent/child relationships that you could implement with inheritance in your code. For more detail on this pillar, review the inheritance tutorial.
In your design document or project brief:
Jot down the objects you want to serve as the starting point for your project concept.
2. Polymorphism - choose your behaviors
After you decide on the types and subtypes of objects you might use for your project, think about the types of behaviors those objects could perform in your program, and how those behaviors might “morph” depending on the object subtype. For example:
- All animals might have a Jump() function, but a cat might have different jumping capabilities than a dog.
- All vehicles might have a Move() function, but a plane moves in all three dimensions and can’t move in reverse.
- All toasters might have a Toast() function, but the premium toaster may also have a special “bagel” setting.
As you know, polymorphism also refers to the fact that methods of the same name can be overloaded with different parameter types to have many forms (“poly” + ”morphs”). You might also consider the different parameter inputs one of these methods could take. For example, a Jump() function could take the max height of the jump [Jump(float maxHeight)] or the force applied to it [Jump(Vector3 jumpForce)].
For more detail on this pillar, review the polymorphism tutorial.
In your design document or project brief:
List the types of functions or behaviors that you would like to program in your application.
3. Encapsulation - choose your data
Encapsulation is all about protecting data in a class so that it cannot be misused and break your application. Think about which data you want to protect in this way, while still allowing other classes to get or set it. For example:
- For an animal, you may need to get or set its name, but prevent the name from being too long.
- For a vehicle, you may need to get or set its year, but ensure the year is not a negative number.
- For a toaster, you may need to get or set the type of bread, but ensure it’s a valid bread option.
For more detail on this pillar, review the encapsulation tutorial.
In your design document or project brief:
Record the types of functions or data you want to encapsulate in your project.
4. Abstraction - choose your functions
Abstraction will probably be the easiest concept to implement once you are already coding, but it may be helpful to think of some of the high-level functions you want in your project before getting started. For example:
- For animals, you might have Walk(), Jump(), Talk() functions.
- For vehicles, you might have TurnOn(), Move(), and TurnOff() functions.
- For toasters, you might have Start(), SetLevel(), and Cancel() functions.
For more detail on this pillar, review the abstraction tutorial.
In your design document or project brief:
Note some of the higher-level functions that could be useful for reuse in your code.
You should now have some idea for what you want to achieve in your project — even if it still feels very conceptual — and you should have your ideas recorded in a document.
If you are still feeling lost with no idea what to do for your project, here’s an idea for an extremely simple project:
- There are three different colored shapes that inherit from a base “shape” class (inheritance).
- When you click on each shape, it prints something different to the screen through an overriden DisplayText() function (polymorphism).
- Each shape contains data, such as its name or color, which are stored as properties with getters and setters (encapsulation).
- Code is organized in a way that reduces duplicate code through higher level methods (abstraction).
5. Create a branch for your title screen and commit changes
Especially when working with multiple developers, branches are incredibly useful for version control. Developers typically start a new branch when they begin implementing a new feature and don’t want to interfere with other developers’ code as they experiment.
After you implement the new feature, you will merge the branch back into the main branch and then deal with any merge conflicts that arise. If you don’t remember what merge conflicts are, you can refer back to the tutorial Set up version control.
To get comfortable with this process, create and merge a new branch for your project’s title screen. If your app does not call for a title screen, use another simple feature of your project instead.
1. Create a new branch in your repo and name it something like “title-screen.” If you are not sure how to create a new branch, follow the instructions in the GitHub documentation. On this branch, you will be able to safely experiment with your new feature without interfering with any other developer’s work.
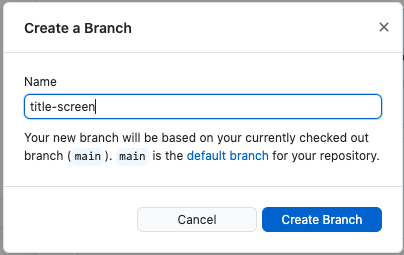
You should now see that the “Current branch” is set to your new branch.

2. Develop your title screen on the new branch. In your project, create a simple title screen for your submission. It should be relevant to the project concept you’ve chosen and be very simple, like the example below.
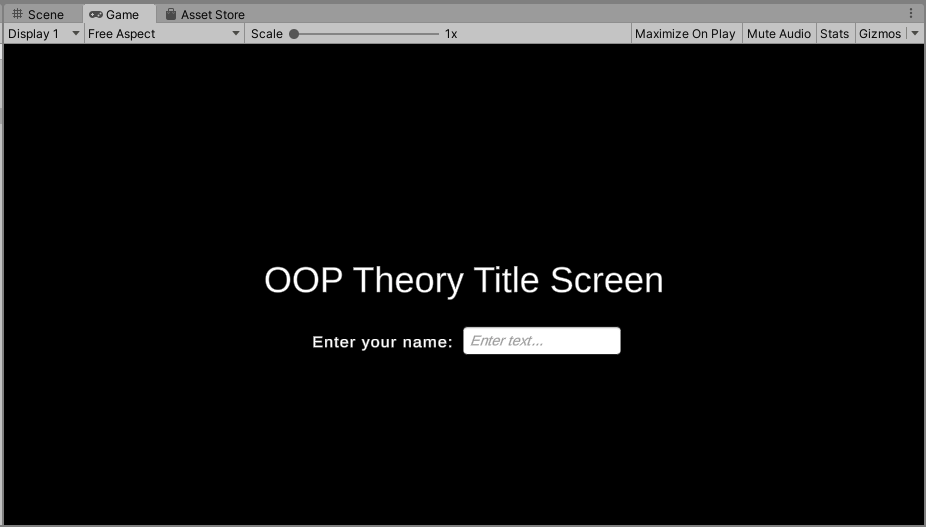
As you develop and save your work, you should see all of the edits and additions to your branch reflected in the Changes panel of your version control software.
3. To merge the changes from this branch with the main branch, commit the changes you’ve made. In the version control software, add a summary and description, then select commit to [branch-name].
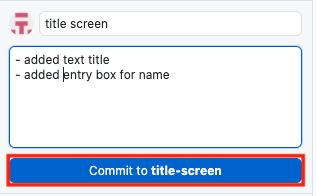
Your changes are now committed to your branch and ready to be merged with the master branch.
6. Merge your branch with the master branch
With your title screen (or other feature) complete, you are now ready to merge your experimental branch into the main development branch.
1. To return to the master branch, use the Current Branch drop-down to select the main branch.
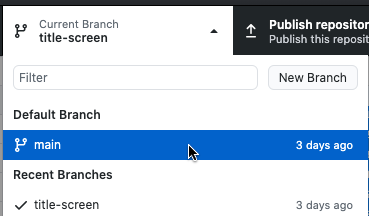
After switching back to the main branch, you will see all of the changes disappear from your Unity scene. Don’t worry — that’s expected, since you are returning to the state of your project before you began implementing your new feature. The feature will reappear in the project after the big merge.
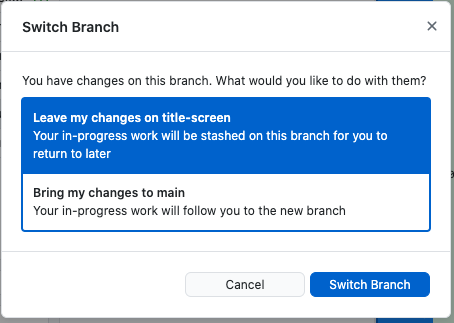
If you’ve made changes since your last commit, you may be prompted to choose whether you want to “Leave changes” on the branch or “Bring changes” over to the main branch. This means that you have changes to your branch that have not yet been committed. Cancel, make sure that all changes are committed on your branch, and try switching to the main branch again.
2. From the branch drop-down, select Choose a branch to merge into main. Then, select your other branch and select Merge [branch-name] into main.
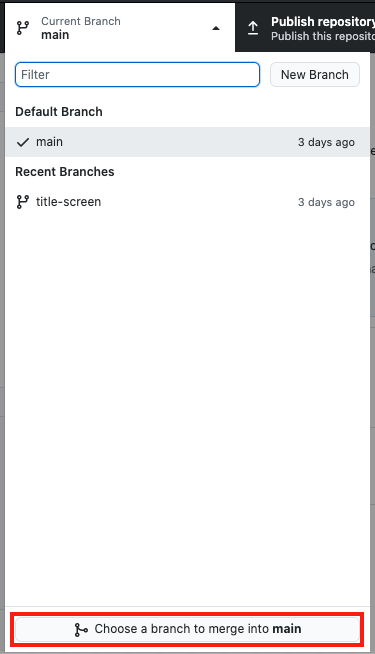
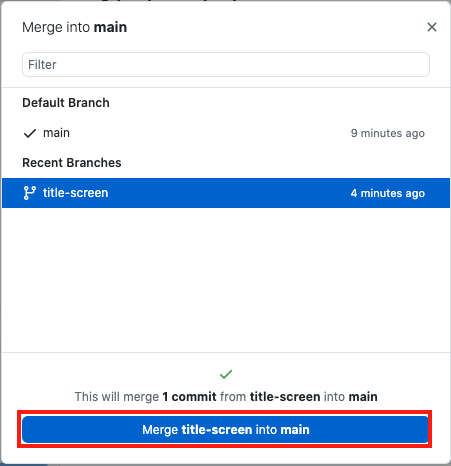
When you return to your Unity scene, you will see the changes you made on your branch now reflected on the main branch. Congratulations on a successful merge!
7. Continue working on your submission
Now that you are more comfortable branching and merging in your repo, you should continue developing your project using these techniques.
Remember, your project should demonstrate each of the four pillars of OOP in your code, which will not be an easy feat. Expect to dedicate a few hours at a minimum, much of which will likely be spent troubleshooting and Googling.
8. Submit your project
After you’ve implemented the four pillars of OOP into your project, please submit and share your project! Before you do, though, make sure you have thoroughly playtested it — or even better, have a friend or family member playtest it.
A successful submission will include:
- A link to your project’s GitHub repo, showing multiple commits with commit messages and at least two branches.
- Demonstration of inheritance (parent/child classes). Add a comment in the code that says “// INHERITANCE” to indicate where it was implemented.
- Demonstration of polymorphism (method overriding or overloading). Add a comment in the code that says “// POLYMORPHISM” to indicate where it was implemented.
- Demonstration of encapsulation (getters and setters). Add a comment in the code that says “// ENCAPSULATION” to indicate where it was implemented.
- Demonstration of abstraction (higher-level methods that abstract unnecessary details). Add a comment in the code that says “// ABSTRACTION” to indicate where it was implemented.
Please take a screenshot of your project, or do a screen-recording walking us through it, then post it here to share what you’ve made.
We highly recommend that you comment on at least one other creator's submission. Did they successfully complete the challenge? What do you like about the project? What would be a cool new feature they might consider adding?
Please login to submit
Complete this tutorial
Submission Gallery

Aircrafts with POO
This is my last project from Pathway Junior Programmer it is a prototype about how POO works. It is about Aircrafts! I know its not perfect, it needs audio, it has no animations, but this is a prototype, enjoy it!

1 v 1000000
A bullet heaven game featuring farm animals! It's a private repo for now
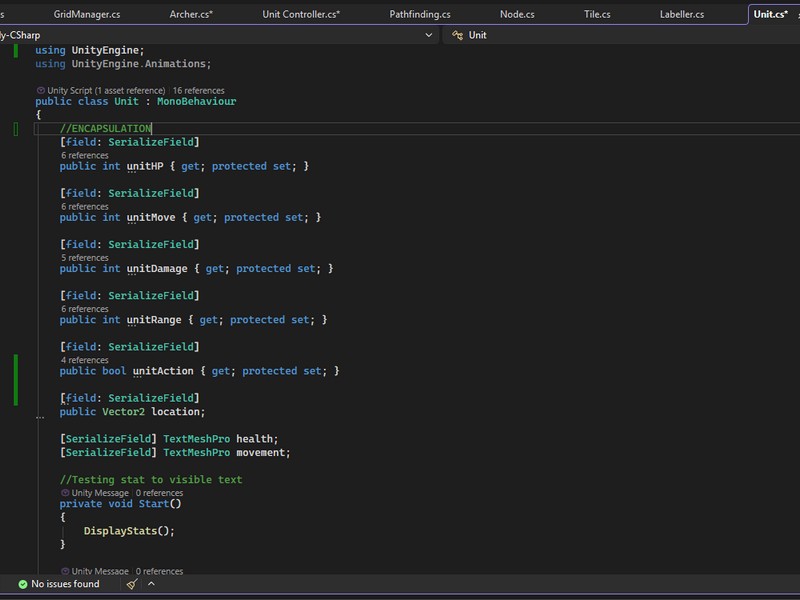
Programming Theory Demo
Foundation for a grid based battle game utilizing different kinds of unit with unique stats and abilities

Teleporter
its a arhitectural project that implements DI and soon it will be playable and with enemies

OOP submission Project
The Mini Racing Game is developed using Unity and C#, following Object-Oriented Programming (OOP) principles to ensure clean structure, reusability, and easy scalability. In this game, the player controls a racing car that moves forward automatically, steers left/right, avoids obstacles, and completes laps or distances to score points.

Programming theory in action
https://github.com/RakhaGalih/unityprojectprogrammingtheoryinaction

BrewAndBloom
I liked this idea so much that I decided to finish the project. You can play it here : https://nikaido8.itch.io/brew-bloom The code is open source here: https://github.com/AlexeySH8/Brew-and-Bloom

The_ancient_ruins
game about girl who discover ancient ruins and solve puzzles and escape from monsters and traps