
Understanding the Emission component of HDRP Lights
Tutorial
intermediate
+10XP
10 mins
(23)
Unity Technologies
All High Definition Rendering Pipeline (HDRP) Light types have an Emission component that defines the emissive behavior of the light. With this component, you can set the color, intensity, range, and whether the light uses a cookie. Most lights share the same properties, except Directional Lights, which don’t have an adjustable range. In this workflow, we’ll go over the Emission component and how each property affects the lights.
Languages available:
1. Understanding the Emission Component of HDRP Lights
This tutorial has been verified using Unity 2019.4 LTS
All High Definition Rendering Pipeline (HDRP) Light types have an Emission component that defines the emissive behavior of the light. With this component, you can set the color, intensity, range, and whether the light uses a cookie. Most lights share the same properties, except Directional Lights, which don’t have an adjustable range. In this workflow, we’ll go over the Emission component and how each property affects the lights.
2. Changing the Emission Properties
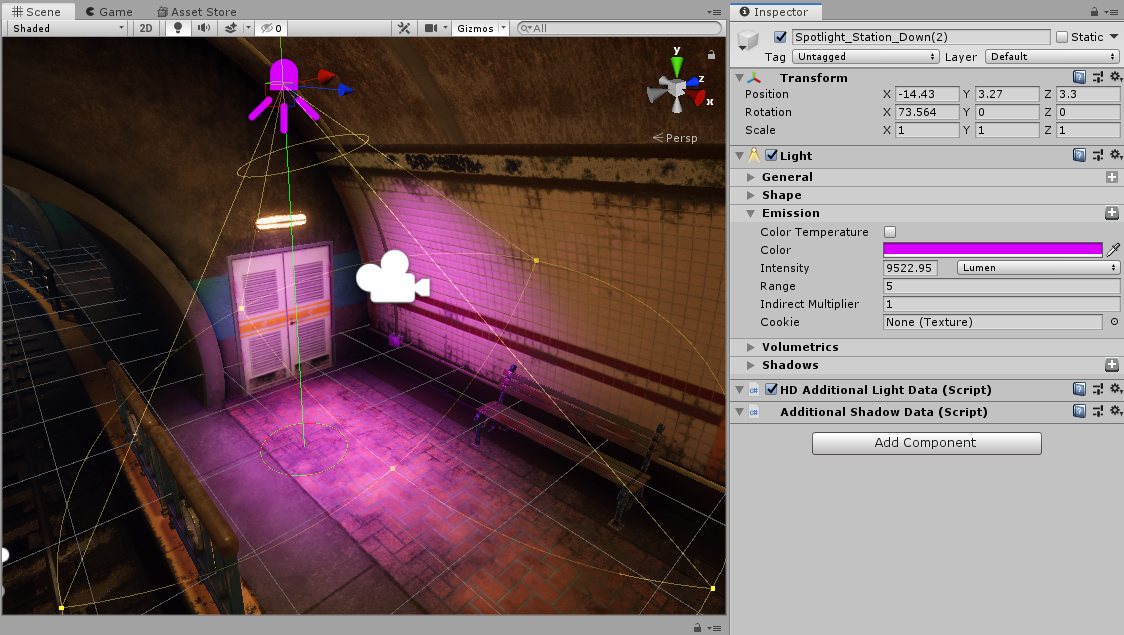
To understand how the Emission component affects lighting in your Scene, begin by creating a Light and changing its color to a vibrant purple.
1. Create a Spot Light by selecting the GameObject drop-down and clicking Light > Spot Light.
2. Move and orient the Light to a place in the Scene where it will be interacting with a couple of walls or other objects.
3. In the Inspector window, with the Light selected, expand the Emission component.
4. Change the Color to a magenta hue.
5. Adjust the Range and Intensity of the light to taste (Figure 01).
As you read about each Emission component property, adjust the settings to get a better understanding of how they affect your Light.
3. Emission Properties
The Emission component has the following properties:
- Color Temperature: When this is enabled, HDRP uses the Temperature mode for the color of the light. Checking this will add a Temperature field and change Color to Filter (Figure 03).
Filter allows you to select a color to tint the light source, much how Color works. Temperature allows you to specify the temperature of the light in Kelvin for HDRP to correlate a color to the light. For reference, White is 6500K. In the image below, (Figure 04), you’ll see three lights, set with a Red, White, and Blue temperature.
- Color: This allows you to specify the color that the light emits (Figure 05).
- Intensity: This determines the strength of the Light. Intensity is expressed in the following units: A Spot Light can use Lumen, Candela, Lux, and Ev 100. A Directional Light can use Lumen, Candela, Lux, and Ev 100. A Point Light can use Lumen and Candela. A Rectangle Light can use Lumen, Luminance, and Ev 100. A Tube Light can use Lumen, Luminance, and Ev 100. For all lights except Directional, the farther the light travels, the weaker it gets; lower values will cause the light to diminish closer to the source while higher values will have the opposite effect.
- Range: This controls how far the light travels. Higher values increase the range while lower values decrease it (Figure 07).
- Indirect Multiplier: This controls the intensity of the indirect light. A value of 1 mimics realistic light behavior. A value of 0 will disable the indirect lighting for this light. This has no effect if both Realtime and Baked Global Illumination are disabled in Lighting Settings.
- Cookie: This allows you to set the RGB Texture that the light projects. Use this to create silhouettes or patterned illumination. The Texture shapes should be 2D for Spot and Directional Lights and Cube for Point Lights. The Cookie Texture should always be imported as a default texture type. This setting is only available for Spot, Directional, and Point Lights.
4. Conclusion
Now that you know how the Emission component works with HDRP lights, experiment with the settings and see what you can achieve. The Emission component plays a significant role in how your lights behave and how lighting affects your scene. Mastery of this component will allow you to create beautiful lighting in your projects.