Implement projectiles for the player
Tutorial
·
Beginner
·
+10XP
·
30 mins
·
(584)
Unity Technologies
At the moment your game includes enemies but no way to defeat them. In this tutorial, you’ll create projectiles that the player can launch at enemies.
By the end of this tutorial, you’ll be able to do the following:
- Create and configure a Projectile GameObject.
- Write a function to launch a projectile using Input Events.
1. Overview
At the moment your game includes enemies but no way to defeat them. In this tutorial, you’ll create projectiles that the player can launch at enemies. Then, in the next tutorial, you’ll configure the projectiles to affect the enemy so the player can neutralize the threat and complete the game.
By the end of this tutorial, you’ll be able to do the following:
- Create and configure a Projectile GameObject.
- Write a function to launch a projectile using Input Events.
Working on your own project?
This tutorial is part of Beginner 2D: Adventure Game and refers to the game project for that course, but this information may be helpful for any beginner creator who wants to implement projectile attacks in their own game.
Note: For the purposes of this tutorial, we chose to use the Ruby’s Adventure asset set, and the file paths used in instructions will reflect this. If you chose another asset set, the file names will be the same, but in your corresponding theme folder.
2. Create a projectile GameObject
You’ve previously set up different GameObjects for this game, now you’re going to repeat that process for a projectile that the player character throws at the enemy.
To set up the projectile, follow these instructions:
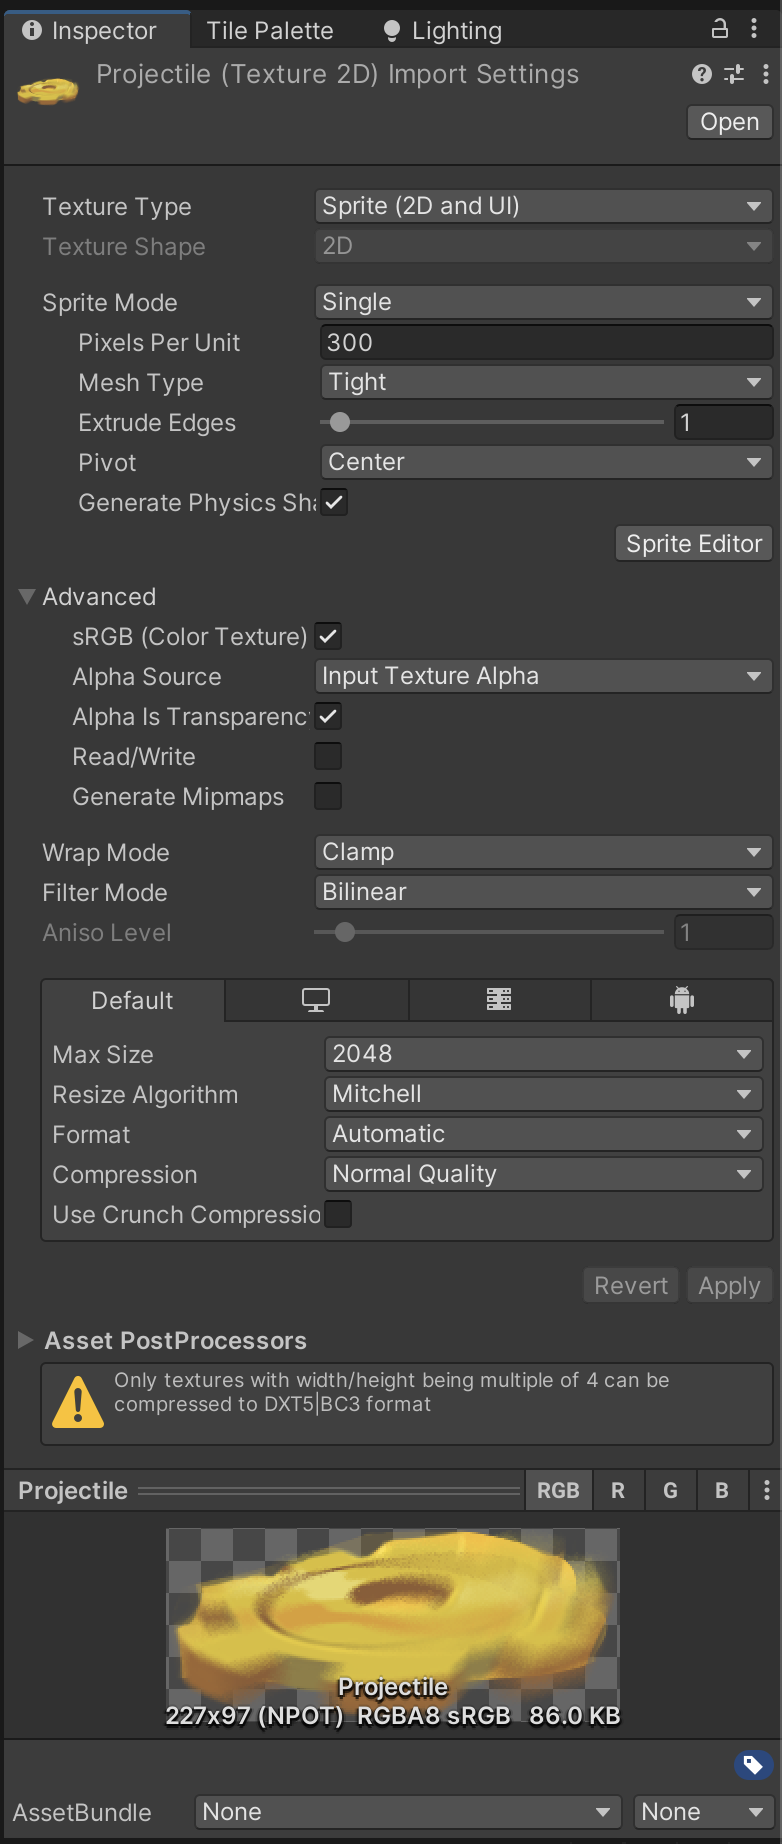
1. In the Project window, within your chosen asset pack folder, navigate to Art > [Chosen Asset Pack] > VFX Select the Projectile sprite.
2. In the Inspector window, set the Pixels Per Unit property to 300, then select Apply.
This change will make the asset more proportional in size to the other game sprites. You can adjust this size if you’d like to!
3. Drag and release the Projectile sprite over the Hierarchy window to create a new GameObject.
4. In the Inspector window, add Box Collider 2D and Rigidbody 2D components so Unity can detect when the projectile collides with another GameObject. In this situation, the default size of the collider is fine because all of the sprite needs to be able to collide with other GameObjects.
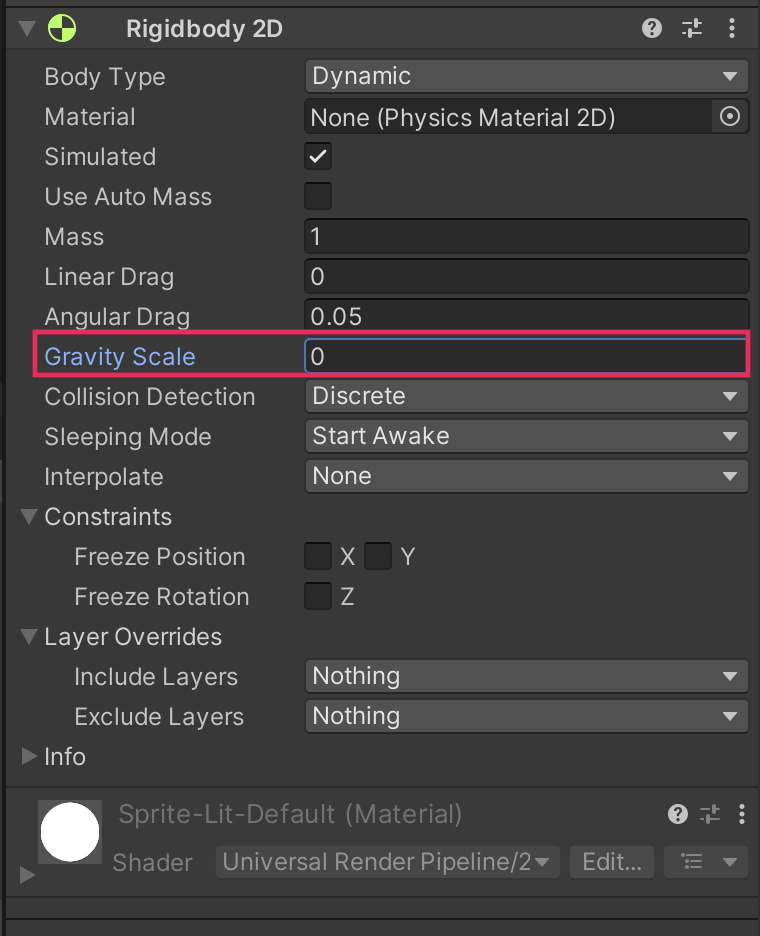
5. In the Rigidbody 2D component, set the Gravity Scale property to 0.
6. Create a new script called “Projectile” and attach it to the GameObject.
7. Turn the Projectile GameObject into a prefab.
8. Delete the Projectile GameObject from the Hierarchy window — the projectile should only be created when the player decides to use one. The prefab will still be available in the correct asset folder.
3. Script the basic projectile functionality
To write the basic physics functionality for the projectile, follow these instructions:
1. Open the Projectile script in your IDE.
2. Add the using statement for the Input System:
using UnityEngine.InputSystem;3. At the top of the Projectile class, declare a private Rigidbody2D variable:
Rigidbody2D rigidbody2d;4. Rename the Start function to “Awake”:
  void Awake()
   {

   }
Start is called on the frame after the Projectile GameObject is instantiated, so when the PlayerController script’s Launch function calls Instantiate, this reference is empty. Awake is called when a GameObject is initialized, before the Start function, which will ensure that the reference is in place.
5. In the Awake function, add an instruction to get the reference to the Rigidbody 2D component on the Projectile GameObject and store it in the rigidbody2D variable:
 void Awake()
   {
	rigidbody2d = GetComponent<Rigidbody2D>();
   }
6. Delete the Update function.
7. Below the Update function, create a new public function called “Launch”:
 public void Launch(Vector2 direction, float force)
   {

   }
Here’s an explanation of this code:
- The function takes a Vector2 variable (direction) and a float variable (force) as its parameters.
- You’ll use these parameters to move the projectile’s Rigidbody component: the higher the force value, the faster the projectile moves.
8. In the Launch function, add the following instruction:
rigidbody2d.AddForce(direction * force);Here’s an explanation of this code:
- The function calls AddForce on the projectile’s Rigidbody component; the calculation for this here is the direction variable multiplied by the force variable.
- When the force is applied to the Rigidbody component, the physics engine will apply that force and direction to move the Projectile GameObject every frame.
9. Below the Launch function, add a new OnTriggerEnter2D function:
   void OnTriggerEnter2D(Collider2D other)
   {

}- The projectile will affect the enemy on impact, so you need to detect when it collides with another GameObject.
- The parameter other stores the Collision2D data associated with the collision.
10. Add the following two instructions to the OnTriggerEnter function:
Debug.Log("Projectile collision with " + other.gameObject);
Destroy(gameObject);
Here’s an explanation of this code:
- The first instruction prints a message to the console when the projectile collides with a GameObject, so you can identify the specific GameObject it has collided with.
- The second instruction destroys the Projectile GameObject on collision. Eventually these projectiles will fix the enemy robots; you’ll add that functionality later in this tutorial.
11. Save your changes.
4. Write a function to launch projectiles
You’ve created a basic projectile with some interim functionality, but at the moment the player character has no way to use it.
Follow these instructions to assign the Projectile prefab to the PlayerController component :
1. Open the PlayerController script in your IDE.
2. At the top of the PlayerController class, declare a new public variable:
public GameObject projectilePrefab;Here’s an explanation of this code:
- The variable type GameObject can contain the data for the Projectile prefab; prefabs are GameObjects saved as reusable assets.
- This variable is public, so you can assign any GameObject prefab to this variable in the Inspector.
3. Underneath the existing functions, add a new function called Launch:
 void Launch()
  {

  }
4. In the new Launch function, add the following instruction:
GameObject projectileObject = Instantiate(projectilePrefab, rigidbody2d.position + Vector2.up * 0.5f, Quaternion.identity);This instruction uses some new things that you haven’t encountered before:
- This instruction calls Instantiate, a Unity function that takes three parameters.
- Instatiate’s first parameter is a GameObject reference. Calling Instantiate creates a copy of that GameObject in a position defined by the second parameter, with the rotation defined by the third parameter.
- In this situation, the Projectile prefab is the GameObject. You’ve defined a position at the position of the PlayerCharacter GameObject’s Rigidbody component but a little up, so the Projectile prefab is placed closer to the character sprite’s hands than feet. You’ve also set a rotation of Quaternion.identity.
- Quaternions are mathematical operators that can express rotation. All you need to know here is that Quaternion.identity means no rotation.
5. Add the following two instructions underneath the first:
Projectile projectile = projectileObject.GetComponent<Projectile>();
projectile.Launch(moveDirection, 300);
Here’s an explanation of this code:
- The first instruction gets a reference to the Projectile script on the newly instantiated Projectile GameObject.
- The second instruction calls the Launch function from the Projectile script on the new Projectile instance, passing it the direction of movement (which you stored in a variable for the player character animations) and a force value of 300.
- The force value that you have set is high because it is expressed in Newton units. This value is a good fit for a basic 2D adventure game, but if you want to fine-tune the force of the projectile you can create a public float variable and use that as the force instead.
6. Add a final instruction to the Launch function:
animator.SetTrigger("Launch");This instruction sets a trigger so the Launch character animation plays when the player launches a projectile.
5. Detect input to launch a projectile
Now you’ve written the Launch function, you need to configure an input for it. You also need to assign the Projectile prefab, so the player character actually has something to launch with this function.
Follow these instructions to set up the Launch action:
1. Open the PlayerCharacter prefab in prefab editing mode, then select the PlayerController GameObject in the Hierarchy window.
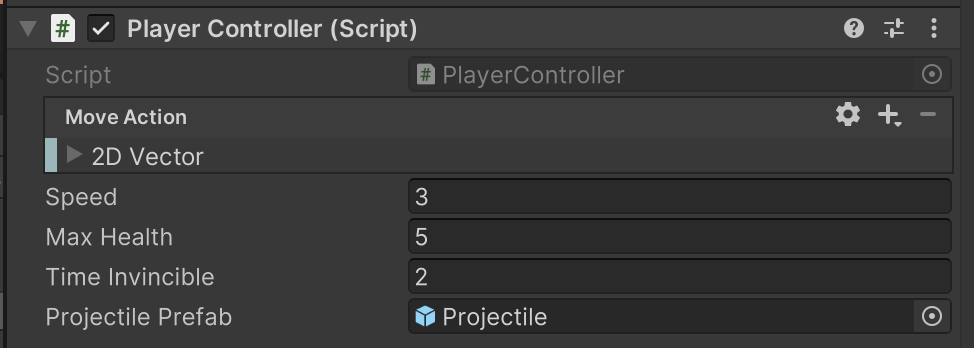
2. In the Inspector window, go to the Player Controller (Script) component. Find the new Projectile Prefab field and assign the Projectile prefab.
Lastly, in your code you need to call the Launch function whenever the user presses key C.
3. In the Update function after the if(isInvincible) loop add the following statement:
if(Input.GetKeyDown(KeyCode.C))
       {
          Launch();
       }
4. Save your changes and return to the Unity Editor. Enter Play mode to test your changes — try to launch a projectile.
As soon as an instance of the Projectile prefab is created, a collision with the PlayerCharacter GameObject is registered in the Console window, and the Projectile GameObject is destroyed. You could remove the destroy functionality to test this, but this change wouldn’t resolve the issue of an immediate collusion.
6. Configure Layers to fix the collision issue
You can address the immediate collision issue by using layers. Layers group GameObjects together so you can filter them. Here, you’re going to create one layer for the player character and one layer for all projectiles. You can then instruct the physics system that these two layers can’t collide, so it ignores all collisions between objects in those layers.
To configure the player character and projectile layers for your game, follow these instructions:
1. Open the PlayerCharacter GameObject in prefab editing mode.
2. In the Inspector window, go to the GameObject header. Open the Layer property dropdown.
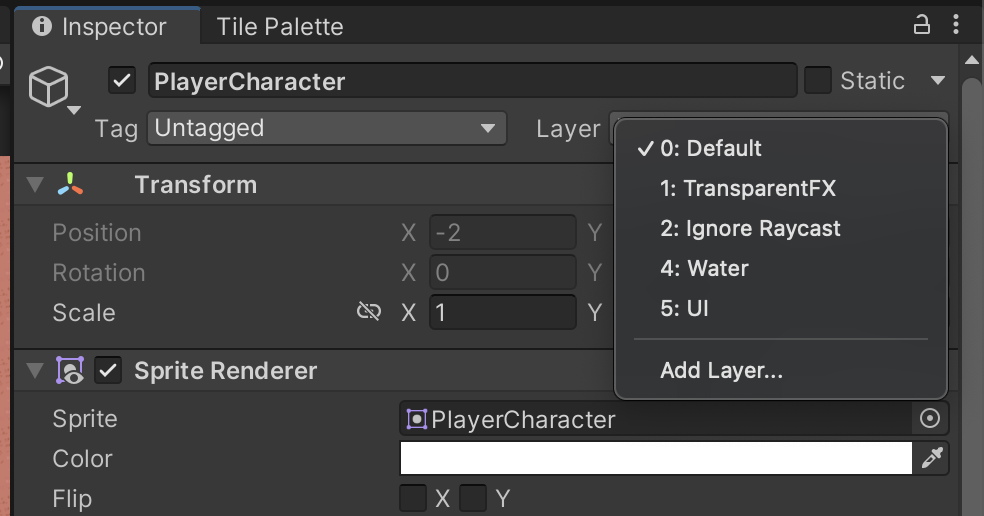
All GameObjects start on the Default layer (layer 0); you can create up to 32 layers for your game. There are some built-in layers already defined.
3. Select Add Layer… to open the Layer Manager view.
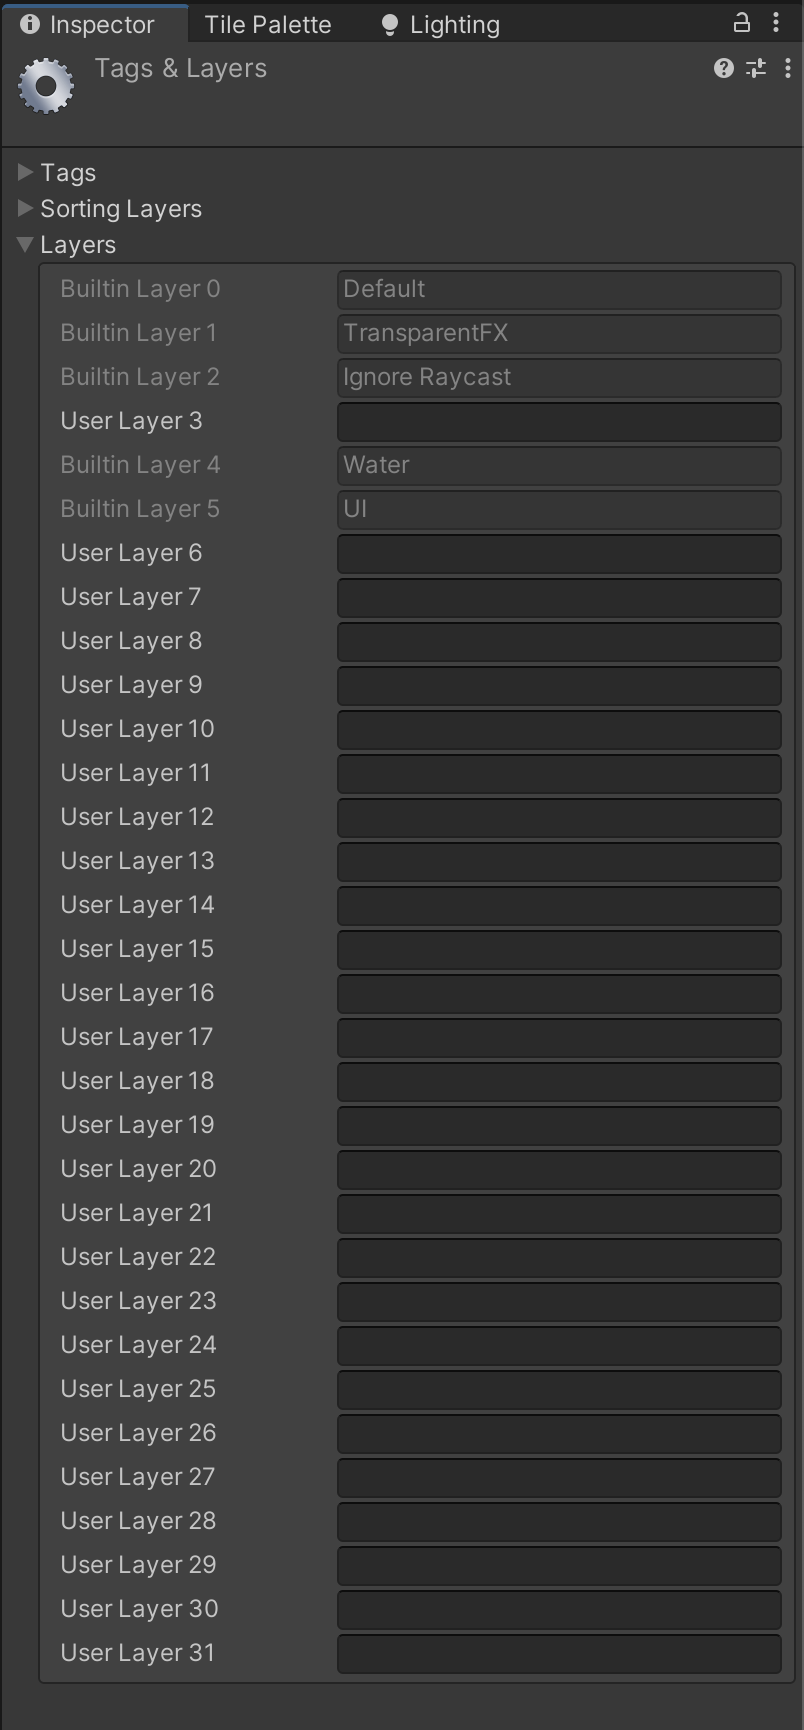
4. Pick any two empty layers and call them “Character”, and “Projectiles”.
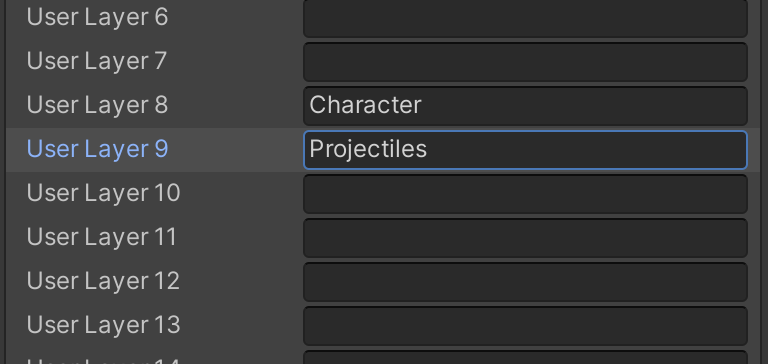
Note: Some layers are used by Unity for fixed purposes, but you can use the other layers as needed.
5. Select the PlayerCharacter GameObject again. Set its Layer property to Character, then save your changes and exit prefab editing mode.
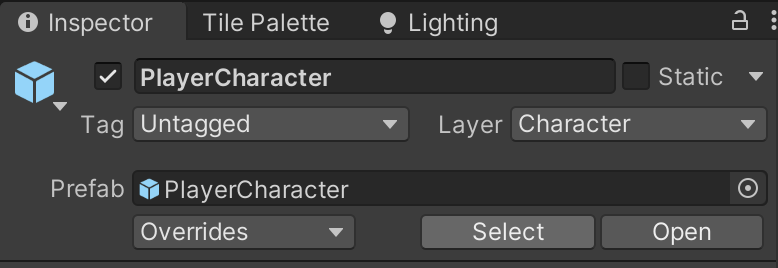
6. Repeat this process to set the correct layer for the Projectile prefab. Remember, you can find the prefab in the Project window.
7. Adjust the Layer Collision Matrix
The final thing that you need to do is to configure your project so that the two new layers can’t collide. Layers are a helpful way to organize the different things in your game for a number of reasons. Here, layers are useful because you can turn off collisions between just the two new layers. Everything else will work as expected, but the projectile and the player character will never collide, which means that the projectile will be available for the player to launch at enemies.
To adjust the layer collision in your project, follow these instructions:
1. In the main menu, go to Edit > Project Settings… > Physics 2D. Select the Layer Collision Matrix tab.
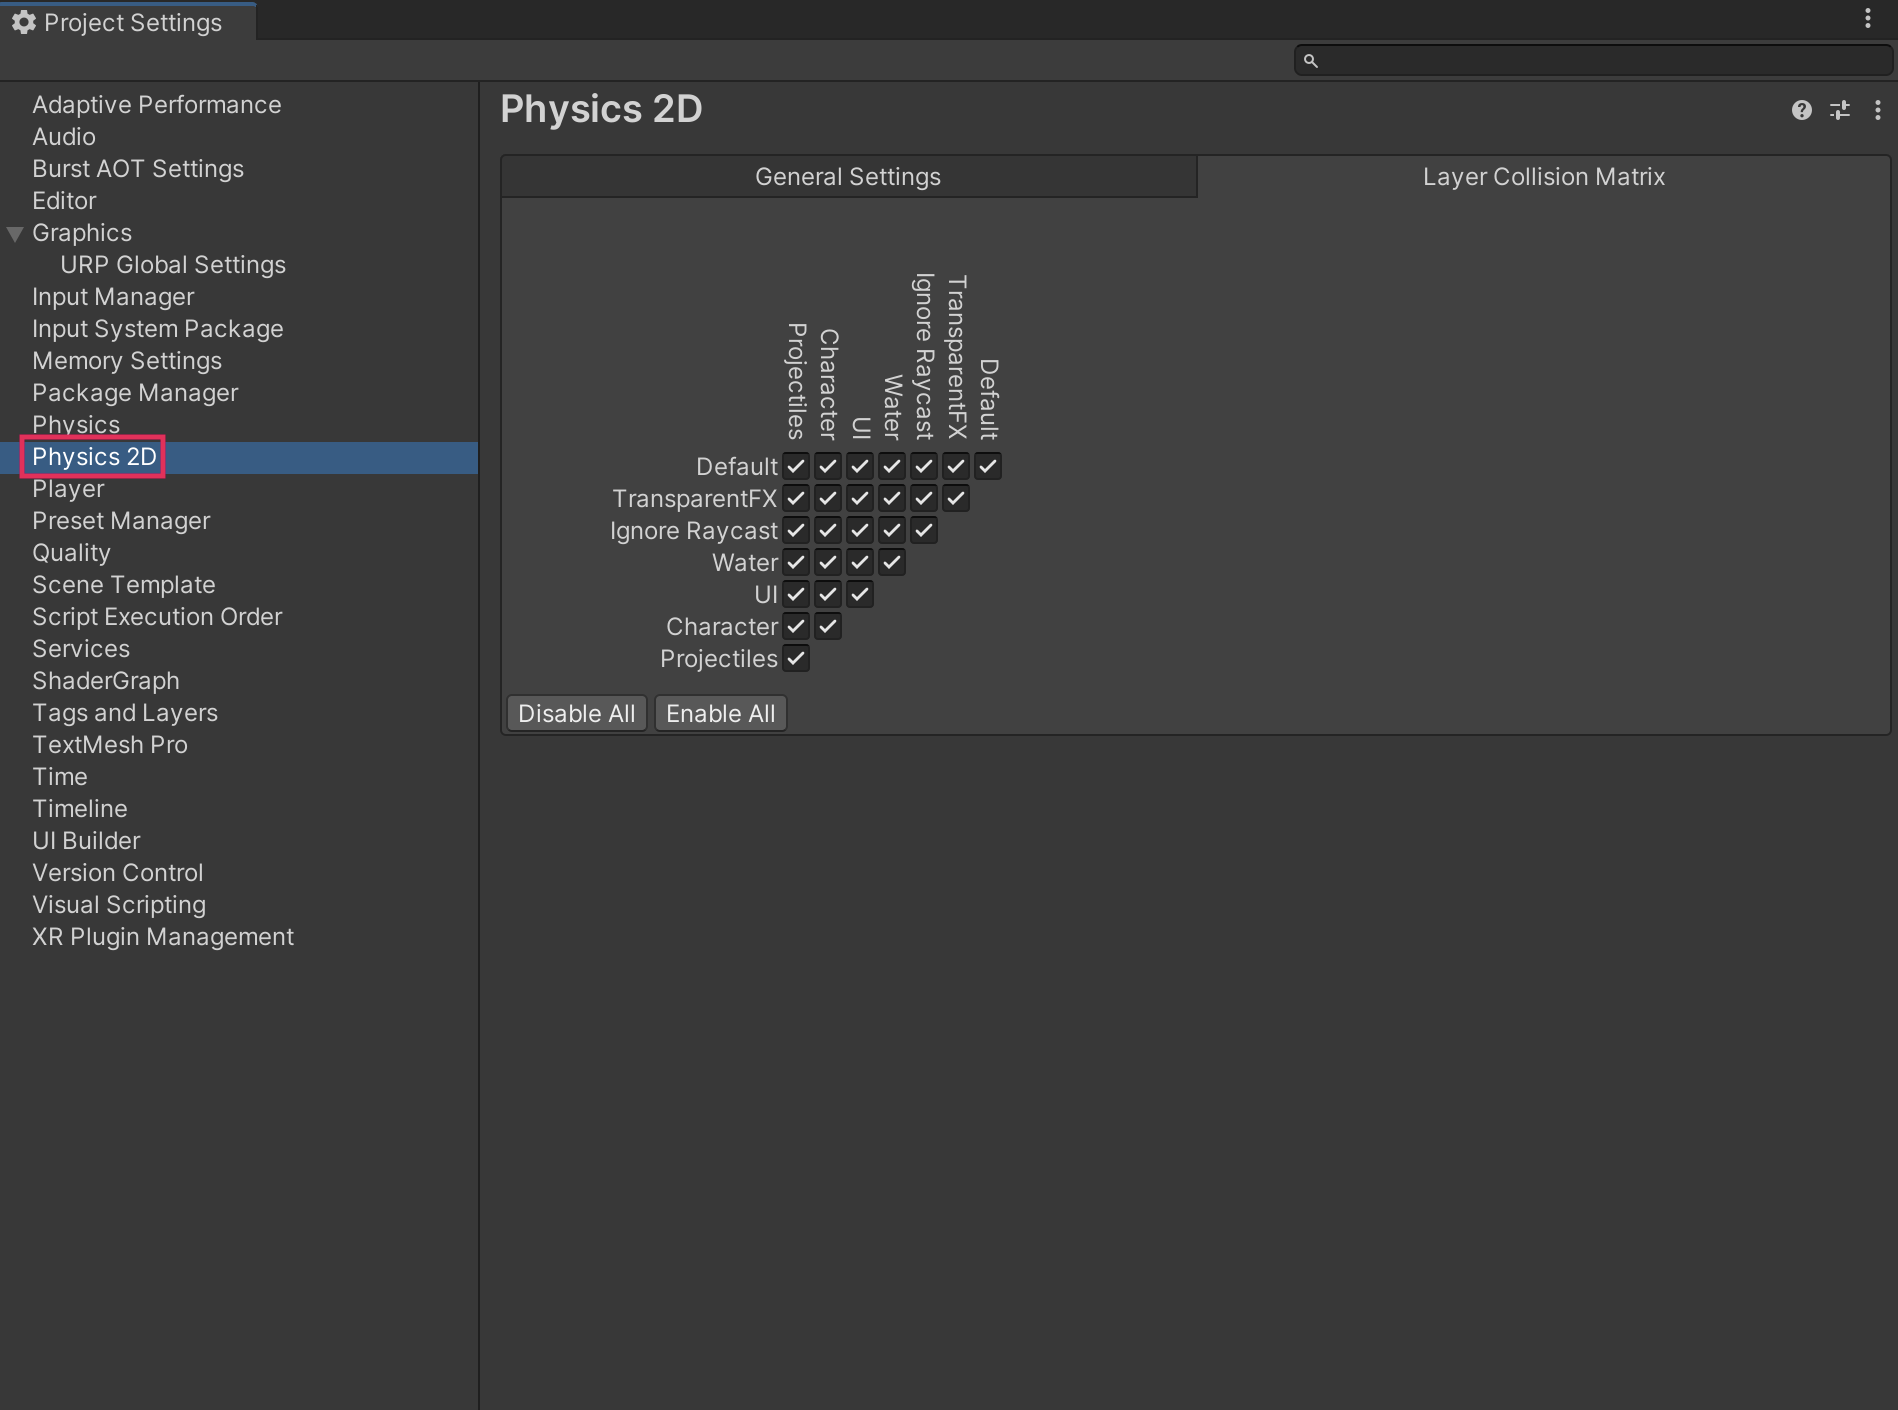
By default, GameObjects in each layer can collide with every other layer.
2. Disable collisions between the Projectiles and Character layers.
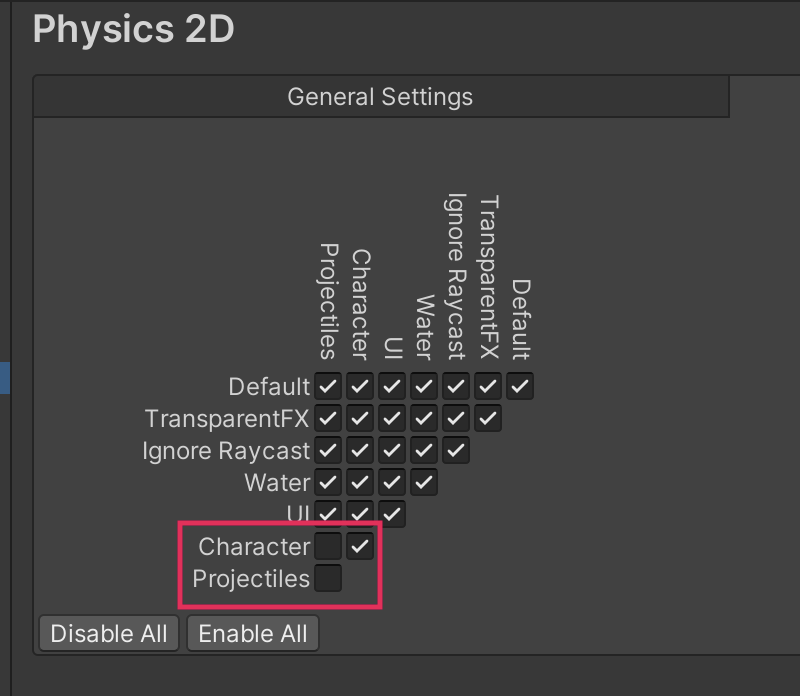
3. Save your changes, then test the game in Play mode.
Now projectiles won’t collide with the player character, but they will collide with all other GameObjects in the scene that have colliders when you launch them.
8. Check your scripts
If you’re completing the 2D Beginner course, take a moment to check that your scripts are correct before continuing.
PlayerController.cs
Important: If you completed any extension work in your script beyond exposing the variable that controls movement speed, this will not be reflected in the reference script below.
using System.Collections;
using System.Collections.Generic;
using UnityEngine;
using UnityEngine.InputSystem;

public class PlayerController : MonoBehaviour
{
  // Variables related to player character movement
  public InputAction MoveAction;
  Rigidbody2D rigidbody2d;
  Vector2 move;
  public float speed = 3.0f;


  // Variables related to the health system
  public int maxHealth = 5;
  int currentHealth;
  public int health { get { return currentHealth; }}


  // Variables related to temporary invincibility
  public float timeInvincible = 2.0f;
  bool isInvincible;
  float damageCooldown;


   // Variables related to animation
  Animator animator;
  Vector2 moveDirection = new Vector2(1,0);


  // Variables related to projectiles
  public GameObject projectilePrefab;


  // Start is called before the first frame update
  void Start()
  {
     MoveAction.Enable();
     rigidbody2d = GetComponent<Rigidbody2D>();
     animator = GetComponent<Animator>();

     currentHealth = maxHealth;
  }

  // Update is called once per frame
  void Update()
  {
     move = MoveAction.ReadValue<Vector2>();


      if(!Mathf.Approximately(move.x, 0.0f) || !Mathf.Approximately(move.y,0.0f))
        {
           moveDirection.Set(move.x, move.y);
           moveDirection.Normalize();
        }


     animator.SetFloat("Look X", moveDirection.x);
     animator.SetFloat("Look Y", moveDirection.y);
     animator.SetFloat("Speed", move.magnitude);


     if (isInvincible)
       {
           damageCooldown -= Time.deltaTime;
           if (damageCooldown < 0)
               isInvincible = false;
       }


     if(Input.GetKeyDown(KeyCode.C))
        {
           Launch();
        }

   }


// FixedUpdate has the same call rate as the physics system
  void FixedUpdate()
  {
     Vector2 position = (Vector2)rigidbody2d.position + move * speed * Time.deltaTime;
     rigidbody2d.MovePosition(position);
  }


  public void ChangeHealth (int amount)
  {
     if (amount < 0)
       {
           if (isInvincible)
               return;

           isInvincible = true;
           damageCooldown = timeInvincible;
           animator.SetTrigger("Hit");
       }


     currentHealth = Mathf.Clamp(currentHealth + amount, 0, maxHealth);
     UIHandler.instance.SetHealthValue(currentHealth / (float)maxHealth);
  }

  void Launch()
  {
     GameObject projectileObject = Instantiate(projectilePrefab, rigidbody2d.position + Vector2.up * 0.5f, Quaternion.identity);
     Projectile projectile = projectileObject.GetComponent<Projectile>();
     projectile.Launch(moveDirection, 300);


     animator.SetTrigger("Launch");
  }

}
Projectile.cs
using System.Collections;
using System.Collections.Generic;
using UnityEngine;


public class Projectile : MonoBehaviour
{
   Rigidbody2D rigidbody2d;


   // Awake is called when the Projectile GameObject is instantiated
   void Awake()
   {
       rigidbody2d = GetComponent<Rigidbody2D>();
   }

   void Update()
   {

   }


   public void Launch(Vector2 direction, float force)
  {
       rigidbody2d.AddForce(direction * force);
  }

   void OnTriggerEnter2D(Collider2D other)
  {
       Debug.Log("Projectile collision with " + other.gameObject);
        Destroy(gameObject);
  }


}
9. Next steps
Now that you’ve created projectiles for the player character, you can add functionality so that they actually do something to the enemy. In the next tutorial, you’ll configure the projectiles to either stop enemies’ aggressive behavior.