Add game audio
Tutorial
·
Beginner
·
+10XP
·
30 mins
·
(405)
Unity Technologies
In this tutorial, you’ll use a variety of different kinds of audio to bring your game to life.
By the end of the tutorial, you’ll be able to do the following:
- Add looping background audio for the game.
- Set up one-off sound effects.
- Implement spatialized sound.
1. Overview
Your game is still missing a critical ingredient: audio. For creators working on a game, audio is a critical design element — it can help players connect with your game and create a more immersive and engaging experience. We’ve created a range of audio for you to implement in your 2D adventure game, but don’t be afraid to find your own assets and customize the experience even further!
By the end of this tutorial, you’ll be able to do the following:
- Add looping background audio for the game.
- Set up one-off sound effects.
- Implement spatialized sound.
Working on your own project?
This tutorial is part of Beginner 2D: Adventure Game and refers to the game project for that course, but this information may be helpful for any beginner creator who wants to implement audio in a 2D game. For a more comprehensive overview of the basics of audio in Unity, refer to Creative Core: Audio.
Note: For the purposes of this tutorial, we chose to use the Ruby’s Adventure asset set, and the file paths used in instructions will reflect this. If you chose another asset set, the file names will be the same, but in your corresponding theme folder.
2. Add background audio for the game
First, you’ll add background music to play on a loop while the game is running. We’ve provided one loop for you to use whichever asset pack you’re working with — you can replace this with audio assets that you’ve sourced yourself if you like!
This tutorial will guide you through setting up audio in your 2D project. However, if you haven’t done any audio work before, you might find it helpful to review this short explanation of audio in Unity from the Creative Core pathway before you continue with the tutorial.
The Main Camera GameObject in your project already has an Audio Listener component, which will pick up the sounds in the scene; to play background audio in your game, you only need to configure an Audio Source component.
Important: If you find your own audio assets in the Unity Asset Store or elsewhere, make sure that you follow the terms of the license.
To set up the background audio for your game, follow these instructions:
1. Create a new empty GameObject and name it “BackgroundMusic”.
2. In the Inspector window, add an Audio Source component to the BackgroundMusic GameObject.
3. In the Project window, go to the folder for your chosen asset pack and navigate to Art > Audio. Find the 2D MUSIC LOOP asset.
4. Drag the asset from the Project window and assign it to the AudioClip property in the Audio Source component.
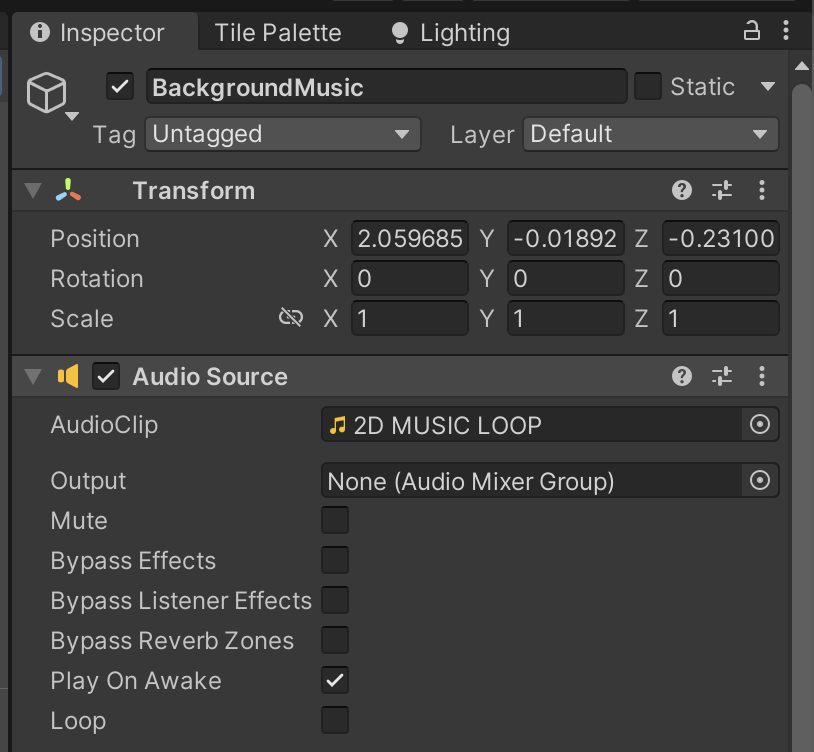
5. Enable the Loop property.
6. Check that the Spatial Blend property is set to 2D.
The Spatial Blend property defines whether the audio clip is spatialized or not — whether it plays from different speakers based on the listener’s location, to give a realistic sense of sound in space. When the blend is set to 2D, the sound is not spatialized and it will play at the same level no matter where the Audio Listener component is in relation to the Audio Source component. This approach is just right for background music that will play throughout the game.
7. Save your changes and test the game. The audio will start to play as soon as the game launches.
Important: If you don’t hear any audio when you test and your hardware is switched on, check the Game view tools to confirm that audio is enabled.
3. Call PlayOneShot for gameplay sounds
There are additional things that happen in your game that you could add sound effects for — for example, the player’s movement or picking up a health collectable. The best way to do this for a relatively simple game like your 2D adventure is to use an Audio Source function called PlayOneShot.
You can assign an audio clip as the parameter of PlayOneShot, and the function will play it once with all the settings of the Audio Source component. This functionality means that you can add an Audio Source component to the PlayerCharacter GameObject, and use that
Audio Source component to play all the one-off sounds related to gameplay.
To set up function to play one-shot audio, follow these instructions:
1. Add an Audio Source component to the PlayerCharacter GameObject. Make sure to apply this as a Prefab override if you do it without entering prefab editing mode.
2. Open the PlayerController script in your IDE.
3. At the top of the class, declare a new private variable to contain a reference to the Audio Source component:
AudioSource audioSource;4. In the Start function, store the Audio Source component reference in the variable:
audioSource = GetComponent<AudioSource>();5. Add a new public function called PlaySound, with an AudioClip parameter:
 public void PlaySound(AudioClip clip)
  {

  }
6. In the function code block, add an instruction that called PlayOneShot on the Audio Source component:
public void PlaySound(AudioClip clip)
  {
     audioSource.PlayOneShot(clip);
  }
7. Save your changes.
4. Add an audio clip to the health collectible
You’ve created a function to call PlayOneShot, but at the moment there are no sound effects implemented for it to play.
To add a sound effect when the player picks up a collectible, follow these instructions:
1. Open the HealthCollectible script in your IDE.
2. At the top of the class, add a public AudioClip type class member:
public AudioClip collectedClip;3. In the OnTriggerEnter2D function, find the if statement increases the player’s health if it is not already at the maximum value. Within that code block, call the PlaySound function on the PlayerController to play the sound:
controller.PlaySound(collectedClip);You’re using the Audio Source component on the PlayerCharacter GameObject rather than the Collectible GameObject because the Collectible GameObject is destroyed when the player meets the conditions for collecting it. The Audio Source component would also be destroyed, which would stop the sound from being played.
4. Save your changes.
5. In the Unity Editor, open the collectible in prefab editing mode.
6. In the Project window, navigate to the Audio folder.
7. Assign the Collectible audio asset to the Collected Clip property in the Health Collectible (Script) component.
8. Save your changes and test your game. Now each time the player character picks up a collectible, a sound effect will play.
Note: If you find the sounds too loud, you can reduce the volume in the Audio Source component on the Player Character and/or BackgroundMusic GameObject. This adjustment can be useful if your background music loop is much louder than the sound effects.
5. Implement spatialized sound for movement
So far you’ve used 2D sound, because the background audio and collectible pickup sound are non-diegetic — sounds for the player but not part of the game world. However, next you’re going to implement audio for the enemy’s movement. This sound is very much part of the game world because the player character would be able to hear it as they move around the environment. You’re going to spatialize the sound to create a more immersive game experience for players.
To implement audio for enemy movement, follow these instructions:
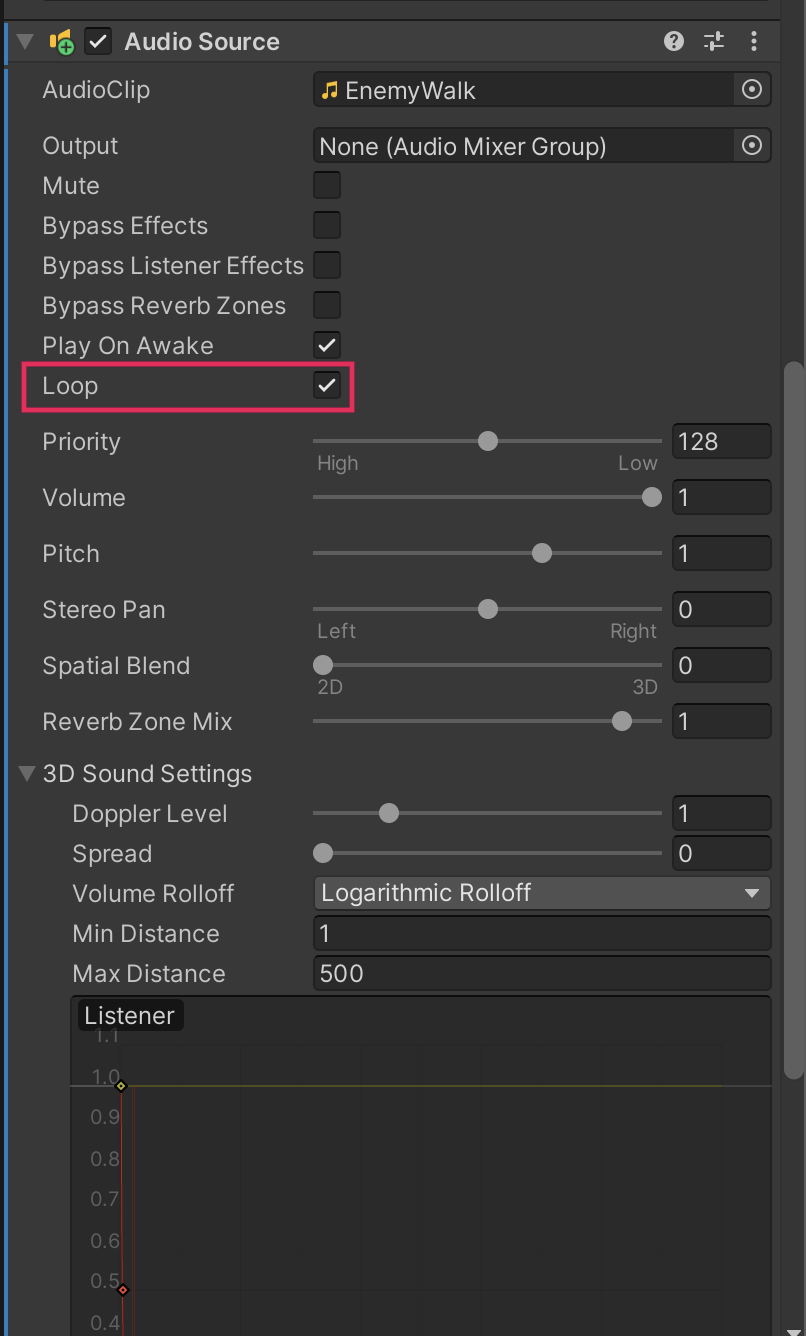
1. Open the Enemy in prefab editing mode and add an Audio Source component.
2. Assign the EnemyWalk asset to its Audio Clip field.
3. Enable Loop.
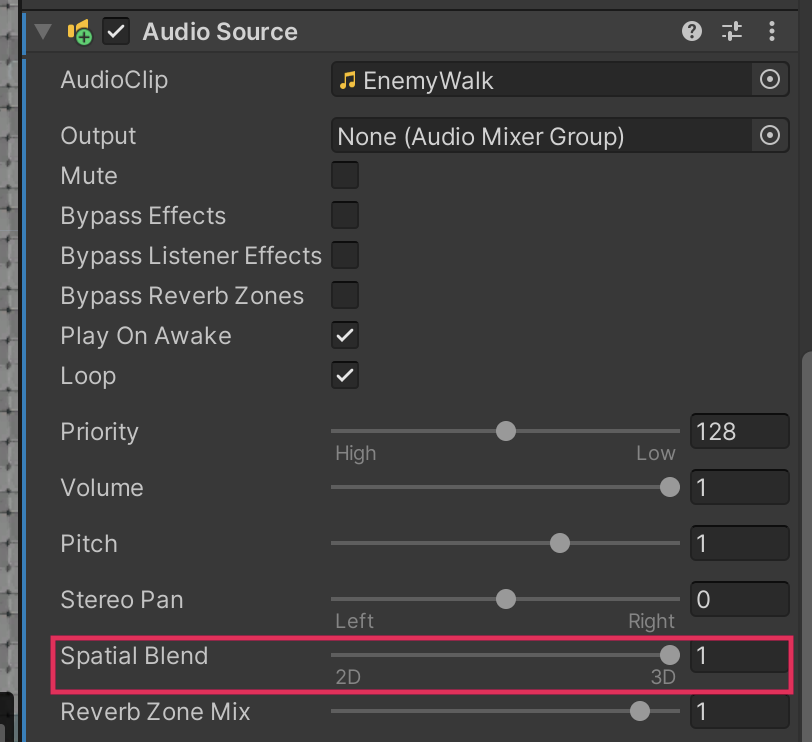
4. Set Spatial Blend to 3D (the very end of the slider range).
5. In the Scene view, a blue circle now surrounds the speaker icon.
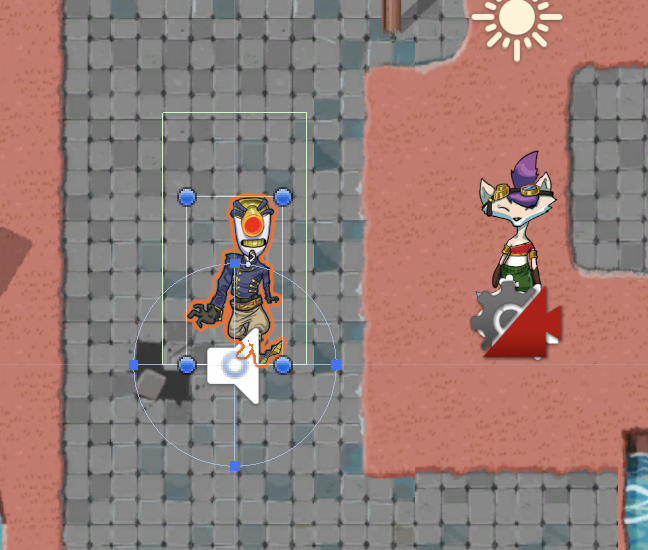
This circle represents the minimum distance of the spatial blend. If the Audio Listener component is inside that circle, it will hear sound at maximum volume. Once the Audio Listener component is outside of the circle, the volume will slowly attenuate (reduce) until the Audio Listener component reaches the maximum distance, where it will be silent.
6. In the Scene view, zoom out until the circle that represents the maximum distance is displayed. You will need to zoom out a lot!

This distance is larger than your entire game world, so you’ll need to adjust it to a more reasonable size. You can drag the dot in the center of the circle, but it’s easier to make the adjustment in the Inspector window.
7. In the Inspector window, Use the foldout (triangle) to expand the 3D Sound Settings property.
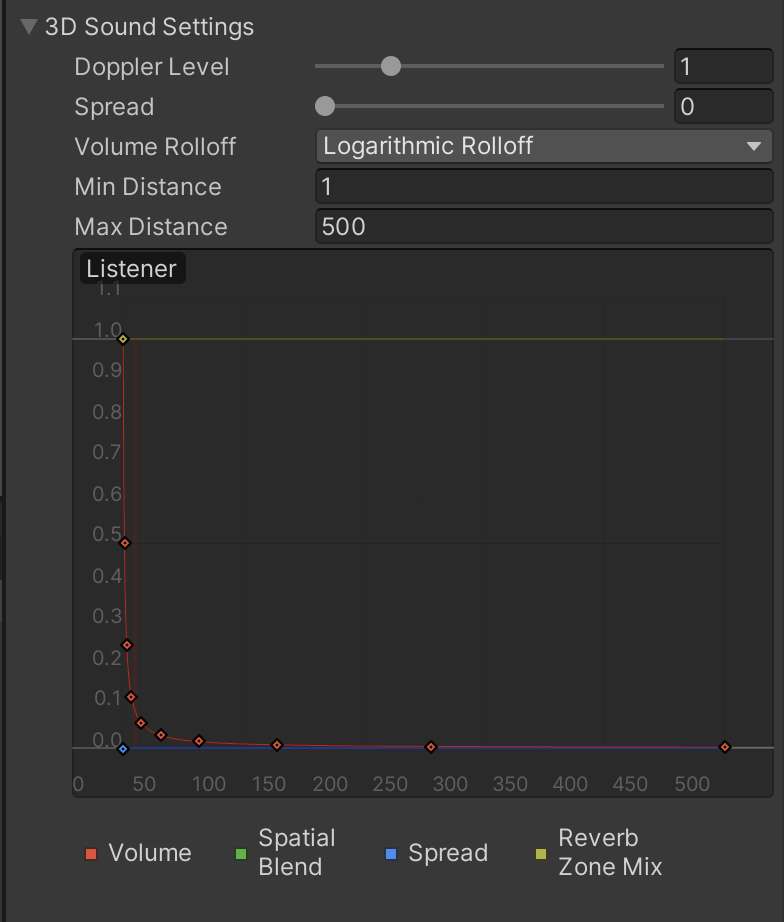
You can use the Volume Rolloff property to choose between three different methods of audio attenuation:
- Logarithmic Rolloff: The default, which mimics the way that sound behaves in the real world. A visualization of this audio reduction curve is currently displayed in the Listener preview pane.
- Linear: The sound is reduced in a straight line rather than a curved rolloff.
- Custom: Used for different custom rolloff curves to achieve specific effects.
You’re working at a very small distance, so either Logarithmic Rolloff or Linear Rolloff will work similarly for your game project.
8. Set the Max Distance property to 10.
Now audio will play at maximum volume if the Audio Listener component (on the PlayerCharacter GameObject) is closer than 1 unit, at half volume at a distance of 5 units, and will mute at 10 units and beyond.
9. Save your changes and exit prefab editing mode. If you test the game now, the attenuations won’t work because this setting is made for 3D. The circles that represent the distances are actually spheres, which are displayed if you turn the Scene view back to 3D mode.
The camera sits slightly above your whole game. This positioning means that even if an Enemy GameObject is in the center of the screen and the camera is directly above, the Audio Listener component on the camera is still at the max distance from the Audio Source and the attenuation is maximum!
6. Challenge: Stop enemy audio when its state changes
The enemy audio is designed for its aggressive state; when the enemy is fixed, this audio is no longer needed.
To stop the audio you’ll need to do the following things in the EnemyController script:
- Create a new variable of type AudioSource to store a reference to the component.
- In the Start function, use GetComponent to retrieve the reference and store it in your variable.
- In the Fix function, call audioSource.Stop().
7. Fix the audio attenuation
You need to place the Audio Listener component at the same depth as the rest of the GameObjects (z = 0) to address the attenuation issue, but there’s a problem with that: if you set the camera to that depth, you’ll break the rendering for your game. Instead, you’re going to create a child GameObject for the Main Camera GameObject — this child GameObject will move with the Main Camera GameObject and be in the center of the screen, but the attenuation can be computed correctly using 2D distance.
To fix the attenuation for your game, follow these instructions:
1. In the Hierarchy, right-click the Main Camera GameObject and select Create Empty. Namel the new child GameObject “Listener”.
2. Select the Listener GameObject.
3. In the Inspector window, add an Audio Listener component.
4. In the Transform component, set the Position coordinates to the following values:
- x = 0
- y = 0
- z = 10
Remember the position set here is relative to the parent GameObject; these position values place the Listener GameObject 10 units in front of the Main Camera GameObject. As the camera is 10 units back from the plane for your game, this places the Listener GameObject at z = 0, just as you need.
5. In the Hierarchy window, select the Main Camera GameObject.
6. In the Inspector window, right-click the Audio Listener component and select Remove Component.
7. Save your changes. Now, when you test your game, the walking sounds for the enemy will be spatialized through your speakers and attenuated depending on the player character’s location.
8. More things to try
If you want to further develop your skills, explore new concepts, or improve your project, check out some of the optional activities below. Each one is tagged as either Easy, Medium, or Difficult, so you can choose the level of challenge.
These activities are entirely optional, so if you’re not interested, no problem — just skip this step. We do recommend attempting at least one of them in order to get the most out of this learning experience. Good luck!
Easy: Additional one-shot sound effects
We’ve provided a range of sound effects that you can implement for the following things:
- When the player walks (PlayerWalk.wav).
- When the player throws a projectile (Projectile.wav).
- When the player hits an enemy with a cog (EnemyHit1.wav or EnemyHit2.wav).
- When the player character takes damage (PlayerHit.wav).
- When the player fixes an enemy with a cog (EnemyFix.wav or QuestComplete.wav).
Adding all of these sounds to your game would make it very aurally busy, so take some time to consider which ones are the best for the specific experience you are crafting. You can also find your own sound assets to achieve this!
For each one-shot sound effect that you implement, remember to do the following:
- Add an Audio Clip member to the script for the GameObject that is the in-game source of the sound. For example, effects for when the player character is hit or throws a projectile should be added to the PlayerController script.
- Call PlayOneShot on the Audio Source component at the relevant code for the action with which you are associating the sound effect.
Note: We’ve also added a sound asset for the player character’s movement (Footsteps.wav), if you’d like to swap that in.
9. Check your script
If you’re completing the 2D Beginner course, take a moment to check that your scripts are correct before continuing.
PlayerController.cs
Important: If you completed any extension work in your script beyond exposing the variable that controls movement speed, this will not be reflected in the reference script below.
using System.Collections;
using System.Collections.Generic;
using UnityEngine;
using UnityEngine.InputSystem;


public class PlayerController : MonoBehaviour
{
    // Variables related to player character movement
    public InputAction MoveAction;
    Rigidbody2D rigidbody2d;
    Vector2 move;
    public float speed = 3.0f;

    // Variables related to the health system
    public int maxHealth = 5;
    public int health { get { return currentHealth; } }
    int currentHealth;

    // Variables related to temporary invincibility
    public float timeInvincible = 2.0f;
    bool isInvincible;
    float damageCooldown;

    // Variables related to Animation
    Animator animator;
    Vector2 moveDirection = new Vector2(1, 0);

    // Variables related to Projectile
    public GameObject projectilePrefab;

    // Variables related to audio
    AudioSource audioSource;


    // Start is called before the first frame update
    void Start()
    {
        MoveAction.Enable();
        rigidbody2d = GetComponent<Rigidbody2D>();
        currentHealth = maxHealth;
        animator = GetComponent<Animator>();
        audioSource = GetComponent<AudioSource>();
    }


    // Update is called once per frame
    void Update()
    {
        move = MoveAction.ReadValue<Vector2>();
        //Debug.Log(move);


        if (!Mathf.Approximately(move.x, 0.0f) || !Mathf.Approximately(move.y, 0.0f))
        {
            moveDirection.Set(move.x, move.y);
            moveDirection.Normalize();
        }

        animator.SetFloat("Look X", moveDirection.x);
        animator.SetFloat("Look Y", moveDirection.y);
        animator.SetFloat("Speed", move.magnitude);


        if (isInvincible)
        {
            damageCooldown -= Time.deltaTime;
            if (damageCooldown < 0)
            {
                isInvincible = false;
            }
        }

        if (Input.GetKeyDown(KeyCode.C))
        {
            Launch();
        }

        if (Input.GetKeyDown(KeyCode.X))
        {
           FindFriend();
        }
    }


    // FixedUpdate has the same call rate as the physics system
    void FixedUpdate()
    {
        Vector2 position = (Vector2)rigidbody2d.position + move * speed * Time.deltaTime;
        rigidbody2d.MovePosition(position);
    }


    public void ChangeHealth(int amount)
    {
        if (amount < 0)
        {
            if (isInvincible)
            {
                return;
            }
            isInvincible = true;
            damageCooldown = timeInvincible;
            animator.SetTrigger("Hit");
        }
        currentHealth = Mathf.Clamp(currentHealth + amount, 0, maxHealth);
        UIHandler.instance.SetHealthValue(currentHealth / (float)maxHealth);
    }


    void Launch()
    {
        GameObject projectileObject = Instantiate(projectilePrefab, rigidbody2d.position + Vector2.up * 0.5f, Quaternion.identity);
        Projectile projectile = projectileObject.GetComponent<Projectile>();
        projectile.Launch(moveDirection, 300);
        animator.SetTrigger("Launch");
    }


    void FindFriend()
    {
        RaycastHit2D hit = Physics2D.Raycast(rigidbody2d.position + Vector2.up * 0.2f, moveDirection, 1.5f, LayerMask.GetMask("NPC"));
        if (hit.collider != null)
        {
            NonPlayerCharacter character = hit.collider.GetComponent<NonPlayerCharacter>();
            if (character != null)
            {
                UIHandler.instance.DisplayDialogue();
            }
        }
    }


    public void PlaySound(AudioClip clip)
    {
        audioSource.PlayOneShot(clip);
    }

}
10. Next steps
Audio makes a significant contribution to the player’s experience of your game. In this tutorial, you’ve enhanced the world that you created. In the next tutorial, you’ll continue to polish your game by improving the game visuals with 2D particle effects.