Make a flying obstacle prefab
Tutorial
Beginner
+10XP
20 mins
1382
Unity Technologies

In this tutorial, you’ll add physics to your obstacle so it falls, bounces, and interacts with the screen borders. Then, you’ll turn it into a prefab — a reusable template that lets you quickly create more obstacles later.
1. Overview
In this tutorial, you’ll add physics to your obstacle so it falls, bounces, and interacts with the screen borders. Then, you’ll turn it into a prefab — a reusable template that lets you quickly create more obstacles later.
2. Add a Rigidbody 2D component
Right now, your obstacle just sits in place. To make it respond to gravity and physics forces, you’ll add a Rigidbody2D component. This tells Unity to treat the GameObject as a physical body so it can fall, bounce, and interact with other GameObjects.
In Unity, it’s important to test changes often in Play mode — where you test your game’s current functionality. But be sure to exit Play mode before making edits! Changes made during Play mode won’t be saved.
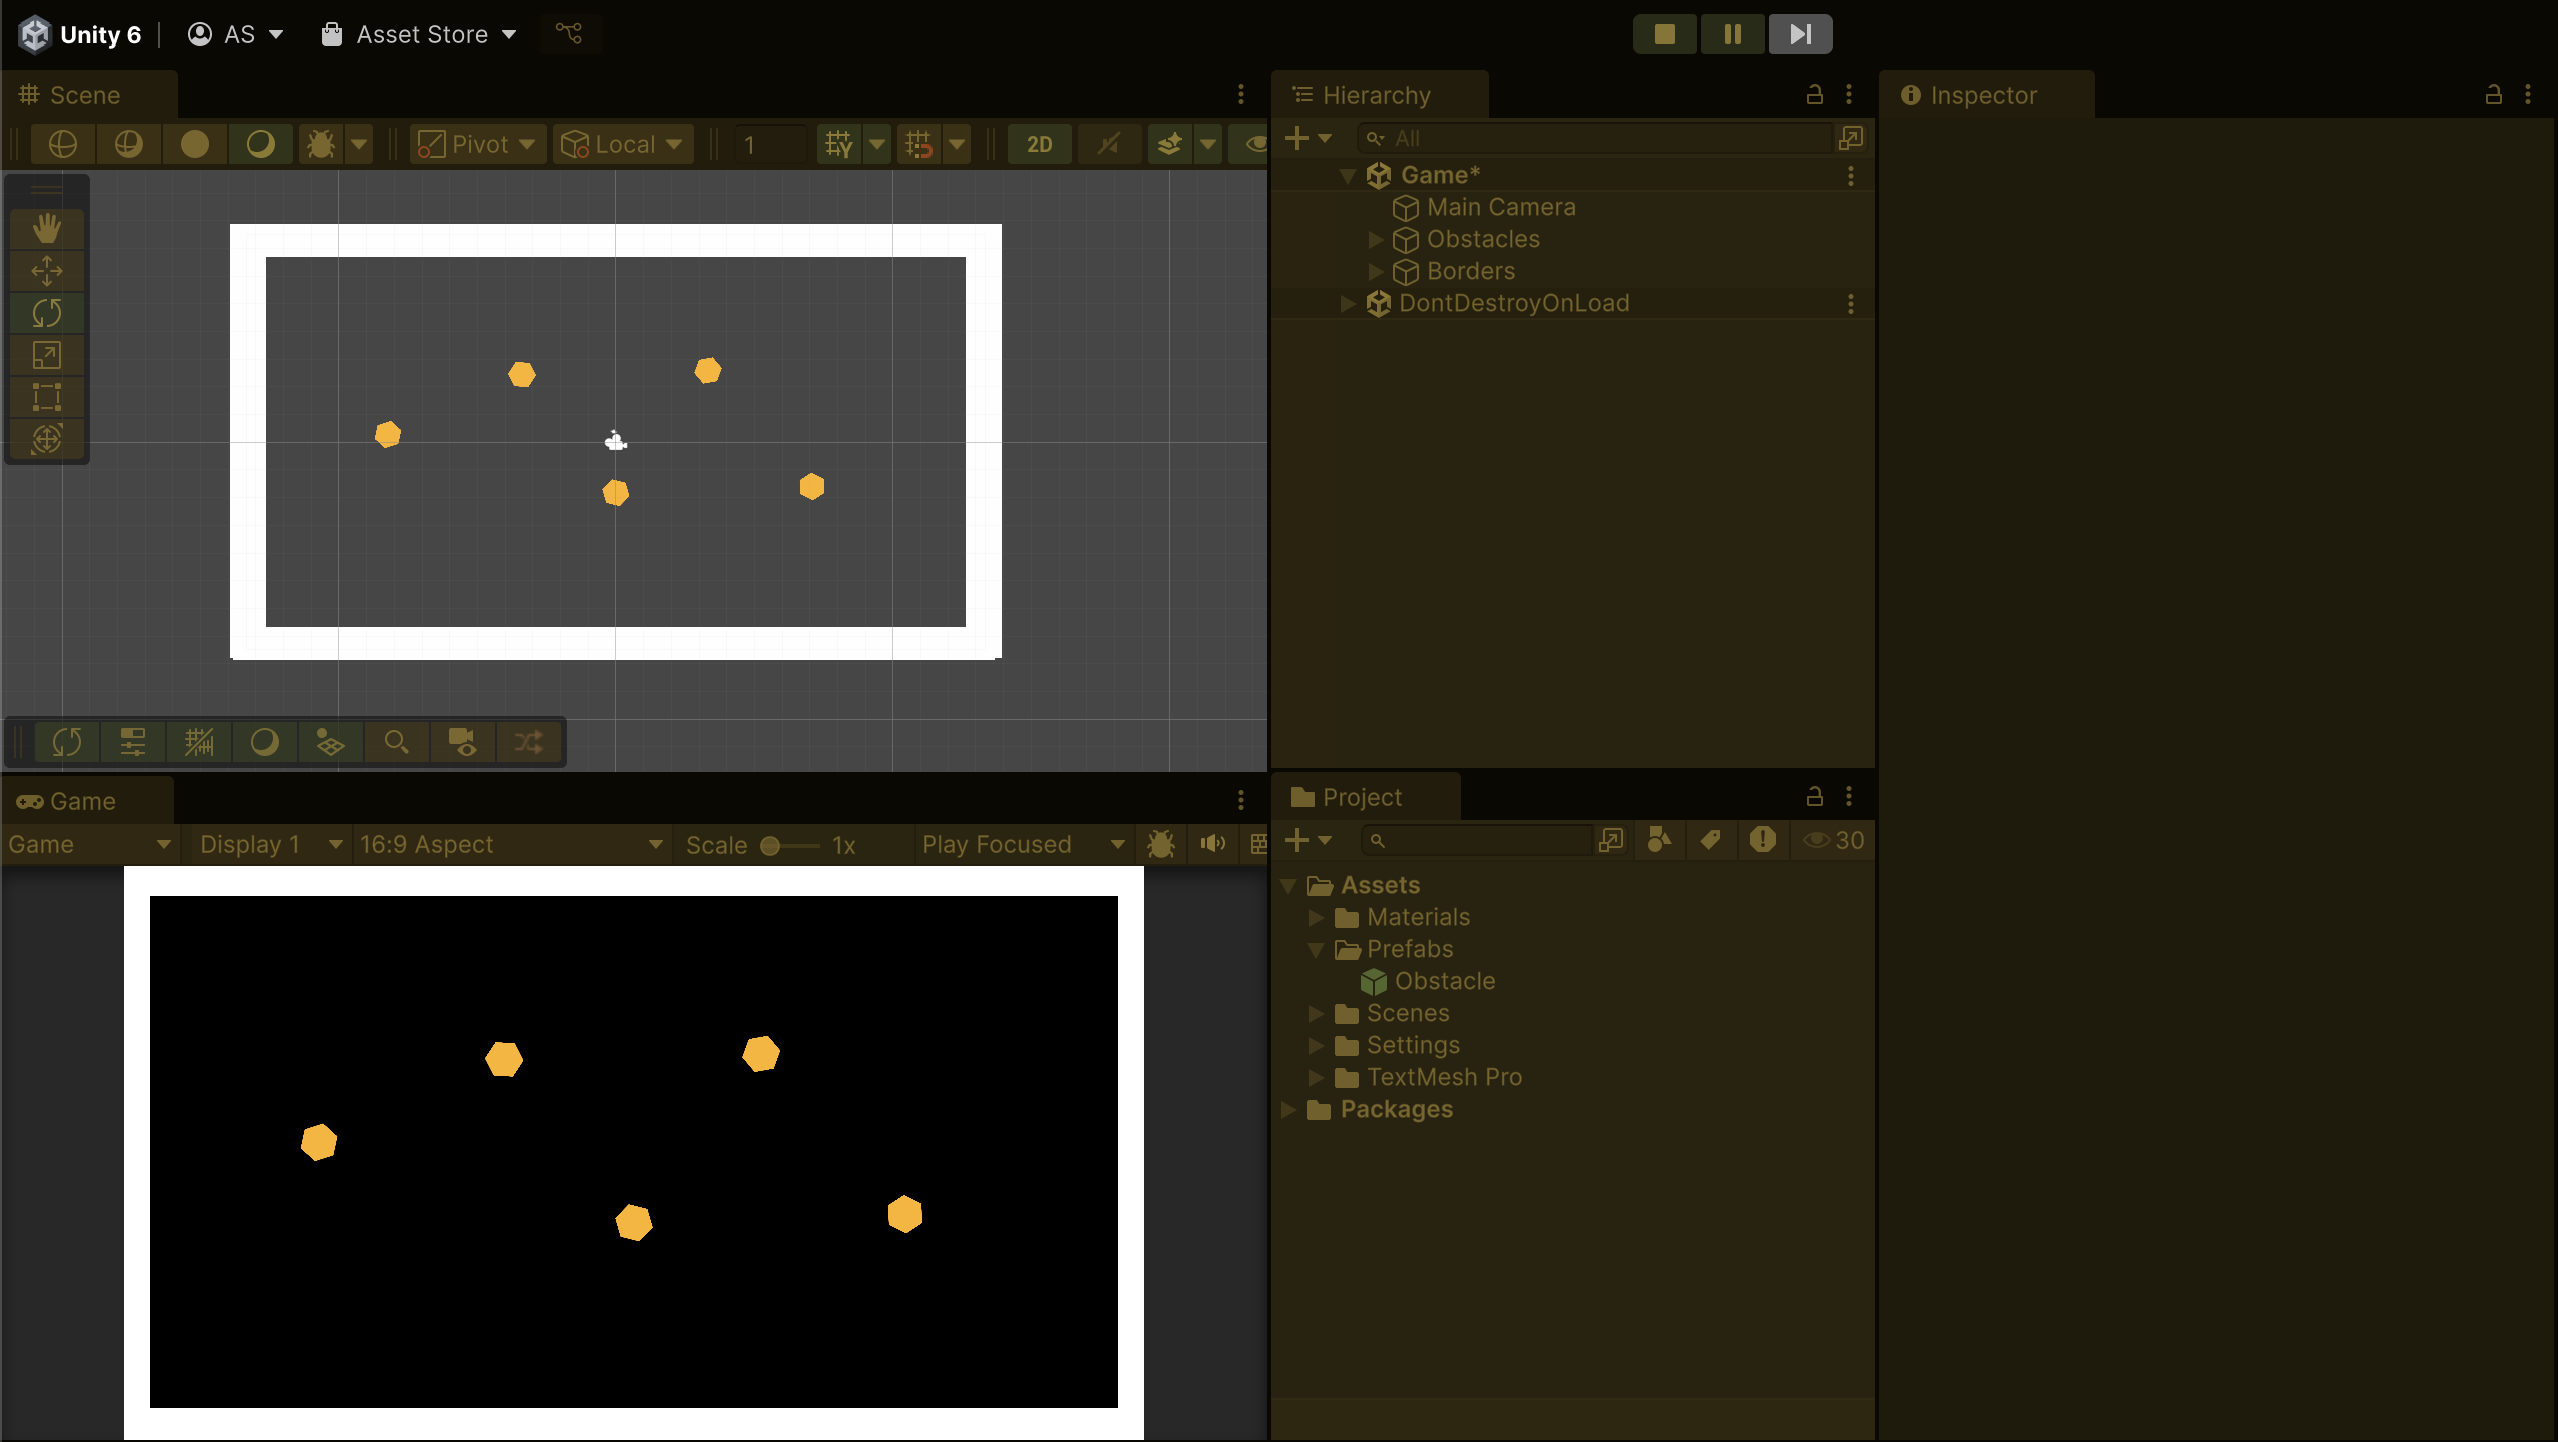
1. Enter Play mode to see what happens without physics:
- Select the Play button at the top of the Unity Editor.
- Notice that the Obstacle GameObject doesn’t move — it just floats in place.
- Press Stop to exit Play mode.
Important: Unity doesn’t save changes made while you're in Play mode, so always exit Play mode before editing.
2. Add a Rigidbody 2D component to the obstacle:
- Select the Obstacle GameObject to view its components in the Inspector window.
- At the bottom of the Inspector window, select Add Component.
- Enter “Rigidbody 2D” into the search box, then select it or press Enter to add the component.
3. Test the game again in Play mode:
- Select the Play button at the top of the Unity Editor.
- Watch the obstacle fall through the scene.
- Select the Stop button to exit Play mode.
Unity applies gravity automatically to GameObject with a Rigidbody 2D component. Right now, the obstacle falls through the floor because it has no collider component. Don’t worry — you’ll add a collider component in the next step.
3. Add collider components
Now that your obstacle has a physical body, it can move — but it still falls through the screen borders because nothing is stopping it. To fix this, you’ll add collider components , which define the shapes that GameObjects use to detect and respond to collisions in Unity.
You’ll use a Polygon Collider 2D for the obstacle, since it’s an unusual shape. You’ll use Box Colliders for the border walls. These colliders let the Rigidbody know where to bounce and stop.
1. Add a collider component to the obstacle:
- Select the Obstacle GameObject in the Hierarchy window.
- In the Inspector window, select Add Component.
- Enter “Polygon Collider 2D” and press Enter or select the component to add it.
Note: Polygon colliders automatically match the shape of the sprite — perfect for the hexagon.
2. Add box collider components to all four screen borders:
- In the Hierarchy window, expand the Borders GameObject to see all four border objects.
- Use Shift+click or Ctrl+click (macOS: Cmd+click) to select Border_Bottom, Border_Top, Border_Left, and Border_Right.
- In the Inspector window, select Add Component and enter “Box Collider 2D”.
- All four walls now have colliders and can block physical objects.
3. Test the scene in Play mode.
- Select the Play button to see what happens.
- The obstacle should fall and hit the bottom wall — then stop, like dropping a bag of sand on the floor.
- Select the Stop button to exit Play mode.
You’ve added collision detection to both your obstacle and your world boundaries. Next, you’ll create a Physics material to make that collision a little more exciting.
4. Add a physics material
Right now, your obstacle drops and stops — but that’s not very fun. In this step, you’ll create a 2D Physics material and apply it to the obstacle to give it some bounce. This material tells Unity how a GameObject should react when it hits something, like whether it should slide, stick, or rebound.
By setting the Bounciness property to its maximum value, you’ll make the obstacle bounce off the walls with energy — turning it from a dead weight into a hazard.
1. Create a new Materials folder:
- In the Project window, right-click the Assets folder and select Create > Folder.
- Name the folder “Materials”.
2. Create a 2D physics material:
- Right-click the new Materials folder and select Create > 2D > Physics Material 2D.
- Name the new material something like “PhysMat_Bouncy”.
3. Set the bounciness value:
- Select the PhysMat_Bouncy material.
- In the Inspector window, set the Bounciness property to 1.0.
4. Apply the material to the obstacle:
- Select the Obstacle GameObject in the Hierarchy window.
- In its Polygon Collider 2D component, locate the Material property.
- Drag the PhysMat_Bouncy material from the Project window into the Polygon Collider 2D’s Material box or select the Material picker (⊙) and select the PhysMat_Bouncy material.
5. Test and experiment:
- Select the Play button to see the bounce in action.
- Try using the Rotate tool (press E in the Scene view) to rotate the obstacle before selecting entering Play mode — see how it spins and rebounds differently.
You’ve now given your obstacle personality — it no longer just drops, but bounces around the scene. This chaotic motion will become a key challenge in your game.
5. Test zero gravity
So far, gravity has been pulling your obstacle downward. But what happens if there’s no gravity at all? In this step, you’ll experiment with changing the Gravity Scale property during Play mode to see how it affects movement.
The Gravity Scale setting in the Rigidbody 2D component controls how strongly gravity affects a GameObject. A value of 1 is normal Earth-like gravity; a value of 0 disables gravity entirely.
This hands-on test helps you understand how gravity works — and sets up behavior you'll use in the final game, where obstacles float freely.
1. Play the scene and pause while the obstacle falls:
- Select the Play button to start the game.
- Wait for the obstacle to begin falling, then select the Pause button (next to the Play/Stop button) to freeze the action mid-fall.
2. Set gravity to zero:
- With the Obstacle GameObject selected, go to the Rigidbody 2D component in the Inspector window.
- Set the Gravity Scale property to 0, then select the Pause button again to resume the simulation.
3. Observe the new behavior:
- The obstacle now floats and rebounds around the screen with no downward pull.
- Select the Stop button to exit Play mode — notice that the Gravity Scale resets to 1.
Note: Unity resets any changes made during Play mode once you stop. This lets you safely experiment without changing your real project settings.
You’ve now seen how gravity affects physics in Unity — and how disabling it creates the fun, chaotic motion. You’ll use this zero-gravity behavior in the final game.
6. Turn the obstacle into a prefab
Now that your obstacle behaves the way you want, it’s time to turn it into a prefab. A prefab is a reusable template asset that stores all the components, settings, and hierarchy of a GameObject. Once you've made a prefab, you can drag out as many copies as you like — and update them all at once just by changing the original.
This step introduces a major Unity workflow: designing in the scene, saving as a prefab, and then reusing that prefab throughout the game.
1. Create a new Prefabs folder:
- In the Project window, right-click the Assets folder and select Create > Folder.
- Name the folder “Prefabs”.
2. Convert the obstacle into a prefab:
- Drag the Obstacle GameObject from the Hierarchy window into the new Prefabs folder.
- Notice how the Obstacle GameObject’s icon in the Hierarchy window turns blue — this means it's now an instance of a prefab.
3. Test with a few more prefabs:
- From the Project window, drag the Obstacle prefab into the Scene view a few times.
- Spread the Obstacle prefabs out and rotate some of them for variety using the Rotate tool (press E).
- Select the Play button and watch them bounce around independently.
You've now created a reusable prefab. Now, whenever you want to make changes to every obstacle in your scene, you can just edit the single source prefab asset in the Project window.
7. Organize the Hierarchy window
As your scene gets more complex, it’s important to stay organized. In this step, you’ll group all of your obstacle GameObjects under a single empty parent GameObject called Obstacles. This makes it easier to manage, move, or disable all obstacles at once — and helps keep your Hierarchy window clean.
1. Select all Obstacle GameObjects:
- In the Hierarchy window, use Shift+click or Ctrl+click (macOS: Cmd+click) to select every obstacle, including the original one.
Note: Make sure you're selecting the GameObjects in the Hierarchy window — not the prefab asset in the Project window.
2. Create an empty parent GameObject:
- With all obstacles selected, right-click one of them in the Hierarchy and select Create Empty Parent.
- Rename the new parent GameObject “Obstacles”.
Tip: For the borders, you first created an empty parent GameObject, then dragged the individual GameObjects onto that parent. What you did in this step is a different technique to achieve the same result.
All of your Obstacle GameObjects are now grouped under a single parent gameObject, making the Hierarchy window easier to manage.
8. Optional: More things to try
Try these optional activities to challenge yourself, build your skills, and improve your project.
Each challenge is tagged as Easy, Medium, or Expert difficulty so that you know what to expect. You can complete one, all, or none of them — it’s totally up to you. If you’re not interested in doing these challenges, mark this step as complete and proceed to the next tutorial.
Medium: Edit Play Mode Tint
By default, the Editor window around the Game view becomes slightly darker when you enter Play mode. However, this change is subtle and can be hard to notice. If you're unaware that you're in Play mode, you might accidentally make changes that won't be saved.
To prevent this and avoid losing work, you can adjust the Play mode tint to make it more obvious when Play mode is active.

- From the main menu, select Edit > Preferences (macOS: Unity > Settings…).
- In the leftmost menu, select Colors, then, under the General section, change the Playmode tint property color to have a subtle color instead of gray.
- Enter Play mode to test the new tint.
The color should be very noticeable, but still allow you to read the text in the Editor.
Medium: Speed up Play mode with Editor settings
Reduce waiting time when testing your game by changing how Unity reloads upon entering Play mode.

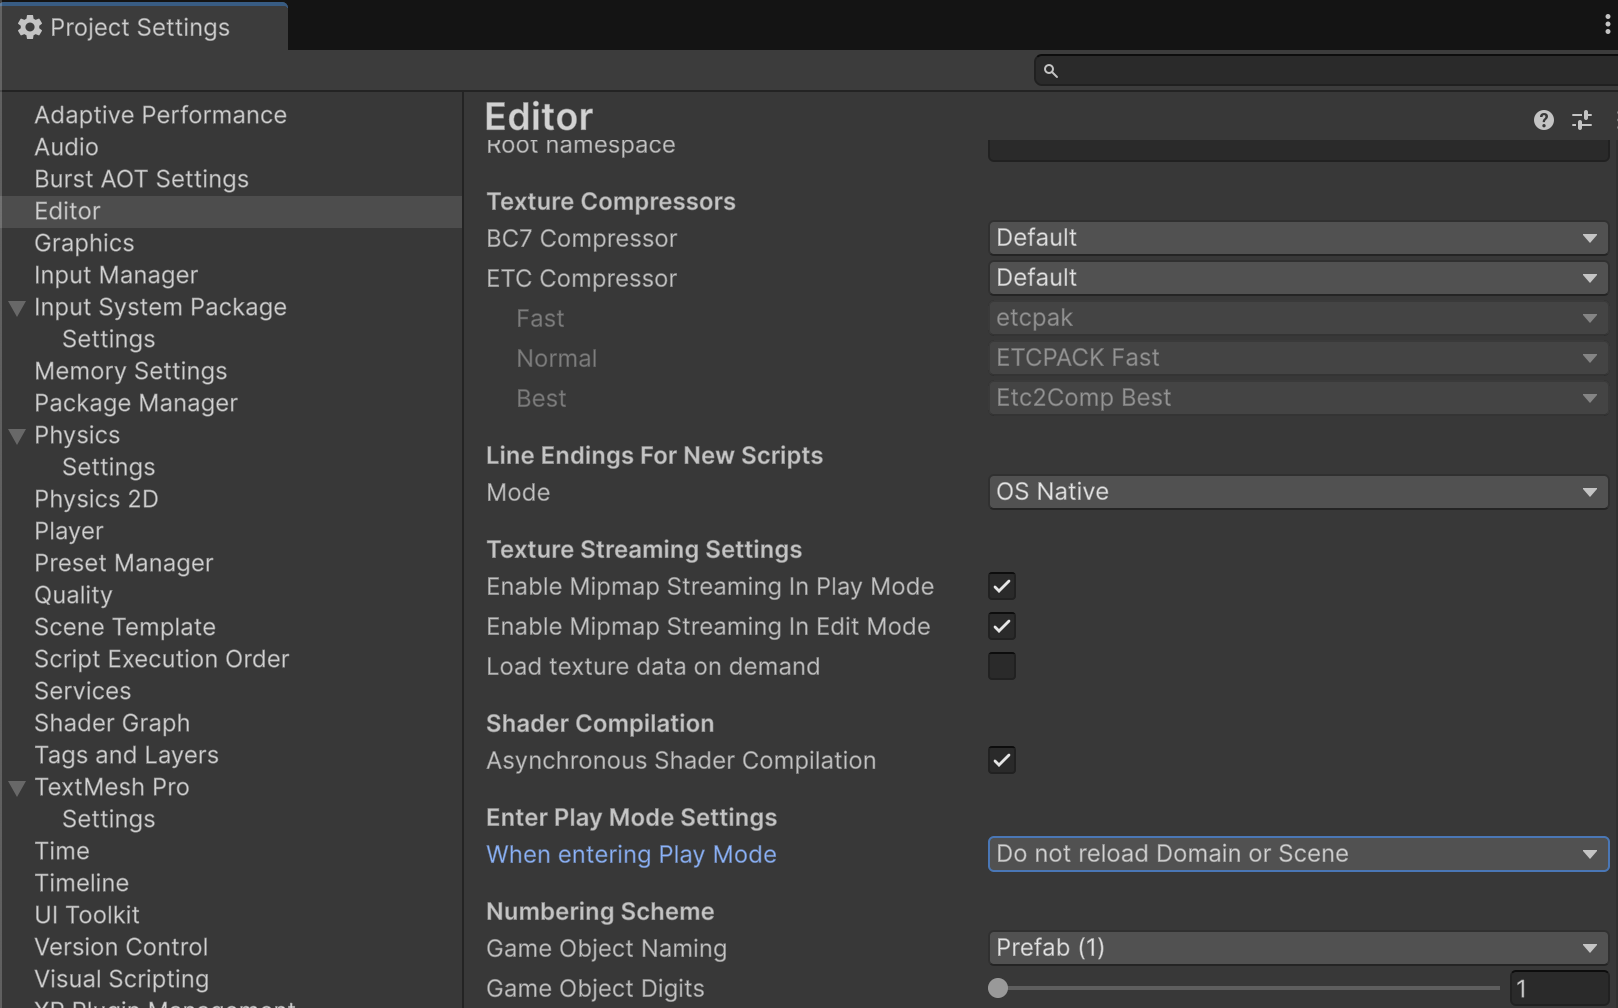
- From the top menu, go to Edit > Project Settings > Editor.
- Under Enter Play Mode Settings, set the When entering Play mode property to Do not reload domain or Scene.
Normally, Unity resets and reloads the entire project every time you select the Play button— which takes a few seconds. By disabling domain and scene reloads, Unity skips that reset, so your game enters Play mode almost instantly. It’s a huge time-saver during early development.
9. Next steps
You’ve brought your obstacle to life by adding physics, colliders, and bounce, and then you turned it into a reusable prefab. In the next tutorial, you’ll start scripting — giving each obstacle a random size, direction, speed, and spin to create a more fun and unpredictable game environment.