
Creating Interaction in a Scene
Tutorial
intermediate
+10XP
15m
Unity Technologies
In this tutorial, we’ll explore a method for adding functionality at runtime by creating a UI that controls the lights in the Scene.
1. Introduction
The Reflect Viewer loads a model at runtime that is not available in the Game Scene when the game is not running. This makes it difficult to add additional scripts and interactions to the model. In this tutorial, we’ll explore a method for adding functionality at runtime by creating a UI that controls the lights in the Scene.
For this tutorial, you will need:
- The Reflect Package installed via the Package Manager
- A Pro license for the Unity Editor
- A Reflect project that contains lights
- The CreatingInteraction_Resources.zip file that is part of this tutorial.
2. Setting up the Interaction
1. Set up the Reflect Viewer by dragging the Reflect Prefab from the Assets > Prefabs folder to the Scene Hierarchy (Figure 01). When prompted to install the TextMesh Pro package, say yes. This is a custom version of the Unity Reflect Prefab that contains an extra button called the Lights Canvas. Selecting this button will open two options called Lights On and Lights Off.
2. Expand the Reflect Prefab in the Hierarchy (Figure 02).
3. Drag the LightControl script from Assets > Scripts onto the Root object (Figure 03).
4. This script contains two methods, one for switching the lights off and one for switching the lights on. The script runs through all of the child objects of the object it was attached to. When it finds an object of the type specified — in this case, a light — it toggles the “enabled” property on or off.
The Root object we applied the script to is a placeholder for the model that will be imported at runtime. When the runtime model is imported, it will be created as a child of this Root object, regardless of which project you open.
5. Expand the Lights Canvas element in the Reflect Prefab and select the Text Light on UI element (Figure 04).
6. In the Inspector, find the Button script and drag the Root object into the On Click() slot. (Figure 05).
7. Select the OnEnable () method from the list of functions by (1) selecting the drop-down menu, (2) Selecting ReflectWorkshop.LightsControls and (3) selecting OnEnable(). These functions come from the script added onto the Root object, which in turn was dragged into the button slot (Figure 06).
8. Repeat this process for the Text Light Off UI element, this time selecting the OnDisable() method.
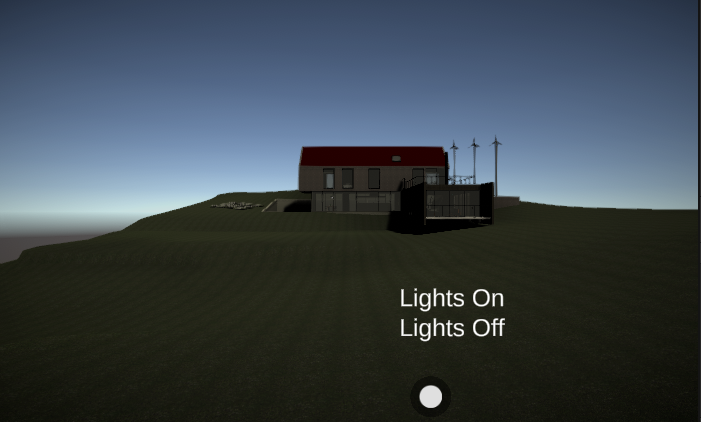
9. Run the project and open any previously created project that contains lights. Expand the new button (Figure 07) and switch the lights on and off with the respective buttons (Figure 08).
3. Next Steps
One of the problems with working with Reflect Viewer runtime models is accessing the objects at runtime. Since the model is only loaded at runtime, you can’t load scripts on specific objects beforehand. Using the Root object and then using the GetComponentsInChildren() method, you can filter through the imported model at runtime and add functionality to specific objects. This tutorial covered the solution to that problem and will allow you to create your own custom controls.