
Customizing Controls
Tutorial
intermediate
+10XP
15m
(6)
Unity Technologies
In this tutorial, we’ll go over where to find the script that controls motion in a Scene, as well as how to adjust settings.
Resources
1. Introduction
The Reflect Viewer uses the standard input system that you would expect to find in a game. Since not everyone is familiar with the WASD- or mouse-based movement typical of a 3D Scene navigation system, it’s essential to understand how this system works as well as how to adjust it to your preferences. In this tutorial, we’ll go over where to find the script that controls motion in a Scene, as well as how to adjust settings.
For this tutorial, you will need:
- The Reflect Package installed via the Package Manager
- A Pro license for the Unity Editor
2. Understanding the Scene Movement Script
1. Set up the Reflect Viewer by dragging the Reflect Prefab from the Packages > Unity Reflect > Runtime folder to the Scene Hierarchy (Figure 01).
2. Expand the Reflect Prefab.
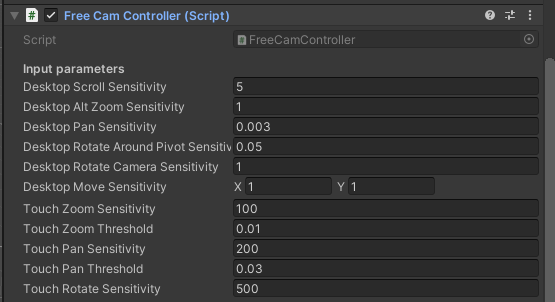
3. Select the FreeCamController Prefab under Reflect > ScreenMode. In the Inspector, search for the Free Cam Controller script (Figure 02).
This script gives you access to some of the parameters that control movement in the Scene once the Reflect Viewer is running. Higher numbers are more sensitive or faster, and lower numbers are less sensitive or slower.
The following parameters are available via the script:
- Desktop Scroll Sensitivity: Rolling the mouse wheel allows you to move forward or backward in the Scene. This setting controls the speed of that motion.
- Desktop Alt Zoom Sensitivity: Holding the Alt key and the right mouse button allows you to zoom in and out by moving the mouse. This setting controls the speed of that motion.
- Desktop Pan Sensitivity: Holding the mouse wheel allows you to pan the Scene by moving the mouse left and right. This setting controls the speed of that motion.
- Desktop Rotate Around Pivot Sensitivity: Holding the right mouse button and moving the mouse allows you to pivot your view around a point you are looking at, similar to walking around a model in real life. This setting controls the speed of that motion.
- Desktop Rotate Camera Camera Sensitivity: Holding the left mouse button and moving the mouse allows you to pivot your view around the point where you are standing. This is similar to you standing in one spot and rotating your head. This setting controls the speed of that motion.
- Desktop Movement Sensitivity: This setting allows you to control forward and backward motion speed when using WASD or the arrow keys on your keyboard. A/left arrow = strafe left movement; D/right arrow = strafe right; W/forward arrow = forward; S/back arrow = backwards.
- Touch Zoom Sensitivity: Putting two fingers on the screen of your mobile device and pinching in and out allows you to zoom in and out on the Scene. This setting controls the speed of that motion.
- Touch Zoom Threshold: When using the zoom function on a mobile device, it’s easy to zoom “through” your Scene. This setting controls how close the zoom will allow you to get to your Scene before stopping the motion.
- Touch Pan Sensitivity: Swiping with two fingers back and forth on your mobile device allows you to pan back and forth in the Scene. This setting controls the speed of that motion.
- Touch Pan Threshold. Using your fingers on a screen makes it easy to swipe out of the Scene. This setting determines how far the panning will go before stopping on a swipe.
- Touch Rotate Sensitivity: Swiping with one finger on a mobile device allows you to rotate the Scene. This sets the speed of that motion.
3. Next Steps
This tutorial covered movement options in the Reflect Viewer Scene. You can set the sensitivity of these motions to your own preferences.