
Create a Quest
Tutorial
·
Beginner
·
+10XP
·
10 mins
·
(607)
Unity Technologies
Talking to NPCs is great, but they can also be very useful ways to give your players quests and reward them with items when these have been successfully completed.
In this tutorial, you’ll:
- Add a quest to your new NPC
- Create Conversation Script Items for the NPC to say when the quest is in progress
- Create an inventory item that players have to collect as the quest
- Connect the quest to a specific branch of NPC dialogue
- Create a reward that the player will be given when they complete the quest
1. Add a Quest to your NPC
First, let’s add a new quest to your NPC:
1. In the Hierarchy, select the NPC GameObject.
2. Right-click and select Create Empty from the contextual menu. This will create a child GameObject.
3. Right-click the new GameObject and select Rename. Call this GameObject Quest.
This GameObject will help you keep your quest organised.
4. In the Inspector, click Add Component.
5. Search for and add the Quest script component.
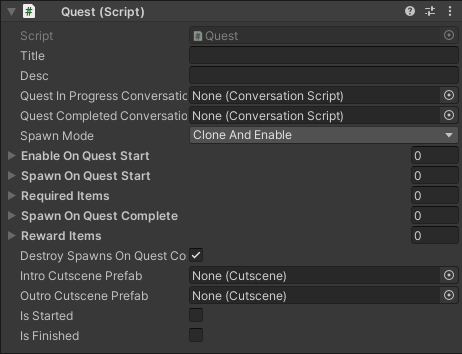
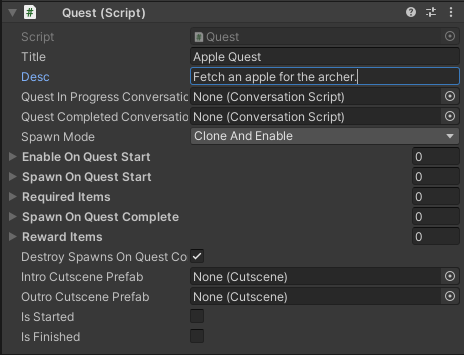
6. In the Title field, name your script “Apple Quest”.
7. In the Desc field, add a short description of the quest:
“Fetch an apple for the archer.”
2. Create NPC Conversation Script Items for the Quest
Now you can associate specific NPC dialogue with the quest, depending on whether it is in progress or the player has met the criteria for completion. This is a good way to remind players what they need to do, if they are in the middle of a quest.
To add quest-specific Conversation Script Items:
1. In the Hierarchy, make sure that the Quest GameObject is selected.
2. In the Inspector, click the Add Component button. Search for the Conversation Script component and add this to Quest.
3. In the Conversation Script, add one Conversational Script Item (following the process you used to set up the initial dialogue):
ID: 1.1.1
Text: Please, fetch me an apple.
4. Select the Add Component button again. In the search bar, type Conversation Script and add a second Conversation Script component to Quest.
5. In the second Conversation Script component, add another Conversation Script Item:
ID: 1.1.2
Text: Thank you for the tasty apple.
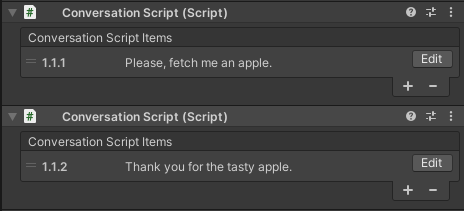
Note: All conversation item IDs must be unique within each Conversation Script component, but otherwise you can assign the ID that makes the most sense to you.
6. Click on the header of the first Conversation Script component and drag it to the Quest In Progress Conversation field in the Quest component. This will assign the dialogue to appear if the player character returns to the NPC without the required item.
7. Click on the header of the second Conversation Script component and drag it to the Quest Completed Conversation field in the Quest component. This will assign the dialogue to appear when the player returns to the NPC with the required item in their inventory.
8. Save your changes.
3. Create an Inventory Item for the Quest
Next, create an Inventory Item for the quest you have prepared:
1. In the Scene view, right-click the location where you want to add the Inventory Item.
2. In the context menu that appears, select Gameplay Prefabs > Add InventoryItem Here. An Inventory Item GameObject will appear in that location.

3. In the Hierarchy, right-click the new GameObject and select rename. Call this GameObject “Golden Apple”. The name of Inventory Item GameObjects are very important, as they are used to identify whether quests are completed or not.
4. In the Inspector, find the Inventory Item component. This can be used to associate a different number of Inventory Items with one GameObject.

Change the Count parameter to 3. Picking up this item will now give the player character 3 Golden Apples in their inventory.
TIP: If you want to change the quest item in a future quest, you can select a different Sprite Asset in the Sprite field.
4. Add the Golden Apple to the Quest Script
Now that you’ve created the Inventory Item, you need to connect this to the NPC’s quest:
1. In the Hierarchy, select the Quest GameObject (child of the NPC GameObject).
2. In the Inspector, click the grey arrow to expand the Enable on Quest Start section.
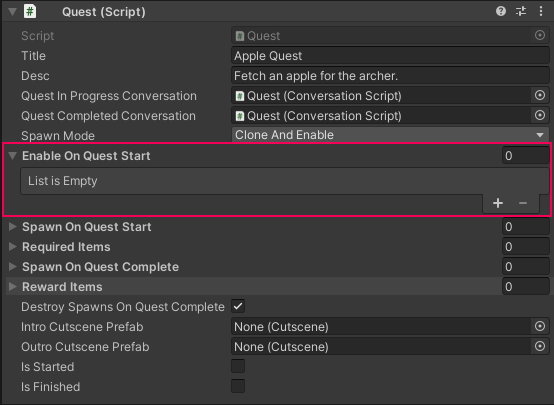
3. Set the Size parameter to 1; a new field named Element 0 will appear beneath.
4. Drag your Golden Apple GameObject from the Hierarchy to the Element 0 field.
The Golden Apple GameObject will now only appear in your game when the player has activated the quest by selecting the associated NPC dialogue option.
5. Next, expand the Required Items section and set the Size parameter to 1. A new section named Element 0 will appear beneath it.
6. Drag the Golden Apple GameObject from the Hierarchy to the Item field in the Element 0 section.
7. Set the Count field to 1. This is the number of that item required in the player’s inventory to successfully complete the quest.
5. Connect the Quest Script to an NPC Conversation Script Item
Now that you’ve set up the quest, you can associate it with a branch of NPC dialogue. When the player selects the response which triggers the selected Conversation Script Item, the quest will activate.
In this case, the Golden Apple quest will activate when the player character greets and compliments the NPC:
1. In the Hierarchy, select the NPC GameObject.
2. In the Inspector, find the Conversation Script component. Open Conversation Script Item 1.1 (“Why thank you! Please will you get me an apple?”) for editing.
3. Drag the Quest GameObject from the Hierarchy to the Quest (Optional) field. This will assign the quest to this dialogue choice.
4. Click Update.
5. Enter Play Mode and test your changes. The Golden Apple quest will be initiated when you select the associated NPC dialogue option.
TIP: Quests should be assigned to NPC conversation branches, rather than the first Conversation Script Item in their conversation tree. This means that you will be able to add multiple quests for the player within one NPC’s conversation tree.
6. Add a Reward for Completing the Quest
Your player can now successfully complete a quest from an NPC. But how many will be motivated by quests without rewards?
To add a reward to your quest:
1. In the Scene view, right-click next to the NPC.
2. In the context menu that appears, select Gameplay Prefabs > Add InventoryItem Here. An Inventory Item GameObject will appear in that location. The default sprite used for inventory items is the Golden Apple. Let’s reward your player with something else though — how about a chicken?
3. In the Inspector, find the Inventory Item component. Click the circle select button to the right of the Sprite field and select the Sprite named _Chicken.

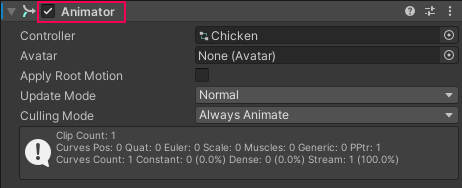
4. In the Inspector, enable the checkbox in the header of the Animator component. This will animate the chicken.
5. In the Hierarchy, right-click on the reward item GameObject and select Rename. Call it Chicken.
6. In the Hierarchy, select the Quest GameObject. Expand the Reward Items section.
7. Set the Size parameter to 1; a new field named Element 0 will appear beneath.
8. Drag your Chicken GameObject from the Hierarchy to the Element 0 field.
9. In the Hierarchy, select the Chicken GameObject. In the Inspector, disable the checkbox in the Chicken GameObject header.

This deactivates the Chicken GameObject, and will stop the player from collecting it before it has been given as a reward.
10. Save the Scene.
Now enter Play Mode and test the changes you’ve made to your game!