Quest Accepted!
Tutorial
·
Beginner
·
+10XP
·
5 mins
·
(559)
Unity Technologies

You’ve used this Creator Kit to create a world, populate it with NPCs and set quests for players to complete. In this final tutorial you'll create a build of your game.
1. Share your game
You’ve used this Creator Kit to create a world, populate it with NPCs and set quests for players to complete. Now it’s time to create a build of the game.
A build is made when Unity takes the Assets you have used and compresses them in an executable file. You can use this file to launch the game without needing Unity Editor on your computer.
To make and share a build of your game:
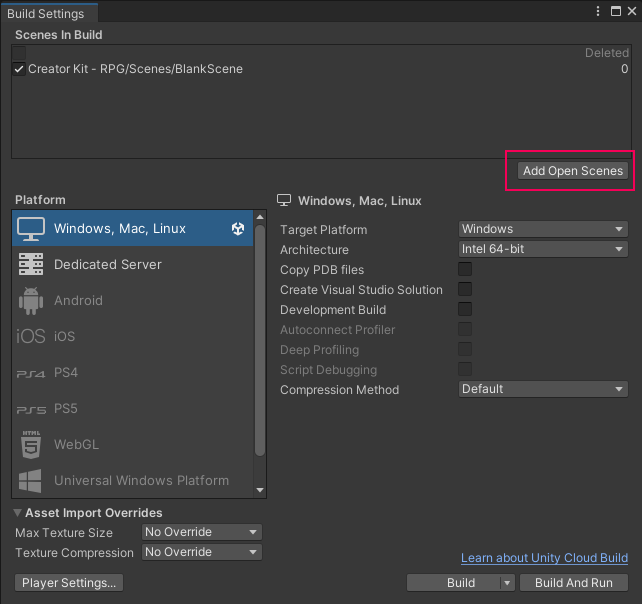
1. In the top menu, go to File > Build Settings.
2. In the dialog window, select the Add Open Scenes button at the bottom of the empty Scenes In Build list. This will add the currently open Scene to the build.

Check that it is the first Scene in the list — this is what will be displayed when your game runs.
3. Now click Build.
4. Select the folder where you want to save your build and give it a name.
5. Unity will create the build and then open the folder which contains the executable file. You can launch this to play your game.
6. Zip the folder which contains your build and send it to your friends!
2. What next?
If you feel ready to start working with code, Ruby’s Adventure: 2D Beginner will take you through building your own 2D RPG from scratch, from first GameObject to final build.
Alternatively, there are also two other Creator Kits to explore:
- Creator Kit: Puzzle, where you’ll create a sequence of physics-based puzzle levels
- Creator Kit: FPS, where you’ll explore level design and customize weapons and targets
Have fun creating — we can’t wait to see what you do next!