Develop the Player Experience
Tutorial
·
Beginner
·
+10XP
·
10 mins
·
(547)
Unity Technologies

Now you’ve created simple quest for your player, but there are other ways to enrich the world that they will explore to create a more immersive RPG experience.
In this tutorial, you’ll:
- Add Story Items which share information with players as they explore
- Create dependencies between Story Items, which can be used to construct a narrative
1. Add a Story Item
Story Items are text which appears to share information with players when they reach a specific location in the world. They can be used to share a narrative, or to direct the player to a specific place.
First, let’s add one individual Story Item:
1. In the Scene view, right-click the location where you want to add a Story Item.
2. In the context menu that appears, go to Gameplay Prefabs > Add StoryItem Here. The new Story Item will appear in that location.
3. If you need to adjust the position of your story item, go to the Toolbar and select the Move Tool. Click and drag the new Story Item to move it to your chosen location.
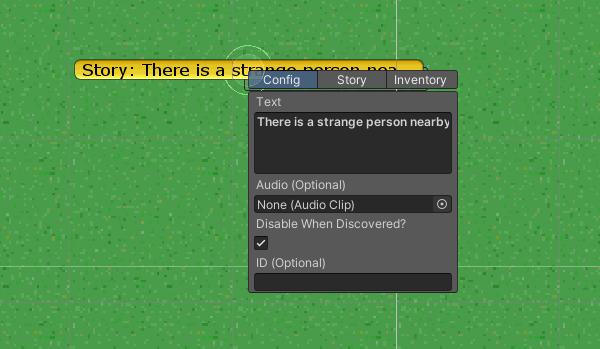
4. Zoom in on the Story Item; a contextual configuration window will appear.
This window has three tabs you can click on to change settings:
- Config, where you add the text that players will see and other key information
- Story, where you can create dependencies between story items
- Inventory, where you can create inventory requirements to access the story item
You can always access this menu by zooming in on a Story Item when it is selected in Scene view.
5. Click on the Config tab.
6. In the Text field of the window, add the following text:
“There is a strange person nearby…”
The title of the StoryItem GameObject will change to include this text.

7. Disable the Disable When Discovered? checkbox. This means that the Story Item remains even when the player has already seen it once.
8. Save your changes to the Scene.
9. Enter Play Mode to test your Story Item. When the player character walks into its space, the story item text will appear on screen. Remember to leave Play Mode when you've finished testing.
2. Create Linked Story Items
Once you’ve created one Story Item, you can add other dependent items. This enables you to make links and narrate the player character’s journey around the world.
To add a dependent Story Item:
1. In the Scene view, create a new Story Item close to your first one.
2. Zoom in on the Story Item until you can see its contextual configuration window.
3. In the Text field of the configuration window, add the following text:
“Oh, just an archer! That’s not so strange after all.”
4. Make sure that the Disable When Discovered? checkbox is enabled.
5. Select the Story tab. Click Add Required Story Item.
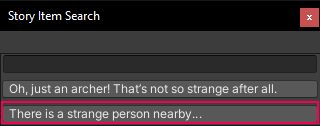
6. Select There is a strange person nearby… from the list of available Story Items.

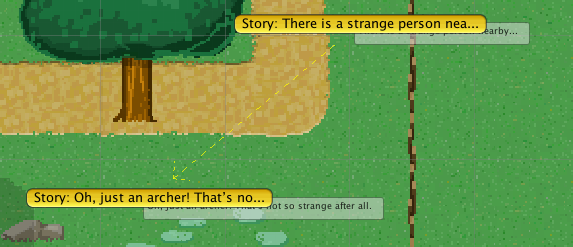
7. In Scene view, zoom out again. A dashed arrow will link the two Story Items, showing the relationship between them. (If they are far apart from each other, you can select the originating Story Item and press F to focus on it to see this more clearly).

8. Save your changes to the Scene.
9. Enter Play mode to test your linked Story Items. The second item will only be available when the first has been activated. When it has been seen for the first time, the second Story Item text (“Oh, it’s just an archer…”) will no longer be activated when the player walks through the Story Item.
That’s it! You can now create independent or linked Story Items to share whatever you like with the player as they explore your world.