Introduction to Odin attributes
Tutorial
intermediate
+10XP
30 mins
20
Unity Technologies
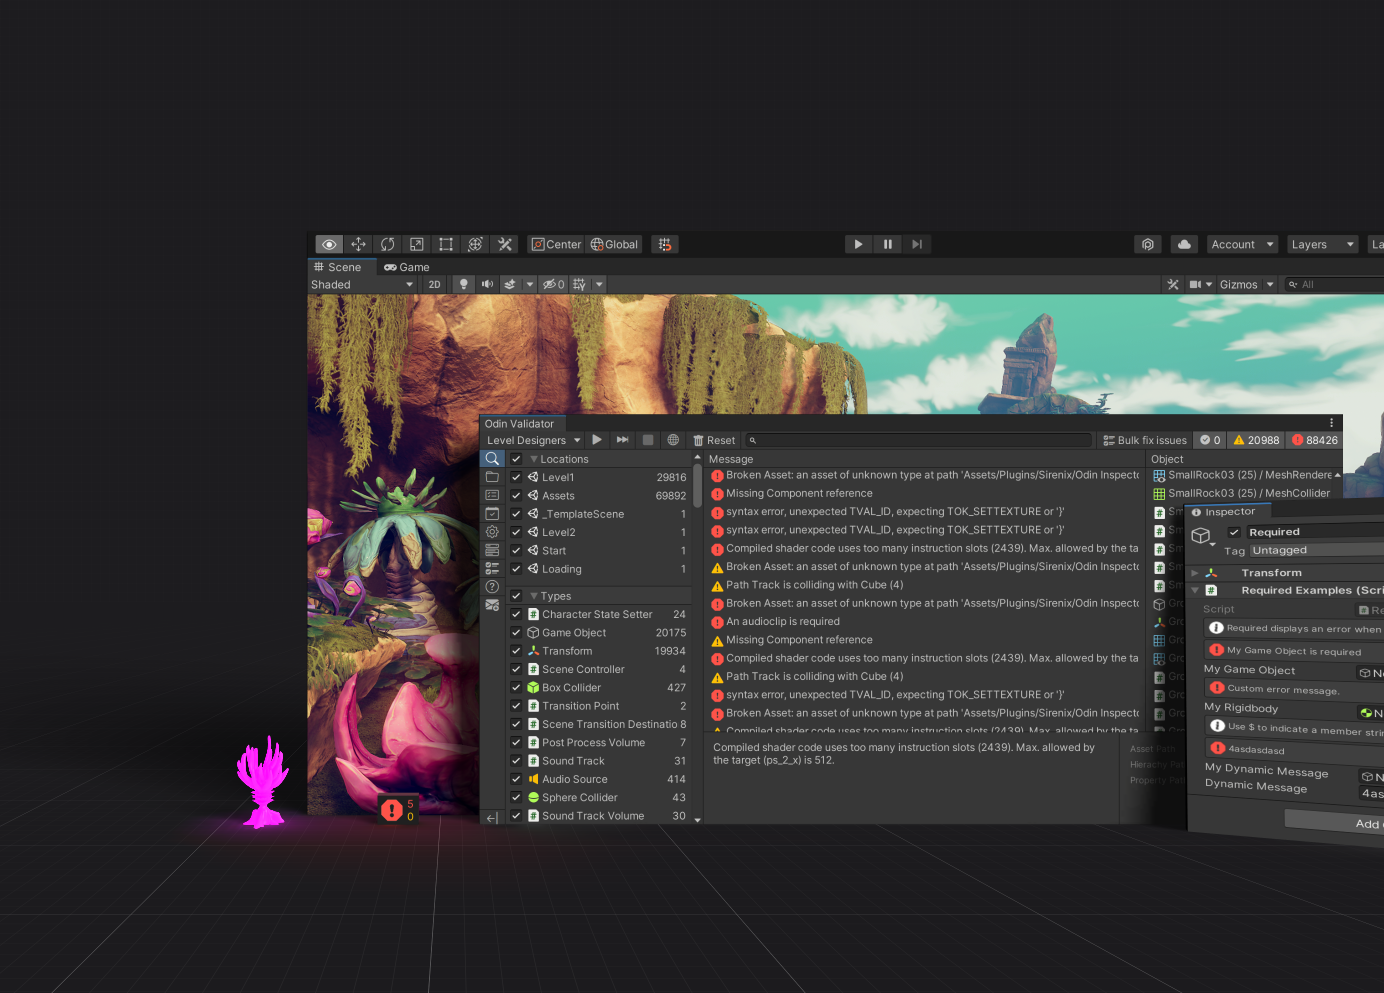
Odin has more than 100 attributes that will let you create powerful and user-friendly editors with little to no effort. These attributes can transform lists into tables, organize items into tabs, provide error messages to users, create buttons, and much more.
In this tutorial, we’ll give you an introduction to the most commonly used attributes, as well as give you a brief introduction to some more advanced features.
1. Using Odin attributes
In C#, an attribute is a declarative tag used to convey information at runtime about the behaviors of various elements like classes, methods, structures, enumerators, assemblies, and more. Attributes are essentially metadata inserted into the code for the compiler to interpret.
Let’s check out a simple attribute example that you might already be familiar with - the Range attribute. With this attribute, we transform the someNumber to be shown in the inspector as a range slider instead of the default number field.
using UnityEngine;

public class MyComponent : MonoBehaviour
{
    [Range(0, 5)]
    public int someNumber;
}
Let’s add some Odin attributes to it. To start using Odin’s attributes, you need to include the “Sirenix.OdinInspector” namespace at the top of your file like so:
using UnityEngine;
using Sirenix.OdinInspector;

public class MyComponent : MonoBehaviour
{
    [Range(0, 5)]
    [HideLabel, InfoBox("This is some number, tune it to change something.")] // Attributes from Odin.
    public int someNumber;
}
If everything is working as intended, you should now see something like this in the inspector:

If you do not see Odin’s attributes in the Inspector window at this point, it might be because you’re working with a script that already has a custom editor made for it, in which case Odin will leave it alone. You can check if this is the case in Odin’s editor type overview by selecting Tools > Odin > Inspector > Preferences.
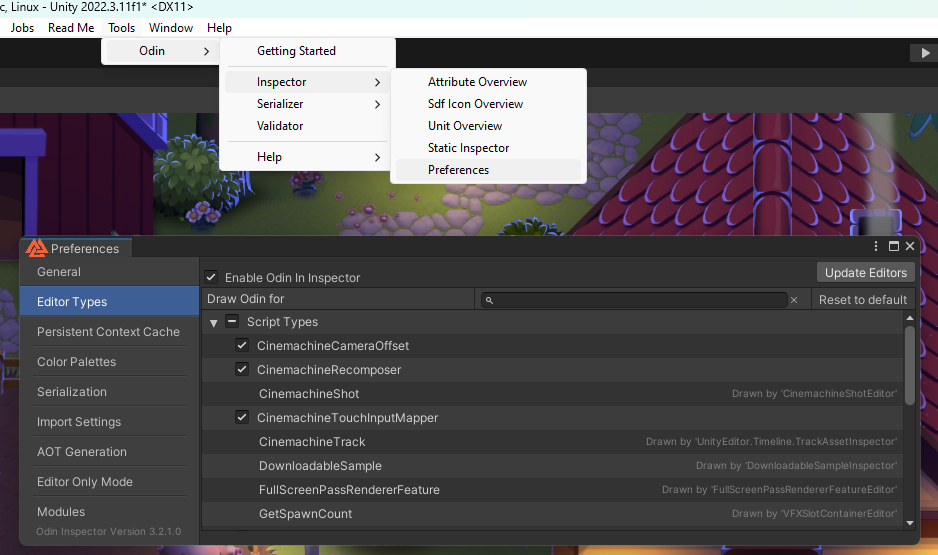
There are many ways you can solve this issue, but for the purposes of this tutorial, it’s best that you find or create a script that doesn’t have a custom editor.
2. Odin attributes examples
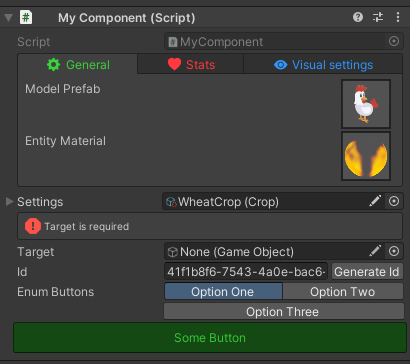
The best way to learn about Odin attributes is to see them in action, so let’s check out some examples.
using UnityEngine;
using Sirenix.OdinInspector;
using System;

public class MyComponent : MonoBehaviour
{
    [TabGroup("General", TextColor = "green", Icon = SdfIconType.GearFill)]
    [PreviewField]
    [RequiredIn(PrefabKind.PrefabInstanceAndNonPrefabInstance)]
    public GameObject modelPrefab;

    [TabGroup("General")]
    [PreviewField]
    public Material entityMaterial;

    [TabGroup("Stats", TextColor = "red", Icon = SdfIconType.HeartFill)]
    public float damage, health, maxHealth, armor;

    [TabGroup("Visual settings", TextColor = "blue", Icon = SdfIconType.EyeFill)]
    public Color entityColor;

    [TabGroup("Visual settings")]
    public Vector3 entityScale;

    [TabGroup("Visual settings")]
    public Sprite entityIcon;

    [Required]
    [InlineEditor(InlineEditorObjectFieldModes.Foldout)]
    public ScriptableObject settings;

    [Required]
    public GameObject target;

    [InlineButton("GenerateId")]
    [Required]
    public string Id;

    [EnumToggleButtons]
    public MyEnum enumButtons;

    [Button(ButtonSizes.Large)]
    [GUIColor("green")]
    private void SomeButton()
    {
        Debug.Log("Some button was clicked!");
    }

    private void GenerateId()
    {
        Id = Guid.NewGuid().ToString();
    }

    [ReadOnly]
    [HideInEditorMode]
    private bool isAlive = true;

    public enum MyEnum
    {
        OptionOne,
        OptionTwo,
        OptionThree
    }
}
Don't worry if the script seems confusing. The purpose is to showcase some commonly used attributes and the types of editors you can create once you become more familiar with what Odin has to offer.
The Attributes Overview window in Odin
You can learn more about each Odin attribute by opening up the built-in Attributes Overview window in Odin. This offers a detailed list of all Odin attributes, each accompanied by a concise description and example of its usage. You can access this though Tools > Odin Inspector > Attributes Overview.
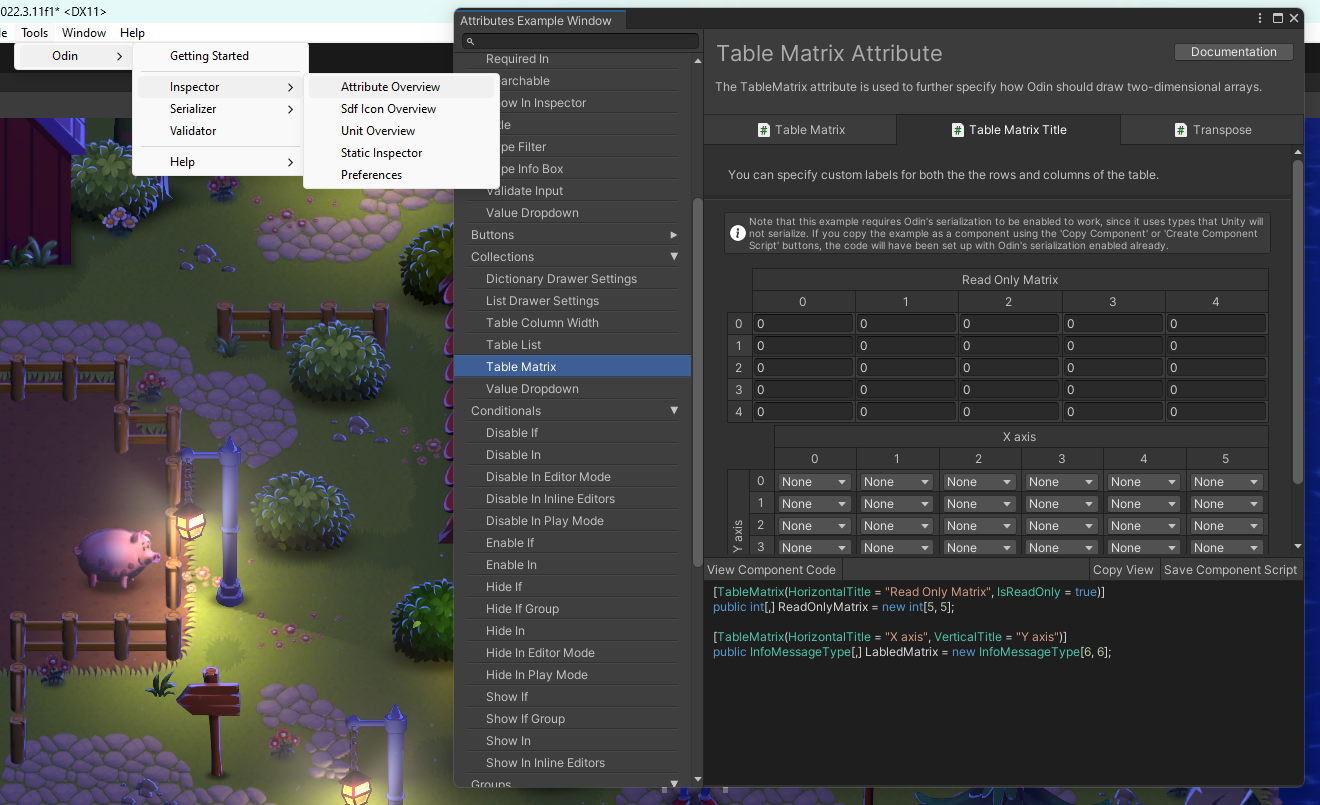
3. Group attributes
Have you ever had a very large script with many inspector variables, and found it a little difficult or tedious to keep track of them all in the inspector? Groups in Odin exist to address this problem, and help greatly with keeping your inspector manageable and nice to look at.
What they do lies in the name: groups let you group together related properties and draw them in any variety of ways, from simple labeled boxes and dropdowns to multi-page tab groups. Using them is easy; simply put group attributes with the same name on the members you want to group together.
You’ll find all of the built in group attributes in the Attribute Overview, or on the website.
[TabGroup("First Tab")]
public int FirstTab;

[ShowInInspector, TabGroup("First Tab")]
public int SecondTab { get; set; }

[TabGroup("Second Tab")]
public float FloatValue;

[TabGroup("Second Tab")]
public void Button()
{
	...
}
You can also merge groups together.
[Button(ButtonSizes.Large)]
[FoldoutGroup("Buttons in Boxes")]
[HorizontalGroup("Buttons in Boxes/Horizontal", Width = 60)]
[BoxGroup("Buttons in Boxes/Horizontal/One")]
public void Button1() { }

[Button(ButtonSizes.Large)]
[BoxGroup("Buttons in Boxes/Horizontal/Two")]
public void Button2() { }

[Button]
[BoxGroup("Buttons in Boxes/Horizontal/Double")]
public void Accept() { }

[Button]
[BoxGroup("Buttons in Boxes/Horizontal/Double")]
public void Cancel() { }
To get an overview of all the group attributes, you can open the Attributes Overview window in Odin. Combining groups is something that can take a little getting used to. There is a great video tutorial about this here.
4. Using attributes on type definitions
Once you’ve familiarized yourself with the basic usage of Odin attributes, a cool trick to know is that attributes can also be applied directly to type definitions. When an attribute is applied to a type, it affects all instances of that type throughout your project.
To give you a simple example, instead of this, where you are applying the same attribute every time:
public class MyComponent : MonoBehaviour
{
    [InlineEditor(InlineEditorModes.Foldout)]
    public MyScriptableObject myScriptableObject1;

    [InlineEditor(InlineEditorModes.Foldout)]
    public MyScriptableObject myScriptableObject2;

    [InlineEditor(InlineEditorModes.Foldout)]
    public MyScriptableObject myScriptableObject3;
}

public class MyScriptableObject : ScriptableObject
{
}
You can apply the attribute on the type definition itself like so:
public class MyComponent : MonoBehaviour
{
    public MyScriptableObject myScriptableObject1;
    public MyScriptableObject myScriptableObject2;
    public MyScriptableObject myScriptableObject3;
}

[InlineEditor(InlineEditorObjectFieldModes.Foldout)]
public class MyScriptableObject : ScriptableObject
{
}
This trick works for all Odin attributes, and it can save you a lot of time and effort when you have a lot of instances of the same type. Some of the most common attributes that you might want to apply to type definitions are InlineEditor, HideLabel, ShowInInspector, Title, Label Text, InfoBox, BoxGroup, TableList, TableColumnWidth, TableColumnMinWidth, and so on.
5. Working with colors in attributes
Several attributes you’ll stumble upon in Odin, such as GUIColor, ProgressBar, TabGroup, accept a color as a parameter for various different purposes. They will ask for a string, and from here you have several options on how to choose a color.
1. Hexadecimal color codes: If you're familiar with color codes, you can simply pass them as a string. For example: #FFFFFF for white, #000000 for black, #FF0000 for red, and so on.
2. RGB or RGBA: You can specify the red, green, and blue values (and optionally, the alpha value for transparency) as numbers between 0 and 1. For instance, rgb(1, 0, 0) for red, rgb(0, 1, 0) for green, rgb(0, 0, 1) for blue, etc.
3. Color names: For convenience, Odin also supports basic skin-adjusted color names. These include standard color names like red, green, blue. The API XML documentation will provide you with the full list of color codes you can use.
[GUIColor("red")]
public float someRedField;

[GUIColor("#00FF00")]
public float someGreenField;

[GUIColor("RGB(0,0,1)")]
public float someBlueField;
6. Attribute expressions
One of the most powerful features of Odin is the ability to use expressions in attributes. Almost all attributes in Odin that take a string parameter can use expressions. Attribute expressions allow you to write code directly in the attribute, which can be evaluated at runtime.
In order to use expressions in Odin attributes, you need to prefix the string with an @ symbol. Here are some simple examples of how you can use expressions in Odin attributes:
using UnityEngine;
using Sirenix.OdinInspector;
using System;
using System.Collections.Generic;
using System.Linq;

public class MyComponent : MonoBehaviour
{
    [EnumToggleButtons]
    public GenderType Gender;

    [ValueDropdown("@NameDatabase.GetNames(this.Gender)")]
    [ValidateInput("@NameDatabase.GetGenderFromName($value) == this.Gender",
        "Name must match the gender type", ContinuousValidationCheck = true)]
    public string Name;

    [EnableIf("@this.Gender == GenderType.Male")]
    [PreviewField]
    public GameObject Beard;
}

public enum GenderType
{
    Unknown,
    Male,
    Female
}

public static class NameDatabase
{
    static string[] maleNames = new string[] { "John", "Jack", "James", "Joe", "Jesse" };
    static string[] femaleNames = new string[] { "Jane", "Jill", "Jenny", "Judy", "Jasmine" };

    public static string[] GetNames(GenderType gender)
    {
        if (gender == GenderType.Male) return maleNames;
        if (gender == GenderType.Female) return femaleNames;
        return Array.Empty<string>();
    }

    public static GenderType GetGenderFromName(string name)
    {
        if (maleNames.Contains(name)) return GenderType.Male;
        if (femaleNames.Contains(name)) return GenderType.Female;
        return GenderType.Unknown;
    }
}
In this example, an error occurs because 'Jack' is not a traditionally female name, and in this fictional game, beards are exclusively available for male characters, which is why the option is disabled. Additionally, when you click on the name dropdown, it will generate a list of names that correspond to the selected gender.

There is a lot more to learn about attribute expressions, they can give you access to the internal state of the inspector, parent values and much more. You can learn more about attribute expressions here.
7. The ShowInInspector attribute and the Serialization debugger
The intention of this tutorial was not to go into details about each attribute, but we wanted to make an exception for the ShowInInspector attribute.
The ShowInInspector attribute is a very powerful attribute that can be used to show a property in the inspector, even if it is private, or static, a field, a method, or a property. This comes in handy in many situations, as it truly will let you show anything.
However, a common error we see people make is using it to show a dictionary, or a type that is not marked with the [Serializable] attribute. This can lead to a lot of confusion when they then enter play mode and see that all of the data they entered disappear.
If a field that you expect to show up in the inspector is not showing up, it’s because it is not being serialized / saved. Why that is the case is actually rather complicated. It depends on various different serialization policies. But luckily Odin includes a serialization debugger that can help you figure out why a field is not being serialized.
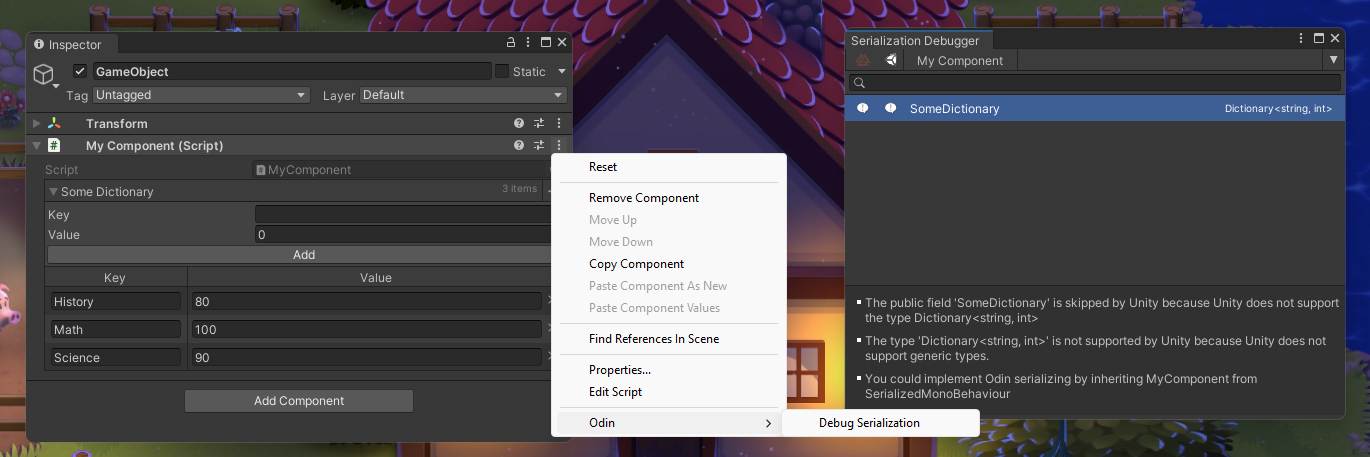
Once you have a field that is not being serialized, you can open up the serialization debugger by going to Tools > Odin Inspector > Serialization Debugger. Or you can use the context menu in the Inspector window to open it up for a script you are working with and select “Odin > Debug Serialization”. See the image below.
public class MyComponent : MonoBehaviour
{
    [ShowInInspector]
    public Dictionary<string, int> SomeDictionary = new Dictionary<string, int>
    {
        { "Math", 100 },
        { "Science", 90 },
        { "History", 80 }
    };
}