Use Sprite Generator to make an avatar icon
Tutorial
·
Beginner
·
+10XP
·
0 mins
·
(17)
Unity Technologies
Use the Sprite Generator to create a character avatar through natural language prompts and image references.
1. Overview
In this tutorial, you’ll use Unity AI’s Sprite Generator to create a character avatar icon. Sprite icons like this can be used for UI, character selection, or identification.
Below are a few examples of the avatar image you might create.
2. What can you do with the Sprite Generator?
The Sprite Generator is a Unity AI tool that lets you generate 2D sprites using a natural-language prompt. These sprites can be used for UI icons, avatar portraits, in-game decals, or stylized 2D assets.
With the Sprite Generator, you can use the following techniques to help you refine your results:
- Selecting from a variety of pretrained models, each trained on different art styles like pixel art, anime, or concept art.
- Using negative prompts to exclude unwanted elements like backgrounds, clutter, or visual noise.
- Choosing a custom image reference to make the results match your existing characters or assets.
3. Best practices for prompts when using the Sprite Generator
Here are some best practices for crafting effective prompts with the Sprite Generator:
- Be clear and descriptive: Include essential details like subject, style, and mood.
- Good: "Bust portrait of a robotic merchant with a glowing eye in pixel art style"
- Avoid: "robot sprite"
- Use natural language: Generators respond best to complete phrases instead of keywords alone.
- Use: "Cute cartoon fox in profile view, holding a leaf"
- Avoid: "fox, cute, cartoon, leaf
- Exclude unwanted elements using negative prompts: You can remove visual clutter or specific traits.
- Example: Enter “background, shadows, text” in the Negative Prompt box to generate a clean sprite for a character.
- Example: Enter “background, shadows, text” in the Negative Prompt box to generate a clean sprite for a character.
- Choose the right model: Different models produce different styles.
- Use the Change button in the Generator window to preview and select a style that appeals to you.
Following these practices helps reduce trial and error and improves the consistency and quality of your generated sprites.
4. Generate a sprite for the character
You’ll now generate a sprite to use as a character avatar icon. While you can use just a prompt to describe your character, it’s often hard to capture the exact look using text alone — so in this step, you’ll try both approaches: first a prompt, then an image reference.
Instructions
1. Open the Sprite Generator window:
- Open the AI dropdown from the top toolbar and select Generate New > Sprite, then name the new sprite something like “Avatar_Sprite”.
2. Choose an image model:
- Select Change to choose an image model.
- Browse one that looks promising for your avatar icon. The Sticker Icons model is a good one to start with.
3. Write a prompt to describe your avatar:
- In the Prompt box, describe the look of the icon you want to generate; for example:
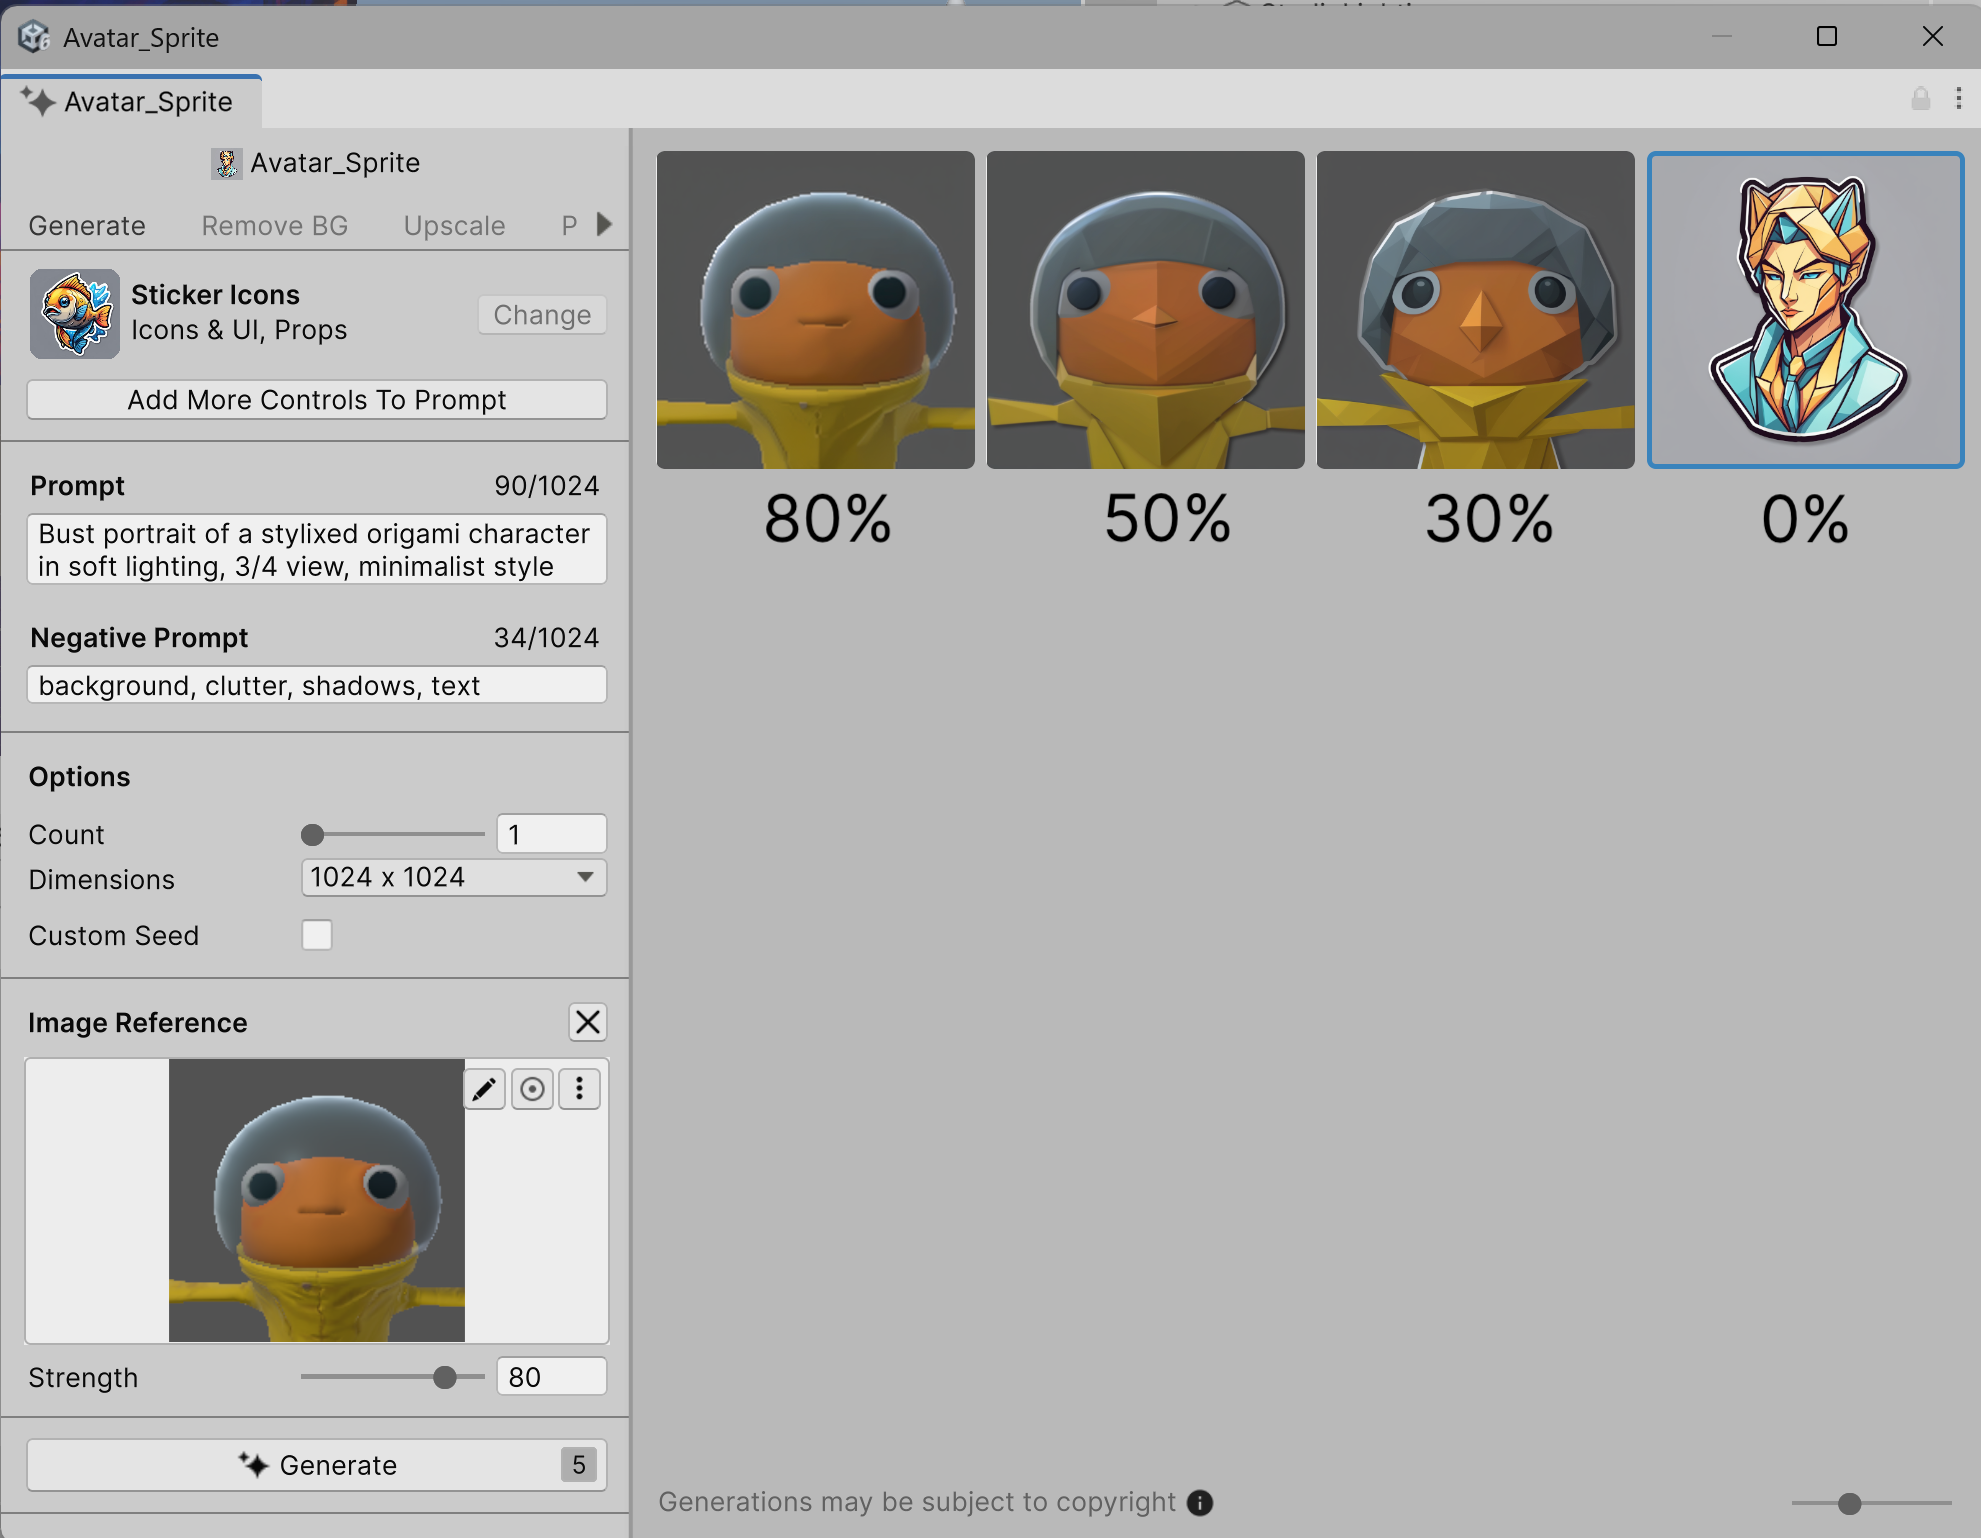
Bust portrait of a stylized origami character in soft lighting, 3/4 view, minimalist style
4. Use a negative prompt to remove unwanted elements:
- In the Negative Prompt box, enter terms like the following:
background, clutter, shadows, text5. Choose a square aspect ratio:
- Open the Dimensions property dropdown and select 1024 x 1024 to create a properly proportioned icon.
6. Generate your sprite:
- Select Generate to preview a set of results.
- If you’re happy with one of the results, right-click and select Promote to current asset.
7. (Optional) Enable transparent background:
- If you prefer to have a transparent background, in the Remove BG tab, select Remove BG so your sprite has a clean alpha channel.
You might have a nice looking sprite, but it likely doesn’t look all that much like your character. You’ll address that in the next step.
5. Use an image reference to improve results
Use a visual reference to guide the AI Assistant and generate a sprite that better matches your character.
Instructions
1. Take a screenshot to use as a reference:
- Take a screenshot of your character’s face from the Scene or Game view and save it to your computer.
2. Enable image reference input:
- In the Generator window, select Add more controls to prompt > Image Reference.
- In the Image Reference panel, use the More (⋮) menu and select Import from disk.
- Select the screenshot you saved earlier.
3. Adjust the strength of the reference:
- Use the Strength property slider to control how much influence the reference image has on the generated sprite, then select Generate again to create new variations using your imported reference.
The image below shows examples of four different generated assets, each with different strength values. Notice how the generated images resemble the reference image less and less at lower strength values.

6. Generate a UI Image for the icon
Now that you’ve created a sprite avatar, you’ll display it in your scene as part of a simple UI. Instead of building a full user interface using UI Toolkit, you’ll use Unity’s built-in UI system, known as UGUI. This system is based on a Canvas and will be quicker for displaying this one image in the scene for now.
If you were building a full UI with multiple components and dynamic layouts, we’d recommend Unity’s newer UI Toolkit, which offers improved flexibility, styling with Unity Style Sheets (USS), and better performance for complex editor workflows.
Instructions
1. Create a UI Image GameObject:
- Right-click in the Hierarchy window and select UI > Image.
- This creates a Canvas with an Image GameObject anchored to the lower-left corner of the screen.
- Rename the Image GameObejct “Avatar_image”.
2. Resize the Image GameObject:
- With the Image GameObject selected, locate the Rect Transform component in the Inspector window.
- Set the Width property to 200 and the Height property to 200 to make it a larger square.
3. Anchor the Image to a different corner:
- In the Rect Transform component, open the Anchor Presets menu.
- Hold Shift+Alt (macOS: Option) and select the upper-left or upper-right anchor preset.
- Adjust the Pos X and Pos Y property values to add margin from the edges of the screen.
4. Assign your generated sprite as the source image:
- In the Inspector window, under the Image component, set the Source Image property to the sprite avatar you generated.
7. Give the icon a background color (optional)
As an option to make your icon stand out more or align better with your color scheme, you could put a background color behind your avatar image. To do this, you’ll need to first make sure you’ve removed the background of your avatar image.
Instructions
1. Remove the background or your original icon:
- In the Project window, select your Avatar_Sprite sprite asset.
- At the top of the Inspector window, select Generate. This will reopen the Sprite Generator tool for that specific asset.
- In the Remove BG tab, select Remove BG so your sprite has a clean alpha channel.
2. Add a background behind the avatar:
- In the Hierarchy window, right-click the Canvas GameObject and select UI > Image again.
- Set the new Image GameObject’s Rect Transform component’s Width and Height property values to match the Avatar_image GameObject, and anchor it in the same corner as your avatar.
- In the Hierarchy window, drag the Image GameObejct above the Avatar_image GameObject in the list — this ensures it renders behind the icon.
- Assign a background sprite or color if desired.
8. Organize your sprites
To keep things organized, move your generated avatar sprites into a dedicated folder.
Instructions
1. Create a new folder:
- Right-click in the In the Assets folder and select Create > Folder.
- Name the new folder “Sprites”.
2. Move your avatar sprites:
- Drag your generated sprites into the Sprites folder.
9. Next steps
You generated a custom avatar icon with the Sprite Generator and displayed it on screen.
If you’d like to explore advanced options like upscaling, recoloring, or inpainting, check out the Sprite Generator documentation.
Next, you’ll add background music and use Unity’s AI Assistant to generate ambient sound effects for your scene.