Add post-processing to your filter
Tutorial
·
Beginner
·
+10XP
·
30 mins
·
(83)
Unity Technologies
Post-processing allows you to change the entire look and feel of your application with a single click. Post-processing is similar to a typical image filter you might add to a photo on your phone.
In this tutorial you'll do the following:
- Set up a post-processing volume for your filter.
- Add post-processing effects to the volume.
- Build and test your updated app.
1. Overview
Now that you’ve added a variety of different effects to your AR filter, the final step is to make it look amazing. Post-processing is a generic term for a full-screen image processing effect that occurs after the camera captures a scene but before the scene is rendered on the screen. Post-processing effects can change the focus of the camera, make bright areas in your scene glow, or darken the edges of the camera view — and provide many other different effects too! It’s a great way to improve the visual look of any application.
In this tutorial you’ll do the following:
- Set up a post-processing volume for your filter.
- Add post-processing effects to the volume.
You’ll also learn a little about the limitations of mobile hardware when post-processing is applied. Post-processing effects can be resource-intensive, so understanding mobile hardware limitations can make a difference as you decide which effects to use for your AR applications.
Note: This tutorial introduces some of the basics of post-processing, but it is not a comprehensive introduction. Try Creative Core: Post-processing to develop your understanding of post-processing in Unity.
2. Post-processing for your filter app
You can add post-processing effects to Unity projects in different ways, depending on the type of project that you’re working on. The AR Template for this pathway uses the Universal Render Pipeline (URP) — a specific set of techniques and calculations to take the three dimensional information in your project and display it on a two dimensional screen.
You can add and manage post-processing effects for scenes in URP projects using something called a volume. For example, you can configure a volume to apply one effect to an entire scene, or configure multiple volumes to display different effects in different areas of the scene.
In this tutorial, you’ll create and configure one volume to apply post-processing effects to your filter app.
3. Set up a post-processing volume
Follow these instructions to set up a post-processing volume for your app:
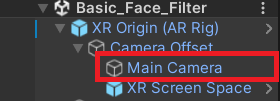
1. In the Hierarchy window, expand the XR Origin (AR Rig) GameObject and its child GameObjects, then select the Main Camera child GameObject.
2. In the Inspector window, find the Camera component and expand the Rendering section if it is currently minimized.
3. Make sure that Post Processing is enabled.

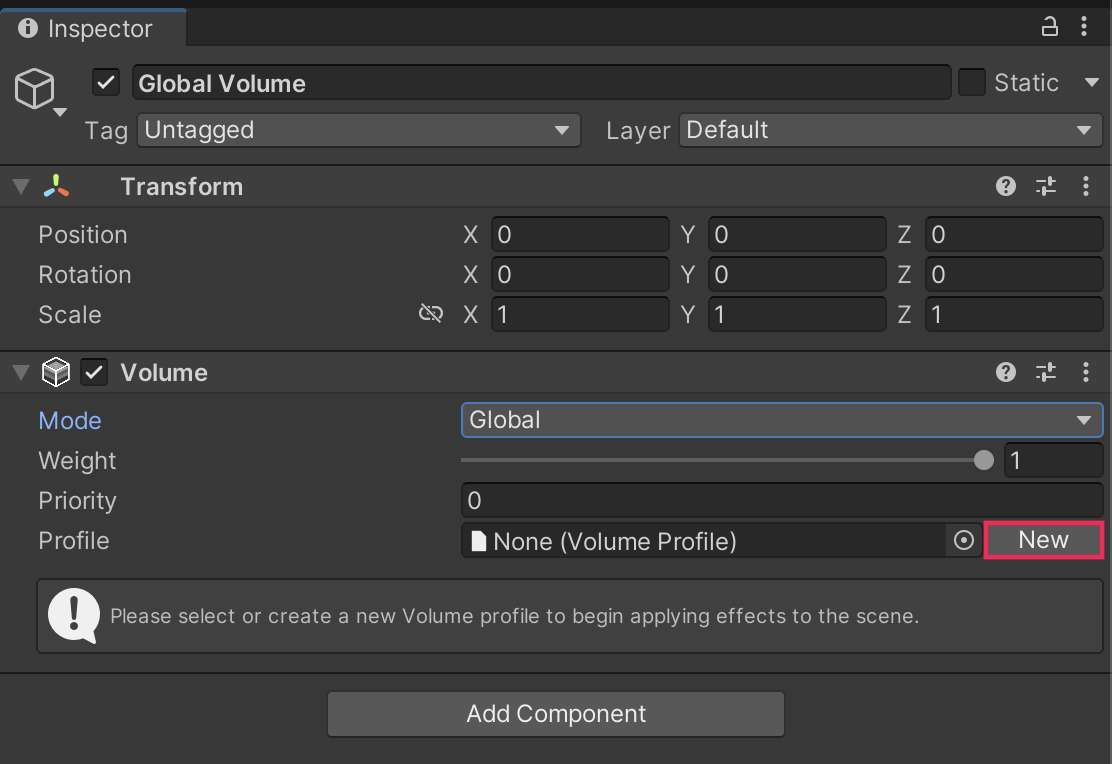
4. In the Hierarchy window, right-click and select Volume > Global Volume.
Global – as opposed to Local – means that the post-processing effect will apply throughout the scene.
5. In the Volume component, select New to create a volume profile.
4. Add a post-processing effect
Now that you have a post-processing volume in the scene, you can add effects to the volume to change the look of your filter. Start with a color tint for your filter:
1. In the Volume component, select Add Override.
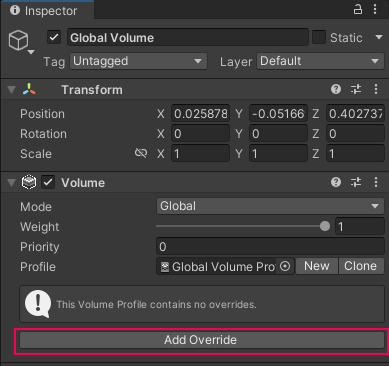
Each effect that you add to a volume is contained in a separate override that adjusts the volume’s settings.
2. Search or navigate to select the Color Adjustments override.
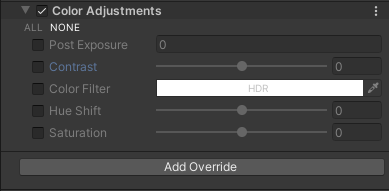
This effect will apply a color tint to everything that the camera sees. It’s one of the most obvious post-processing effects, so it’s a good one to test for your app.
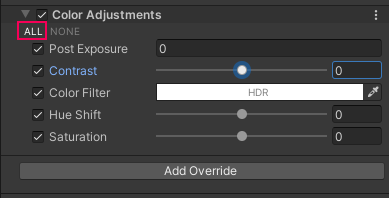
3. Select All to enable every property in the Color Adjustments override.
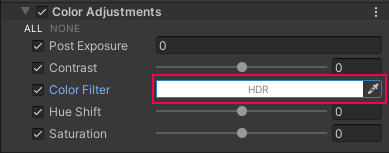
4. Select the Color Filter swatch and choose tint color for the scene in the dialog window.
5. Build and test
When you build your application to test it, the color tint should now be applied to the entire camera view.
Follow these instructions to build and test your app:
1. Save the scene.
2. Open the Build Settings window (File > Build Settings).
3. Make sure that your device is plugged in and then select Build and Run to build the app on your device.
4. The application will open automatically on your device. When a face is detected, the application should display everything you have added so far and the animations for your accessory should play.
Note: For a reminder of how to build to your device, you can review the process for Android or iOS.
6. Mobile limitations on post processing
While post-processing can make experiences more visually striking, these effects can take up a lot of resources and cause significant performance problems. Since most AR applications will run on mobile hardware, you need to consider the limitations of the hardware when selecting post-processing effects.
If you’re using URP to create an experience, the following effects are the most mobile-friendly by default:
- Bloom (with High Quality Filtering disabled)
- Chromatic Aberration
- Color Grading
- Lens Distortion
- Vignette
7. More things to try
If you want to further develop your skills, explore new concepts, or improve your project, check out some of the optional activities below. Each one is tagged as either Easy, Medium, or Difficult, so you can choose the level of challenge.
These activities are entirely optional, so if you’re not interested, no problem — just skip this step. We do recommend attempting at least one of them in order to get the most out of this learning experience. Good luck!
Easy: Create a vignette effect
A vignette is a useful effect to focus the viewer’s attention on the center of the screen or to add a soft fade to the edges. The term comes from photography, where vignetting refers to darkening or desaturation towards the edges of an image. Add a Vignette override to your volume.
Try modifying the following properties of your Vignette in the Inspector window:
- Color: Use the color picker to set the color of the vignette.
- Intensity: sets the strength of the vignette effect
- Smoothness: Use the slider to set the smoothness of the vignette borders.
Medium: Create a color filter
Changing the way colors are displayed in your experience can create artistic effects. Add a Color Curves override to your volume. This tool works in the same way adjustment filters work in photo editing apps. With this tool, you can make common visual adjustments such as toning down particularly bright areas, or you can create artistic effects such as selectively changing different color ranges. Read more about Color Curves in the URP post-processing documentation.
Use the Hue vs Saturation curve to adjust specific ranges in the colors and saturation of your scene. Some specific color filters you could make include:
- Removing all saturation to make your scene monochromatic.
- Removing all colors except your favorite color.
Difficult: Find a post-processing effect and apply it in Unity
Now that you have an idea of what post-processing is and how to apply effects in Unity, try some of the other effects that are available and explore how they can enhance your face filter!
You can find a full list of the available effects in the URP post-processing documentation.
8. Next steps
Congratulations! You have made an AR application that not only tracks faces, but does so with 3D animation and visual effects. To do this you did the following:
- Applied a face texture to the filter.
- Chose and applied animation to a 3D accessory.
- Chose and added a particle system.
- Configured post-processing effects for final polish.
Now it’s time to take all your skills and knowledge and put them towards a new challenge. You’ll create your own unique AR filter in response to a project brief from an imaginary business. Once you have a new AR filter app you're proud of, you’ll submit your work to share it with others!