
Customizing Post-Processing Effects
Tutorial
intermediate
+10XP
10m
(7)
Unity Technologies
In this tutorial you will look at where the post-processing profile is stored in the Unity Reflect Viewer Prefab and how to adjust it to fit your needs.
Resources
1. Overview
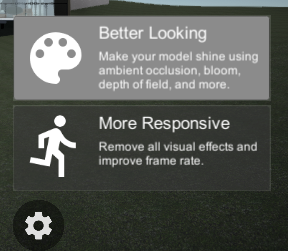
The Unity Reflect Viewer settings button brings up a menu that allows you to switch to “More Responsive” performance, or “Better Looking” Scenes (Figure 01).
Switching to the Better Looking option activates the post-processing stack that’s part of the package. This means an additional Post-Processing Layer is added to the Scene, enabling effects that make the Scene look better. This, however, requires additional resources at runtime. If you are running the viewer on a desktop machine, you may not notice any impact on performance. But when using a mobile device or virtual reality, there may be a significant impact depending on the hardware and complexity of the Scene.
In this tutorial, you will see where the post-processing stack is stored and how you can add or remove effects.
2. Locating the Post-Processing Profile
The Post-Processing Profile is typically added to a camera, and after adding the Unity Reflect Viewer Prefab to the Scene, you can find the profile applied to the FreeCamController object at Reflect-ScreenMode (Figure 02).
The Post-Processing Profile can now be viewed in the Inspector (Figure 03).
3. Changing the Post-Processing Profile
Once you have the FreeCamController selected in the Scene Hierarchy, you can adjust the Post-Processing Profile in the Inspector by switching effects on and off or adjusting the settings of the selected effects.
Please note that while all effects will work in most cases and with most devices, they do tax resources and should be used sparingly.
Version 2.0 of the Post-Processing Profile is VR-optimized, but some effects just don’t work well with VR and may cause the user to suffer motion sickness or discomfort.
Below is a table of effects and their recommended usage.
4. Next Steps
You may now go ahead and change the Post-Processing Profile to suit your specific needs. The profile will be activated globally when you choose the “Better Looking” option on the settings menu.