
Detect the user’s touch
Tutorial
Beginner
+10XP
60 mins
63
Unity Technologies
A single tap on the screen is one of the most simple and intuitive interactions with a mobile device. Most users instinctively try to tap on elements they think they can interact with on the screen.
In this tutorial, you'll do the following:
- Create a new visual script.
- Detect if the user has touched the screen.
- Detect the position of the touch on the screen.
- Add a user interface that displays information about the user’s touch.
1. Overview
A single tap on the screen is one of the most simple and intuitive interactions with a mobile device. Most users instinctively try to tap on elements they think they can interact with on the screen.
Your app is successfully detecting and displaying planes detected in the environment. When the project is complete, tapping on one of those planes will spawn a portal to a virtual world. The first step towards that outcome is detecting when and where the user has touched the screen.
In this tutorial, you will do the following:
- Create a new visual script.
- Detect if the user has touched the screen.
- Detect the position of the touch on the screen.
- Add a user interface that displays information about the user’s touch.
2. Create a new script graph
First, follow these instructions to create a new script graph:
1. In the Hierarchy window, right-click and select Create Empty.
2. Name the new empty GameObject “Visual Scripts”.
3. In the Inspector window, select Add Component, then add a Script Machine component.
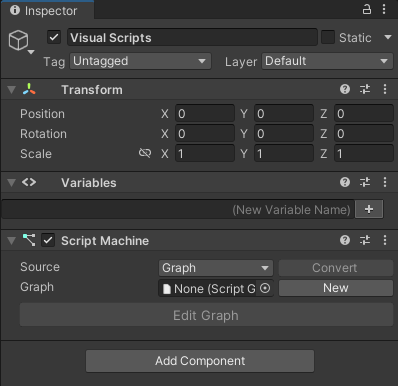
4. In the Script Machine component, find the Graph property and select New.
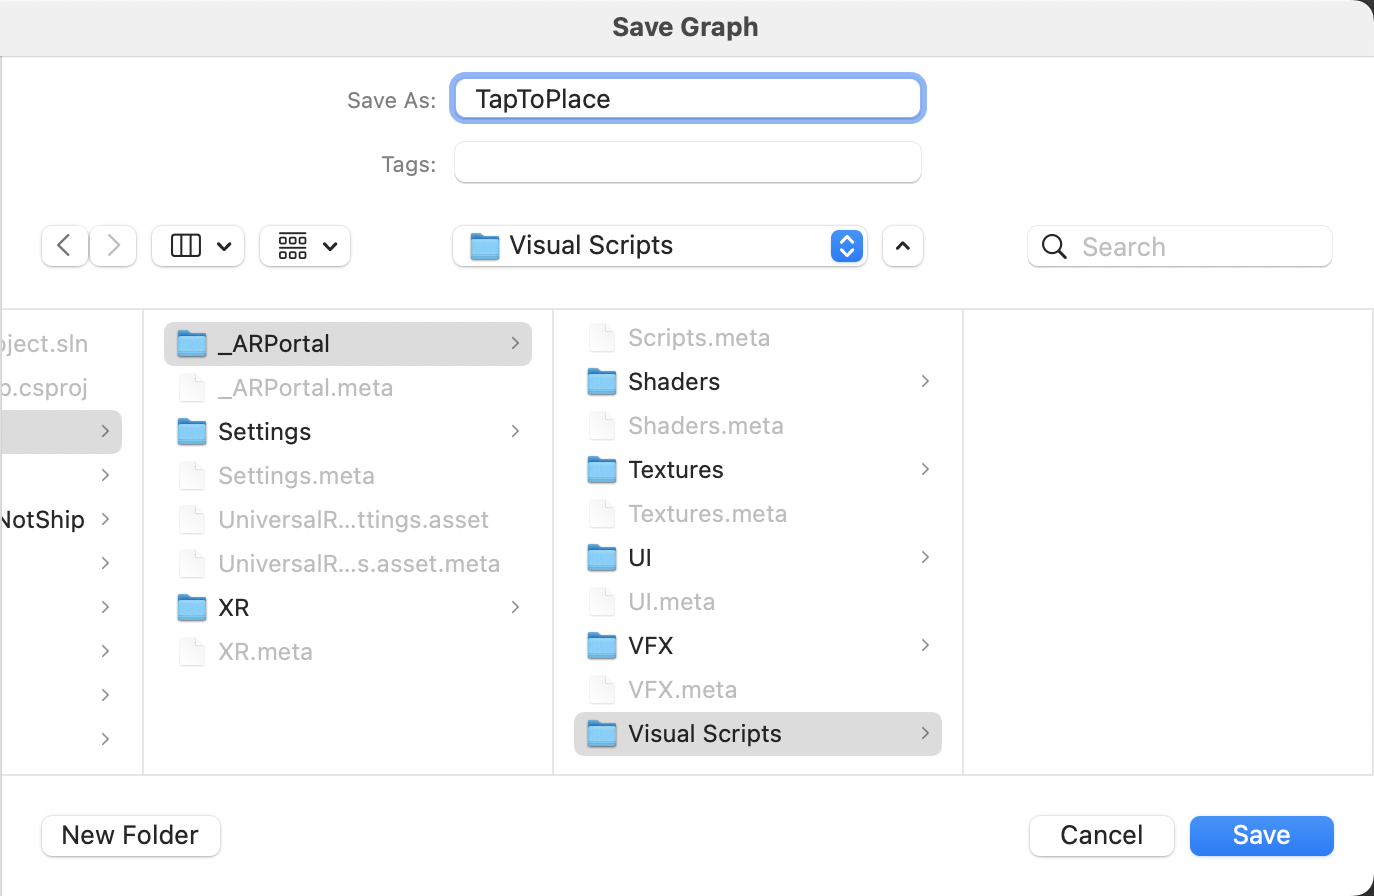
5. When the Save Graph dialog window appears, create a new folder inside the _ARPortal folder and name it “Visual Scripts”.
6. Name the new graph “TapToPlace” and select Save.
7. In the Script Machine component, update the graph text fields as follows:
- Title: Tap to place
- Summary: Detects touch on an AR plane and places a portal object
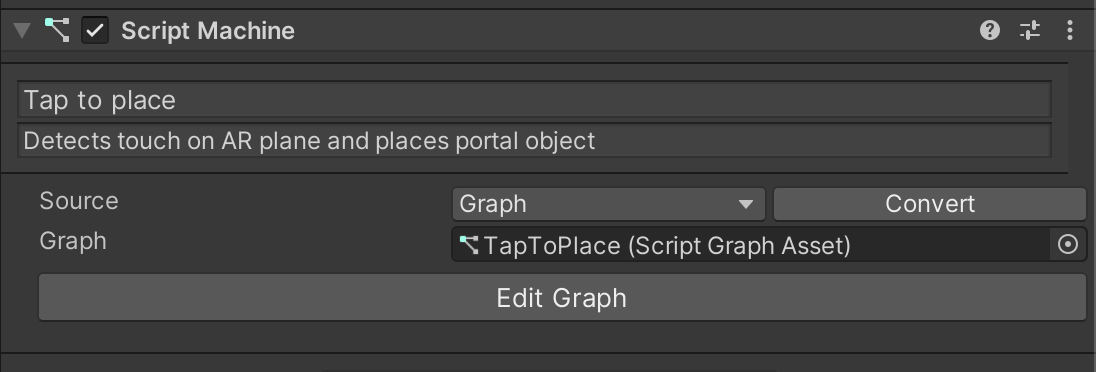
8. Select Edit Graph to open the TapToPlace script graph.
3. Add a debug UI to your app
Before you get started on your visual script, you should prepare to debug the app on your device.
Developing apps for a phone presents unique challenges for debugging. When the app is running on your device, there is no easy way to see errors in the console when they arise.
In situations like this, it can be helpful to implement a simple debugging user interface (UI) that displays directly on your device as the app is running. This can just be a simple text box that you can print messages to, to make sure that the app is working as you expect.
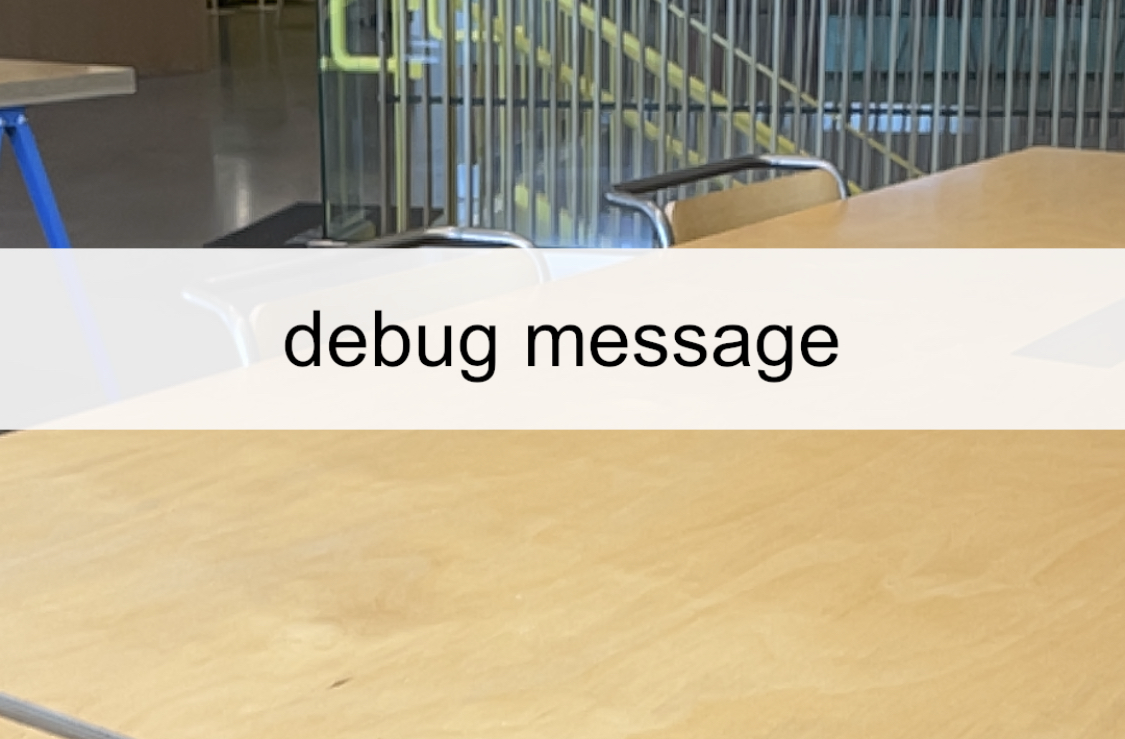
We have provided a simple UI for you to use, but feel free to customize its appearance.
Implement the debug UI
Follow these instructions to add a debug UI to your app and log a message:
1. In the Project window, go to _ARPortal > Prefabs > Testing.
2. Click and drag the Debug UI prefab from the Project window into the Hierarchy.
3. In the Hierarchy window, expand the debug UI and the Panel child GameObject, then select the Text GameObject.
4. In the Inspector window, find the Text component and try editing the Text property to change the text that appears in the Game view.
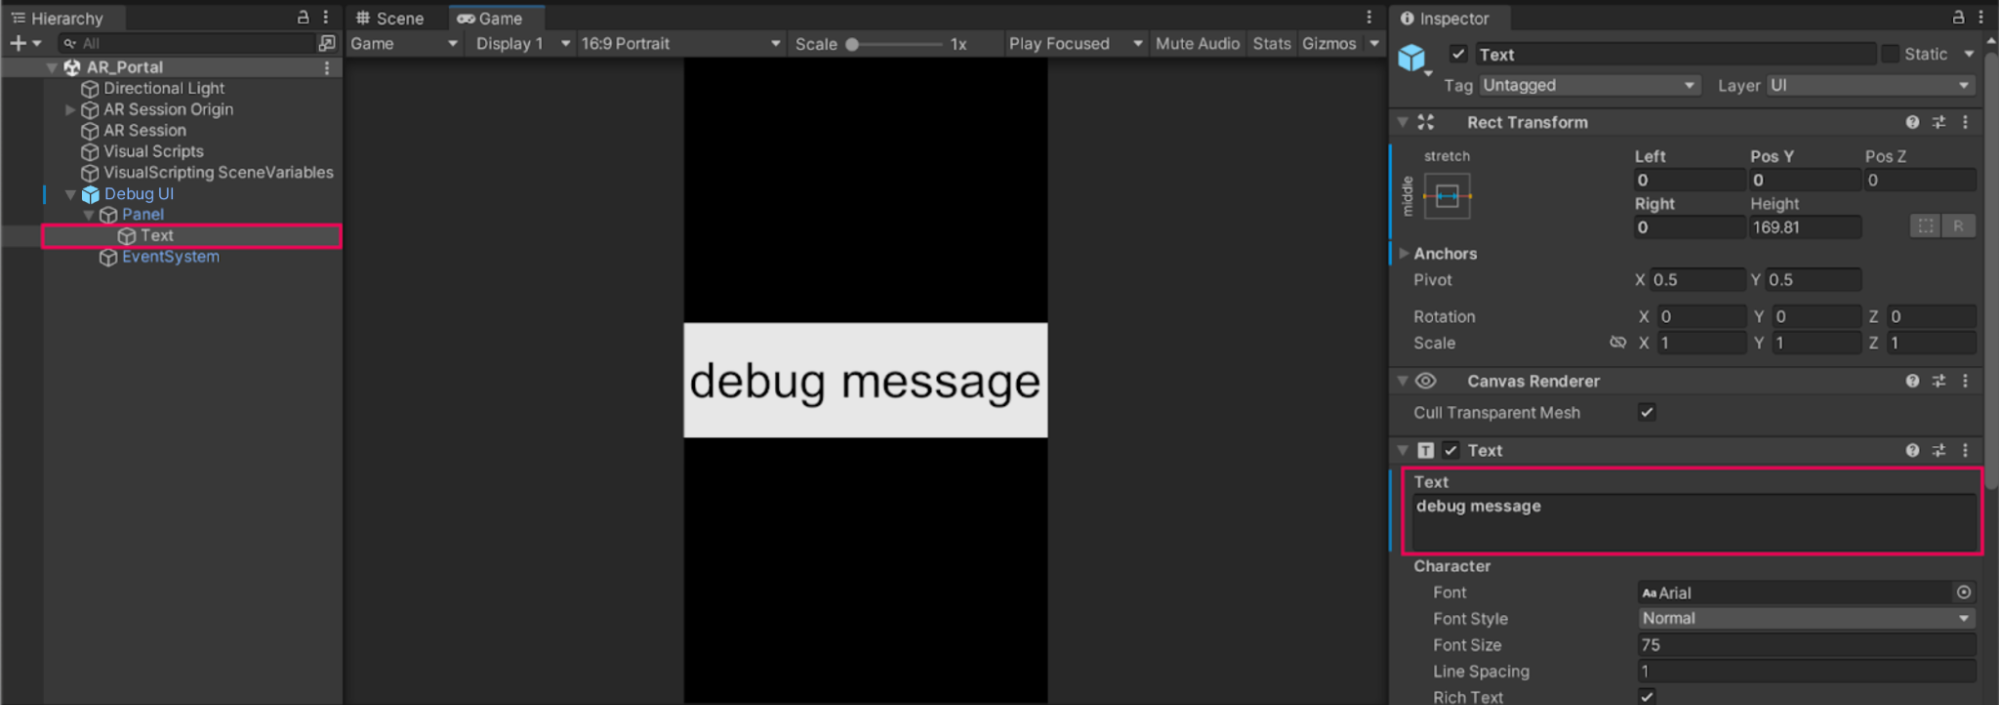
Note: The size of the font may appear differently than in the screenshot above, depending on the aspect ratio and resolution of your Game view preview window. This size difference is expected behavior.
4. Save your scene.
5. Build and run the app to preview the debug UI on your device.
4. Create a new variable for the debug message
The debug UI is ready to display any message you want. Next, you need to make sure you can actually change the content of that message while the app is running from a visual script. You can do this using a variable.
Follow these instructions to set up your debug UI text as a variable:
1. In the Script Graph window, go to the Blackboard and select the Object tab.

2. In the (New Variable Name) box, enter “debugText” and select Add (+).
3. Set the Type property to Text.
4. Select the Value property object picker (⊙) and choose Text.

5. Log a message to the debug UI
Now that you’ve set up the variable, you can change the debug message displayed at the start of your visual script.
Watch the video or follow the instructions below to see how it’s done.
Follow these instructions to change the debugText variable at the start of your visual script:
1. In the Graph Editor, use the fuzzy finder to add a Text: Set Text node. Connect the On Start node flow output to your new node.
2. Left-click the handle on the debugText variable and drag the variable into the Graph Editor, then connect it to the Text input of the Set Text node.
3. In the String input of the Set Text node, enter a custom message. For example, you could change it to “application started”.
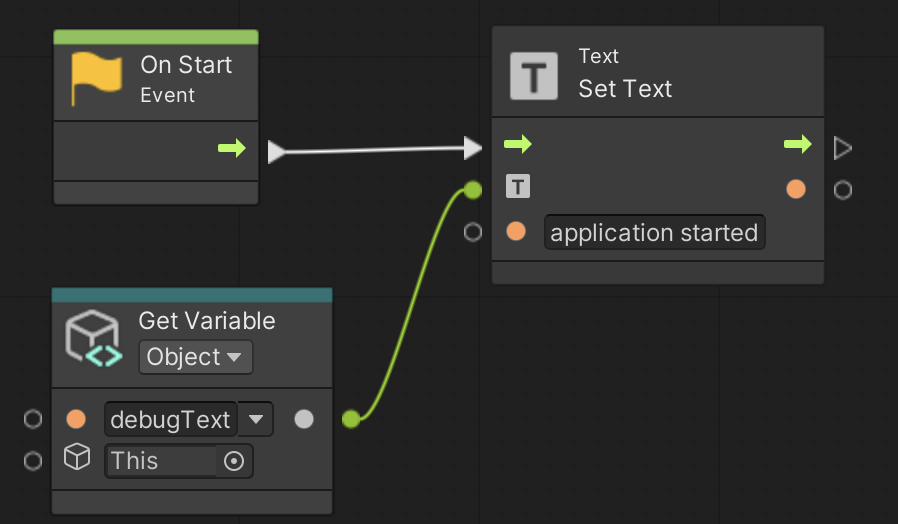
4. Test the app in Play mode or build and run the app to preview the new starting debug message.
6. Detect a touch
Next, you will add functionality to detect when the user has touched the device screen and send a message to the debug UI to verify that the touch detection is working correctly. The message should be something like, “touch detected”.
The new Input System in Unity uses events to detect and respond to user actions. It operates by listening for specific events defined in the Action Map configured by the user. When an action, such as a button press or screen touch occurs, an event is triggered. Once this event is triggered, you can specify which action or actions should follow by using additional visual scripting nodes
Watch the video or follow the instructions below to detect a touch and log the event to the debug UI:
1. In the Hierarchy window, select the Visual Scripts GameObject.
2. Add a new Player Input component.
The Player Input component requires an Input Action asset. In this project, we created one for you.
3. Click and drag the TouchControls Input Action asset from Assets > _ARPortal into the Actions property in the Player Input component.
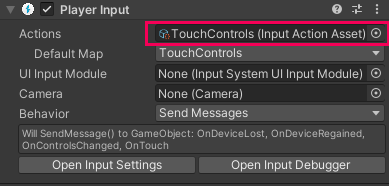
If you’re interested in learning more about the New Input System and how to create your own action maps, you can read more about it in the Input Action Assets documentation.
Now that you’ve added the Input Action component to the Visual Scripts GameObject, you can access it with an On Input System Event node.
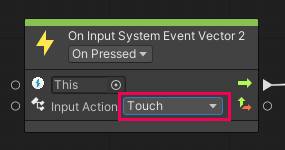
4. In the Graph Editor, use the fuzzy finder to add an On Input System Event Vector2 node.
This node will listen for an input event and send the Vector2 data of the event to the script. Later in this tutorial, you will use this Vector2 data to determine where the touch took place on the screen.
5. Set the Input Action dropdown menu on the On Input System Event Vector2 node to Touch. The Touch Input action is defined in the Touch Controls Input Action asset we created for you and that you assigned in the Player Action component earlier.
6. From the On Start event node sequence you created earlier, select and duplicate the Set Text and Get Variable nodes.
7. Connect the On Input System Event Vector2 node flow output to the flow input of the duplicated Set Text node.
8. In the duplicated Set Text node, change the String value message to something like “touch detected”.
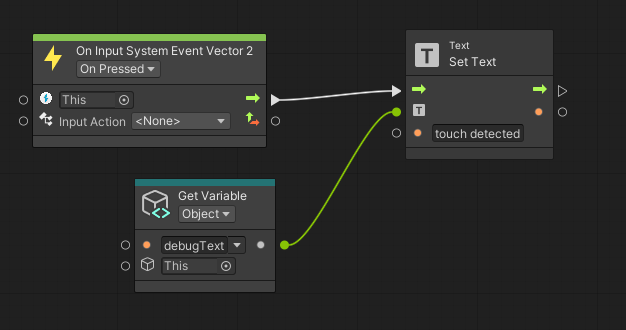
9. Build and run the app to preview the new functionality. When you touch the screen, the debug UI should display touch detected.
7. Get the touch position
In addition to checking whether or not a touch has occurred, you also need to determine the location of that touch on the screen. You can use the X and Y coordinates of the touch to determine whether or not the user successfully touched a horizontal or vertical plane.
The process to determine the touch position
The On Input System Event Vector 2 node has an additional output that contains the Vector 2 (X and Y) coordinates of the touch event. You can use that output to display where the user touched the screen.

You’re going to display these coordinates in the debug UIs text. However, the Set Text node will not accept a Vector2 input for its text — the input requires a String value.

In order to display the Vector2 coordinates from the On Input System Event Vector2 node using the String input on the Set Text node, you first need to convert those Vector2 coordinates into a compatible String format. You can do this using a To String node, which converts data into String format that can be used for text.
Display the touch position coordinates
Watch the video or follow the instructions below to get the touch position and display those coordinates in the debug UI:
1. In the Graph Editor, add a Vector 2: To String node and insert it in the sequence between the On Input System Event Vector2 and Set Text nodes.
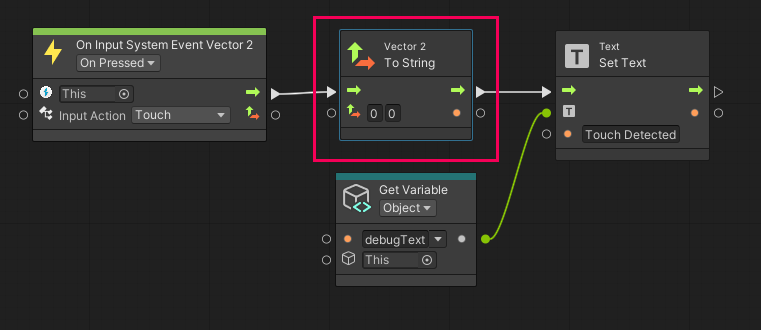
2. Connect the String output from the To String node to the String input of the Set Text node.
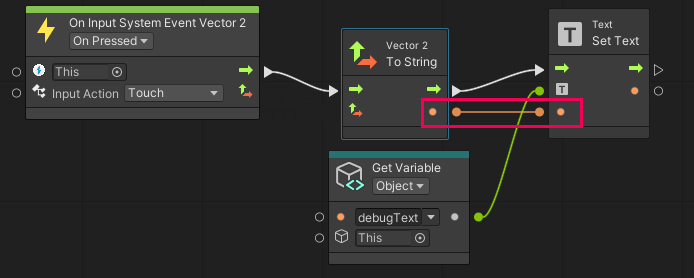
3. Connect the Vector 2 output from the On Input System Event Vector2 node to the Vector 2 input of the To String node.
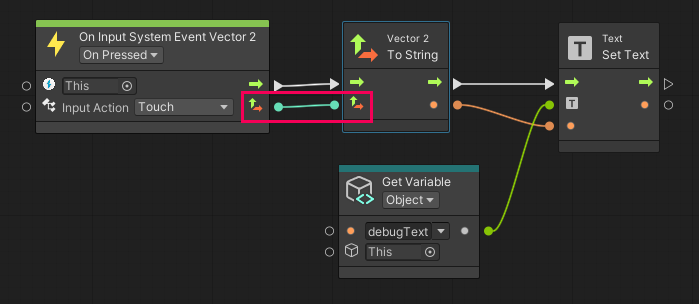
4. Build and run the app to preview the new functionality. As you touch the screen, the debug UI should display the touch position’s X and Y coordinates.
8. More things to try
If you want to further develop your skills, explore new concepts, or improve your project, check out some of the optional activities below. Each activity is identified as being either Easy, Medium, or Difficult, so you know what you’re getting into!
These activities are entirely optional, so if you’re not interested, no problem – just skip this step.
We do recommend attempting at least one of them in order to get the most out of this learning experience. Good luck!
Easy: Display a helpful starting message
In this tutorial, you displayed the text, “application started” on the debug UI to verify the UI was working properly. Displaying text at the start of an AR experience is often very useful, since it is an opportunity to tell users how to interact with the application. In this app, you could tell the user, “move the camera around slowly to detect a vertical/horizontal surface.” Try implementing a more helpful message like this at the start of your application.
Difficult: Create a touch visualizer
In the video demos throughout this tutorial, you probably noticed the small white circle that followed the touch position.
The small circle can be helpful for debugging, since it confirms precisely when and where your finger makes contact with the screen.
Use the following guidance for help completing this challenge:
- Use a screen space UI image in the shape of a circle for the visualizer.
- Create a new Script Machine named “TouchVisualizer” to control the functionality. It is helpful to keep this kind of extra functionality separate from your main script.
- Use the GameObject: Set Active node and the Transform: Set Position node to enable and position the UI circle.
9. Next steps
In this tutorial you detected a touch event and logged the coordinates in a custom debug UI. You then used the coordinates to verify that your visual scripts were working as expected. In the next tutorial, you’ll detect whether or not the user has touched a valid horizontal or vertical plane.