
Instantiate the portal on a plane
Tutorial
Beginner
+0XP
60 mins
Unity Technologies
You have done so much setup work for this portal: you’ve chosen your portal theme, set up plane detection, detected the user’s touch position, and raycasted into the scene to determine whether or not the touch was on a valid plane. In this tutorial, you will actually spawn (or instantiate) the portal GameObject onto the selected plane in your environment.
1. Overview
You have done so much setup work for this portal: you’ve chosen your portal theme, set up plane detection, detected the user’s touch position, and raycasted into the scene to determine whether or not the touch was on a valid plane. Now you will actually spawn (or instantiate) the portal GameObject onto the selected plane in your environment.
By the end of this tutorial, your project will look something like the video demos below.
The trickiest aspect of spawning this portal in your scene will be only spawning one of them. You will need to use a new If node to make sure that you don’t accidentally spawn hundreds of portals at once.
Let’s get started!
2. How do you instantiate an object?
When you spawn a new object (GameObject) in a scene it is often referred to as instantiating, as you are creating a new instance (version) of an object. In this case, you’ll create a new instance of a portal prefab.
When you instantiate this object, you’ll need to define the following inputs:
- The prefab to use as the Original
- The Position of the new instance
- The Rotation of the new instance
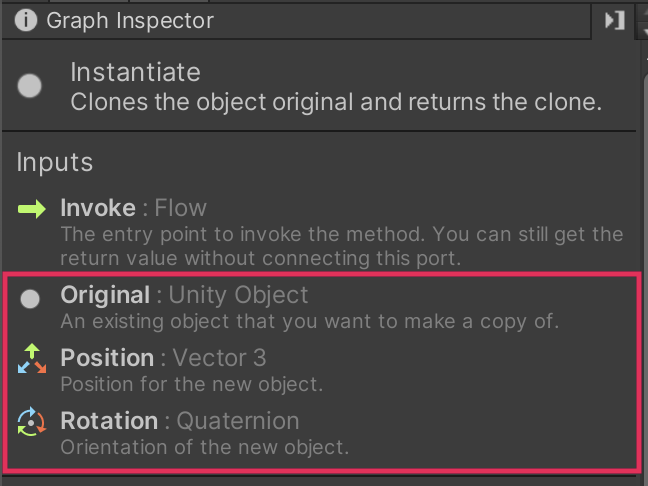
Let’s break down each of these inputs.
Original
For the Original input, you’ll select the prefab you want to instantiate. If your app detects horizontal planes on tables and floors, you’ll select a horizontal portal that you can peer down into. If your app detects vertical planes on walls and doors, you’ll select a vertical portal that you can peer through like a window.
The portals are located in _ARPortal > Prefabs > Portals — we have provided a horizontal and vertical option for all three of the environments.

Position
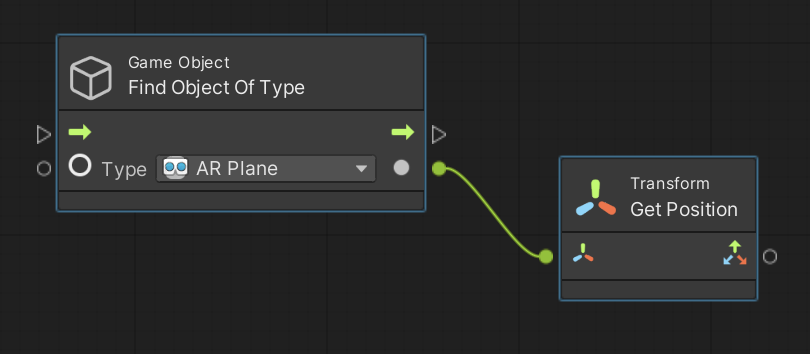
The goal is to position the portal at the same position as the plane. In order to get the position of the plane, you’ll use the Find Object Of Type node and the Transform: Get Position node. You can then use that same position when you instantiate the portal GameObject.
Rotation
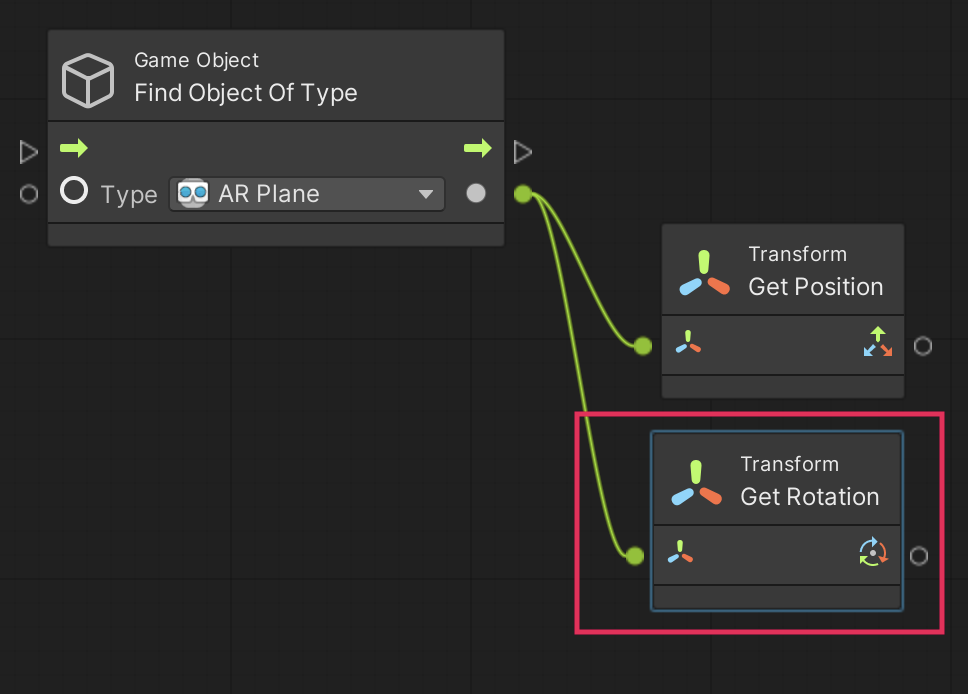
The portal’s rotation should also match the plane’s rotation. Just as you used the Transform: Get Position node to get the plane’s position, you’ll use the Transform: Get Rotation node to get the plane’s rotation.
3. Instantiate the portal
Now that you understand the approach for instanting this portal, watch the video or follow the instructions below to update your visual script:
1. Check that you have the TapToPlace script graph open in the Script Graph window.
2. In the Graph Editor, at the end of the On Input System Event sequence, add a new Game Object: Find Object of Type (Type) node. Set the Type input to AR Plane.
3. Add a new Game Object: Instantiate node and connect it to the end of the sequence. Make sure to select the Instantiate node with the three inputs: Original, Position, and Rotation.
4. For the Original input, use the object picker (⊙) to select either a horizontal or vertical portal prefab.
5. For the Position input, create a Transform: Get Position node. Attach the Find Object of Type node output to your new Get Position node, which then connects to the Position input of the Instantiate node.
6. For the Rotation input, create a Transform: Get Rotation node. Attach the Find Object of Type node output to your new Get Rotation node, which then connects to the Rotation input of the Instantiate node.
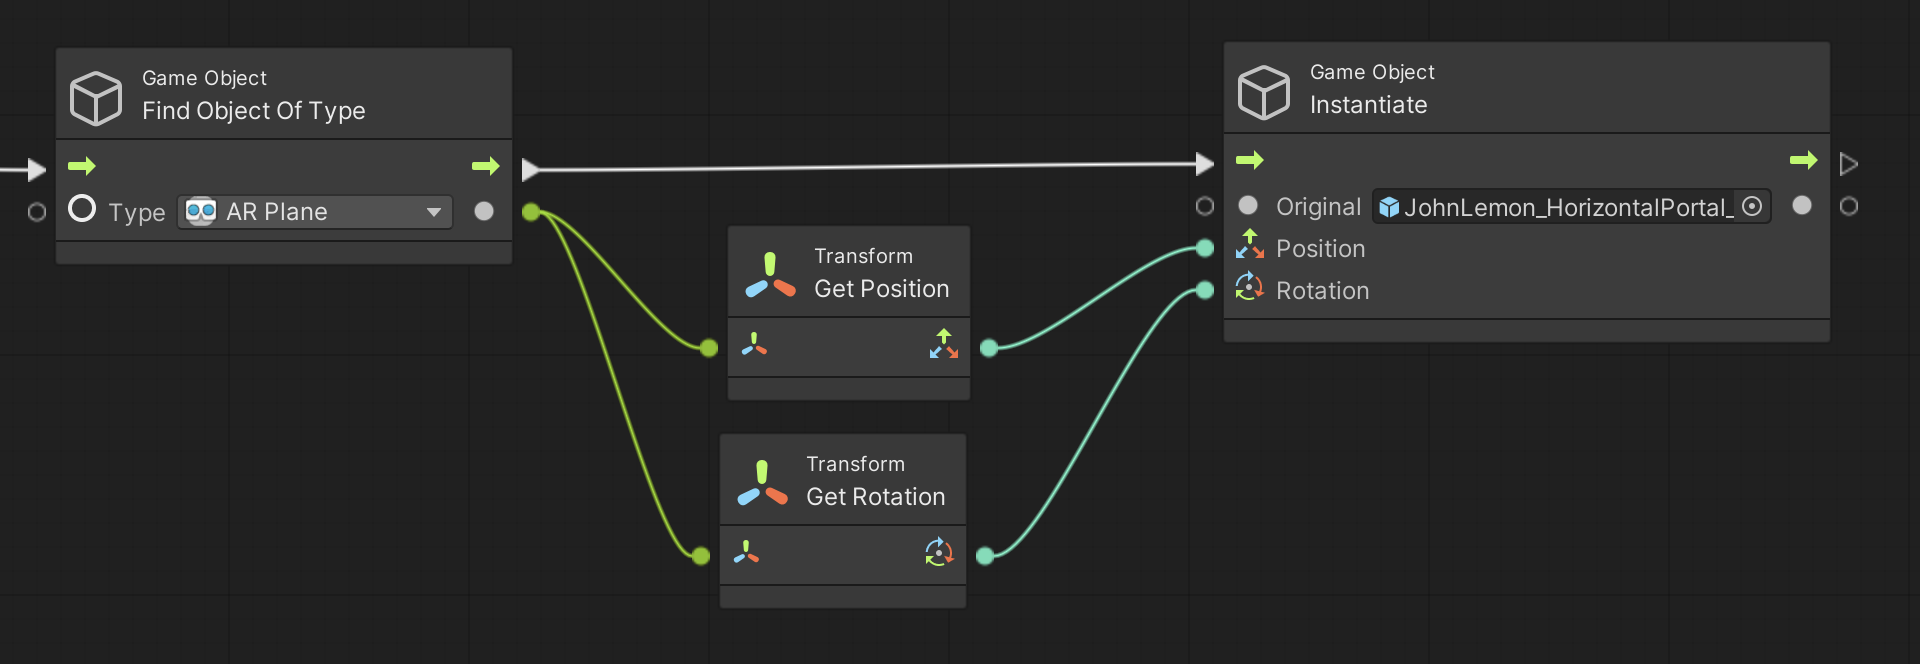
7. Build and run the app to preview the new functionality.
When you touch a valid plane, a portal should spawn at the center of the plane.
Vertical plane troubleshooting
Important: If you’re using vertical planes and portals, you'll notice that the portal spawns rotated downward rather than flat against the wall (as shown below).
Don’t worry – you’ll fix this in the next step!
4. Fix the vertical portal’s rotation
If you are using a vertical portal, complete this step to fix the portal’s spawn rotation. If you are using a horizontal portal, you don’t need to complete this step, but we recommend that you read through it anyway to better understand how to orient objects on planes.
If you tried to create a vertical portal, you’ll have noticed that the portal spawned facing downward.
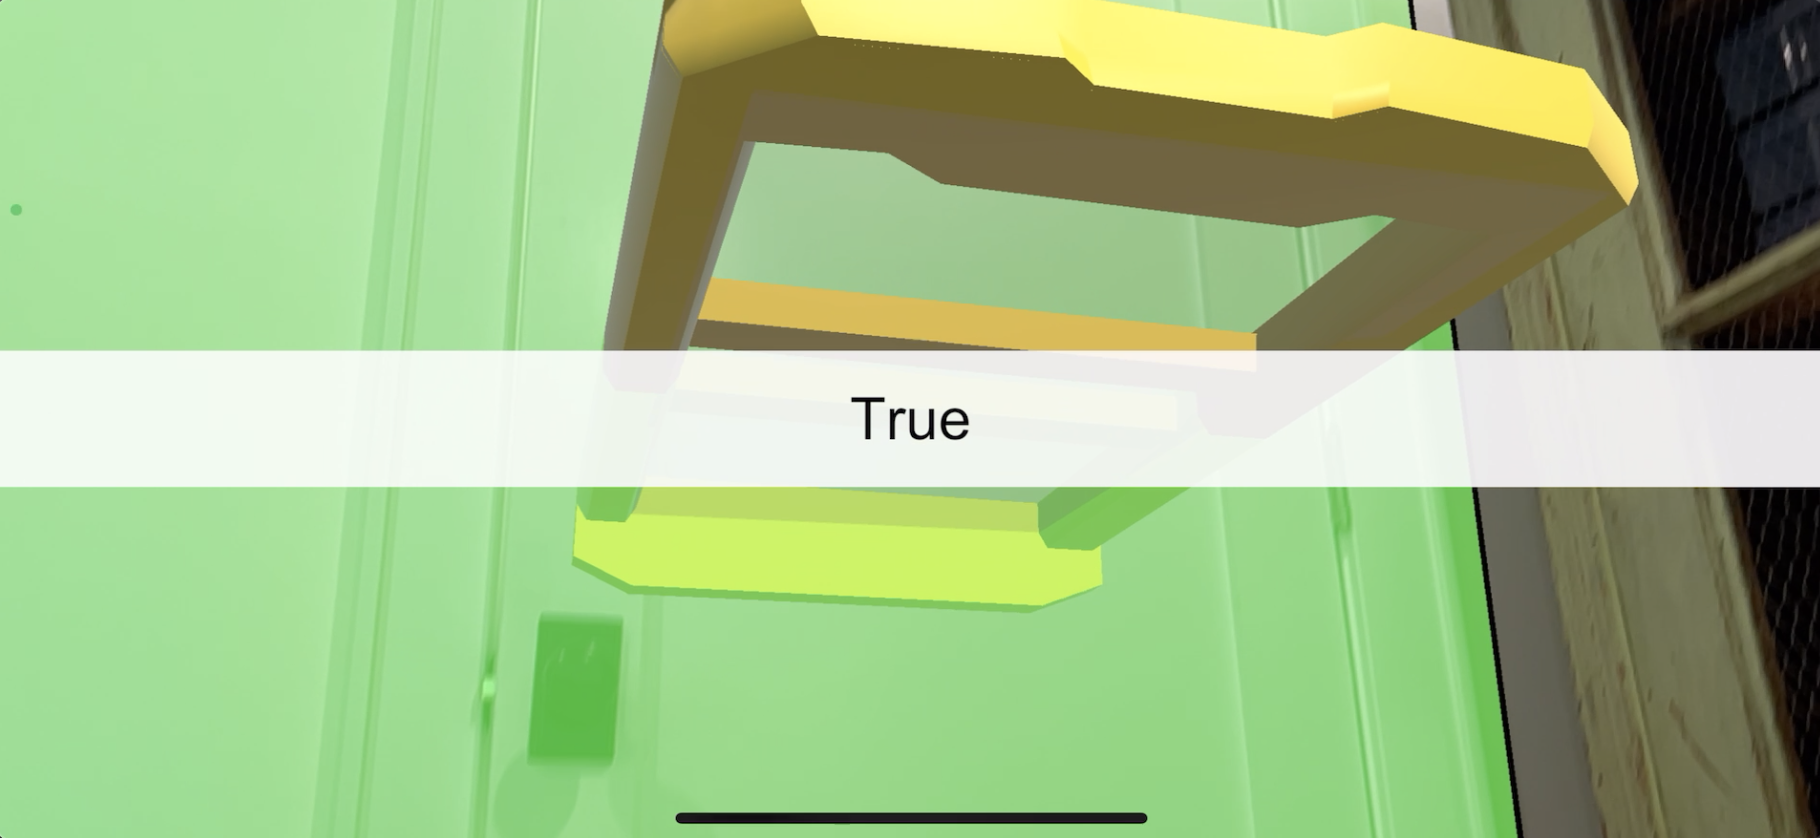
The problem is that vertical planes are rotated 90 degrees from the floor. When you set your portal’s rotation to match the plane’s, this will also rotate the portal 90 degrees from the floor.
To visualize this, the image below shows how a vertical portal would spawn on a horizontal plane.
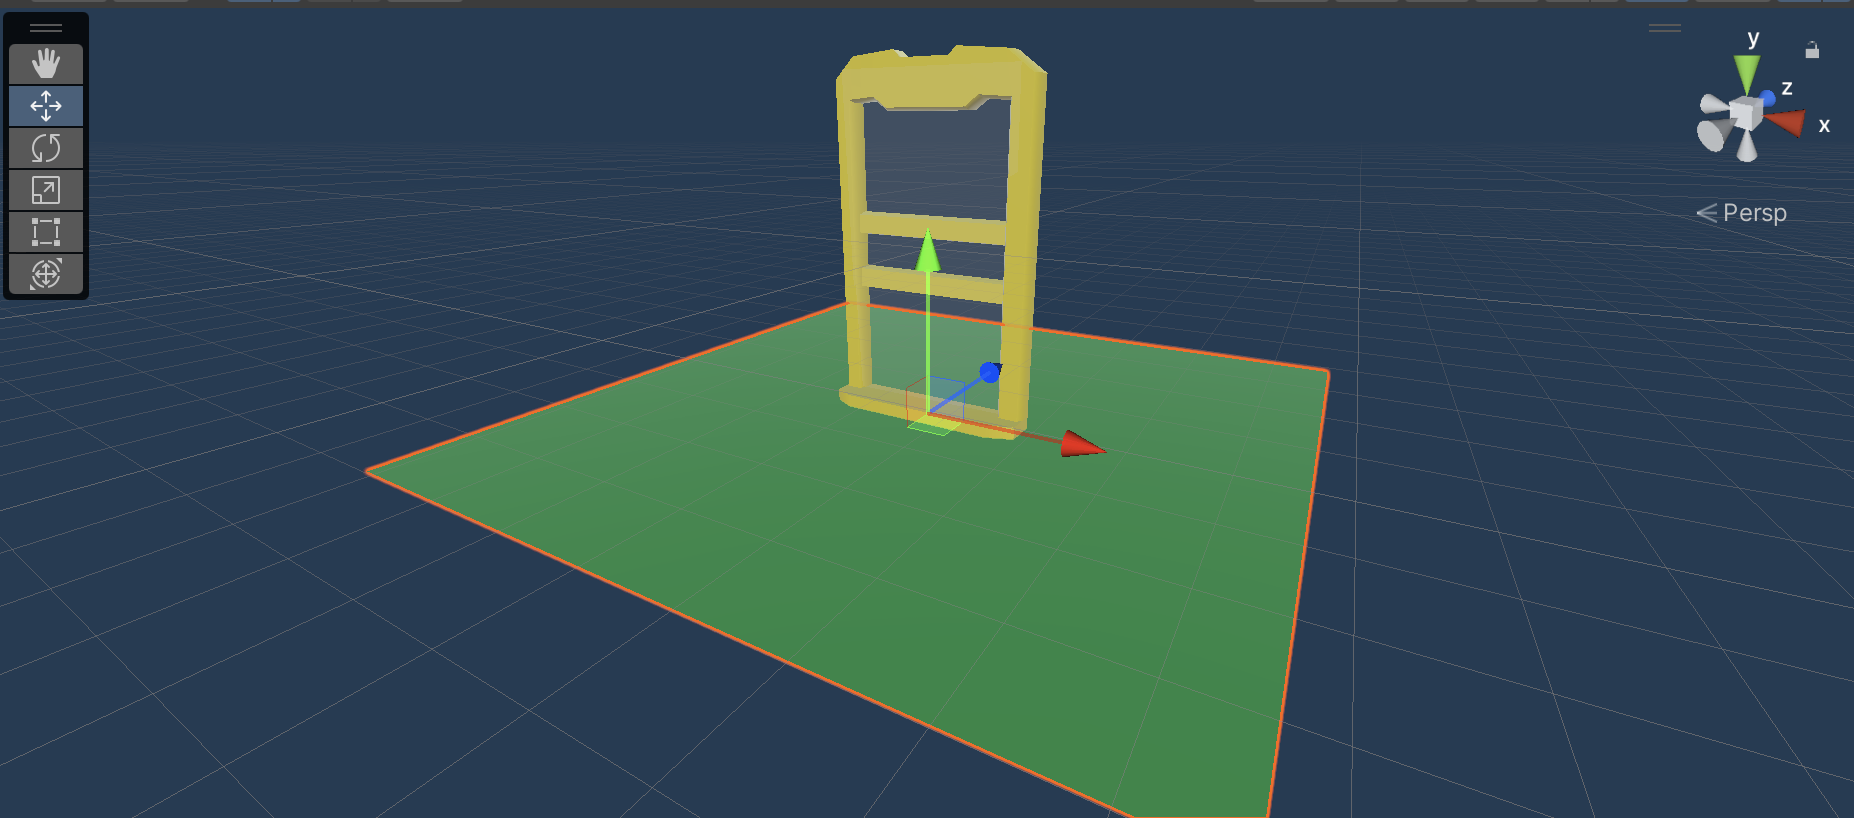
But notice what happens when the plane is rotated by 90 degrees to the position of a vertical wall — the portal rotates downward.
To fix this downward rotation, the portal window needs to be rotated backwards to lie flat so that when it spawns on a vertical plane, the portal is vertical too.
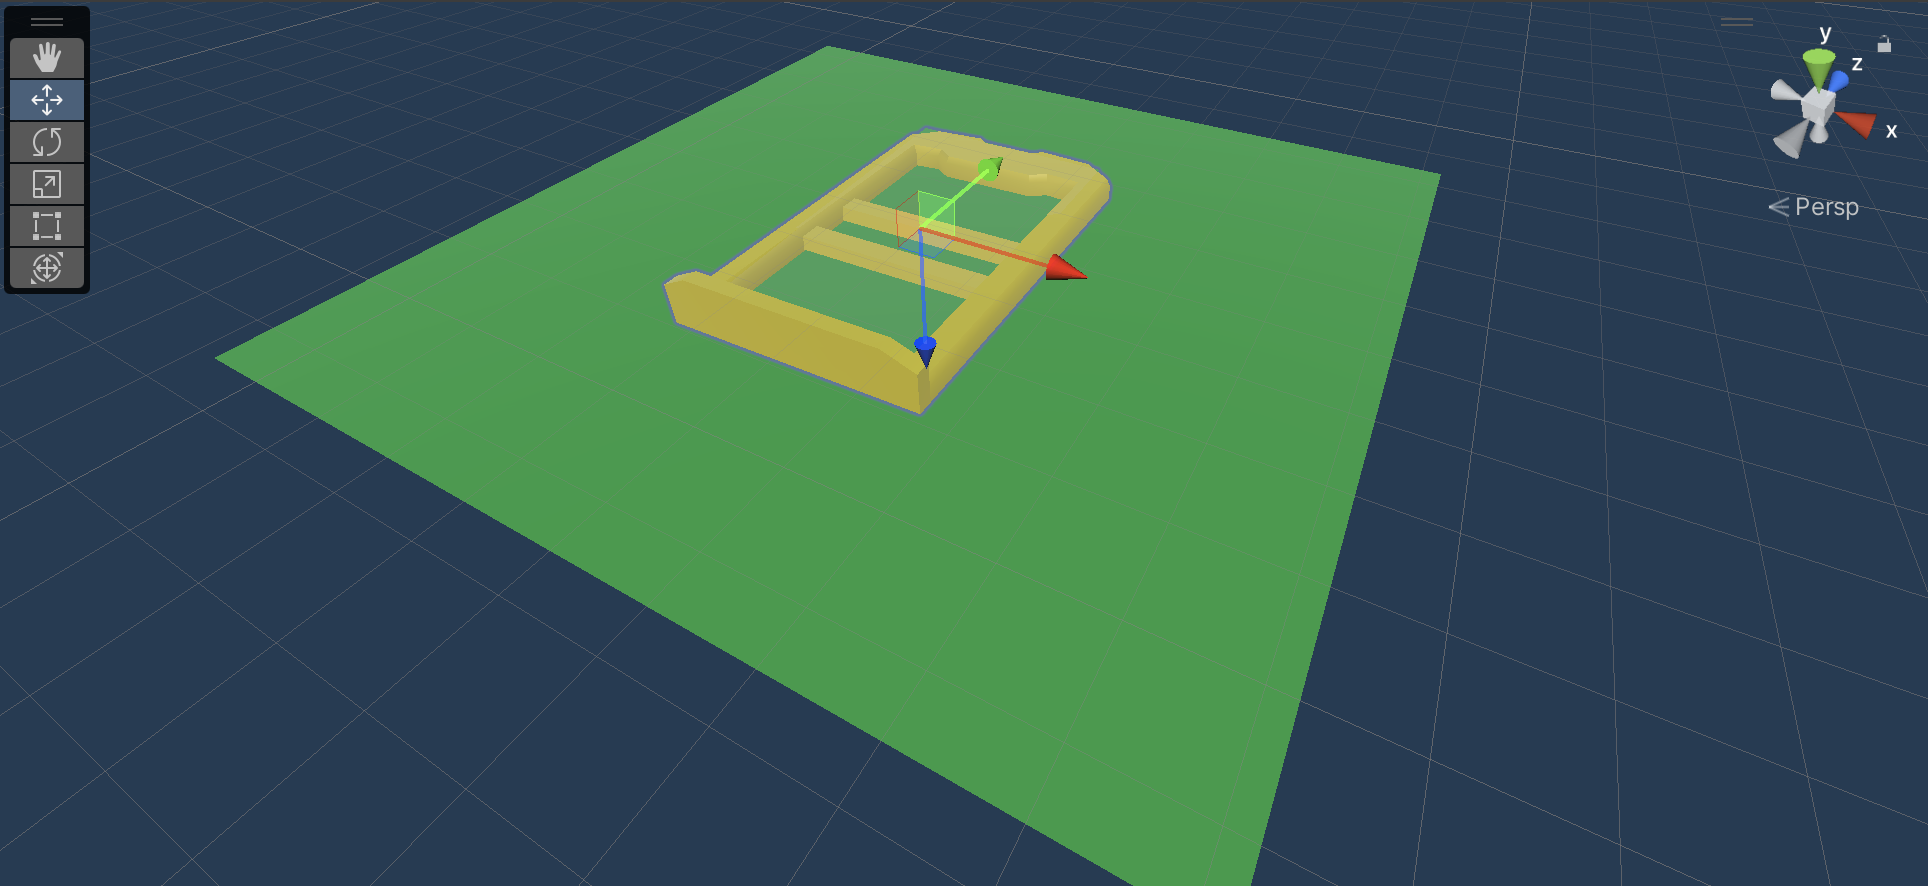
Follow these instructions to rotate your vertical portal and have it spawn flat against a vertical plane:
1. From the Project window, go to _ARPortal > Prefabs > Portals, then double-click the portal you’re using to open the prefab in the Scene view.
2. In the Hierarchy window, select the Window GameObject, then rotate it by 90 degrees so that it is facing upward in the Scene view. The outside face of the window should point in the direction of the green y-axis arm of the Scene gizmo and the top of the window should point in the direction of the blue z-axis arm.
Important: You must rotate the child Window GameObject — not the parent GameObject. The top-most parent GameObject’s rotation gets reset when it is instantiated, so any edits to this parent GameObject’s rotation will be overridden.
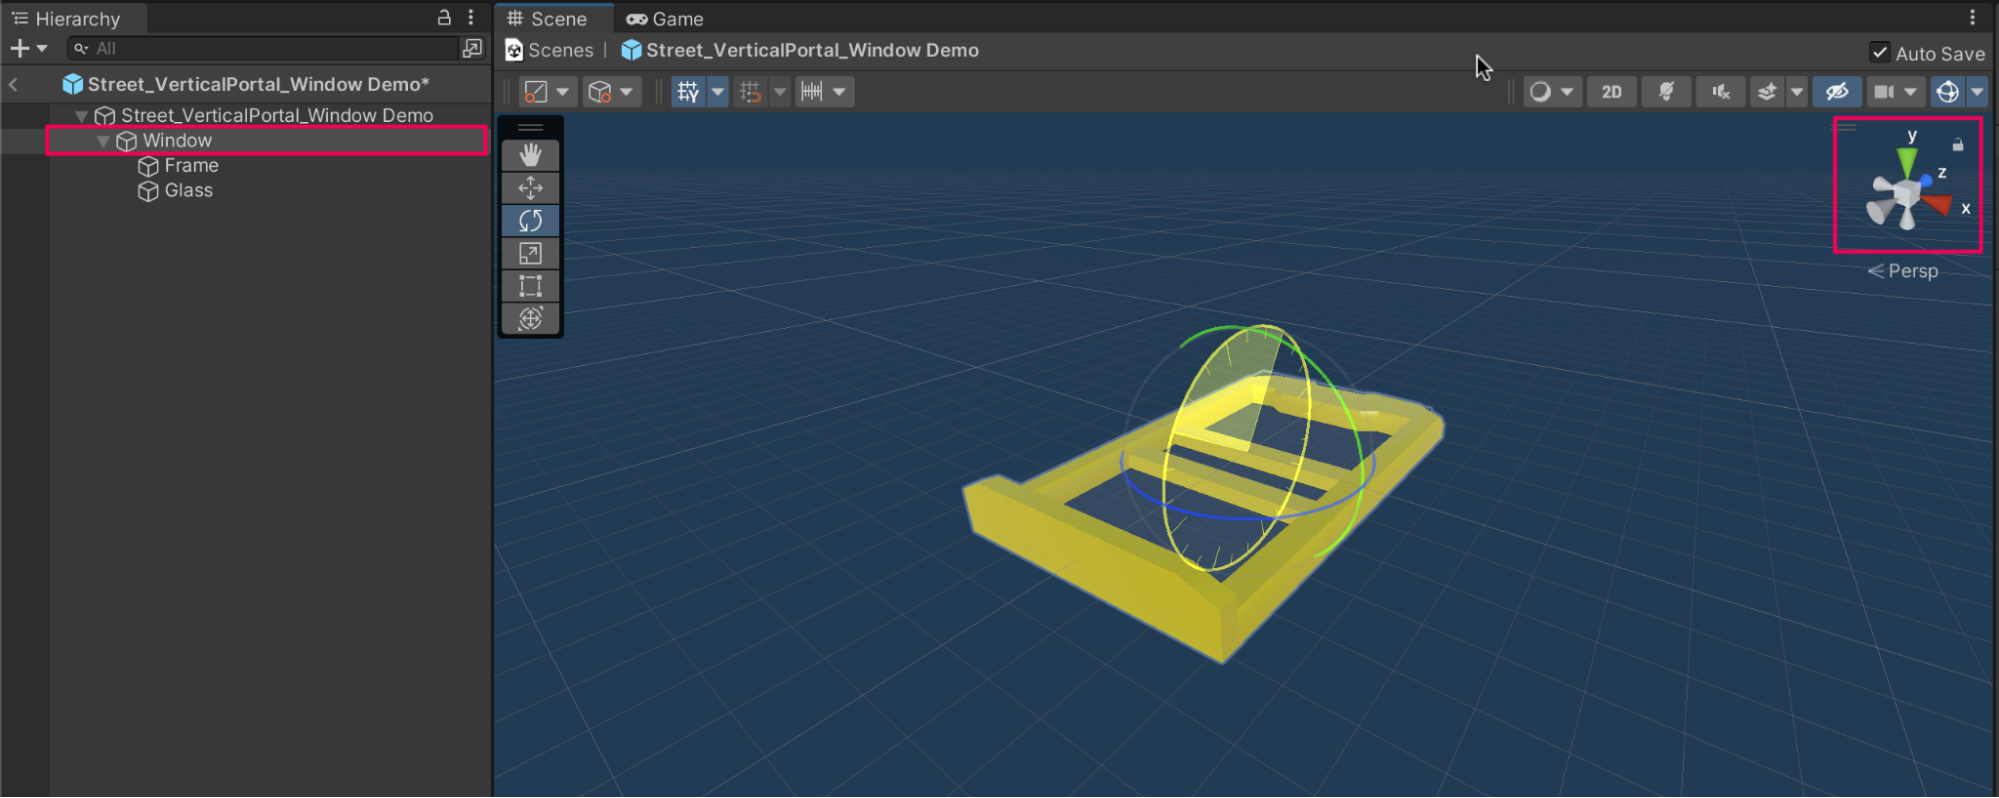
3. Build and run the app to preview the new functionality. When you instantiate the vertical portal, it should lie flat against the vertical plane, oriented correctly.
5. How to limit an action to only run one time?
In the previous step, it may have seemed like you were only spawning a single portal onto the plane — but in reality, you may have actually spawned hundreds of portals!
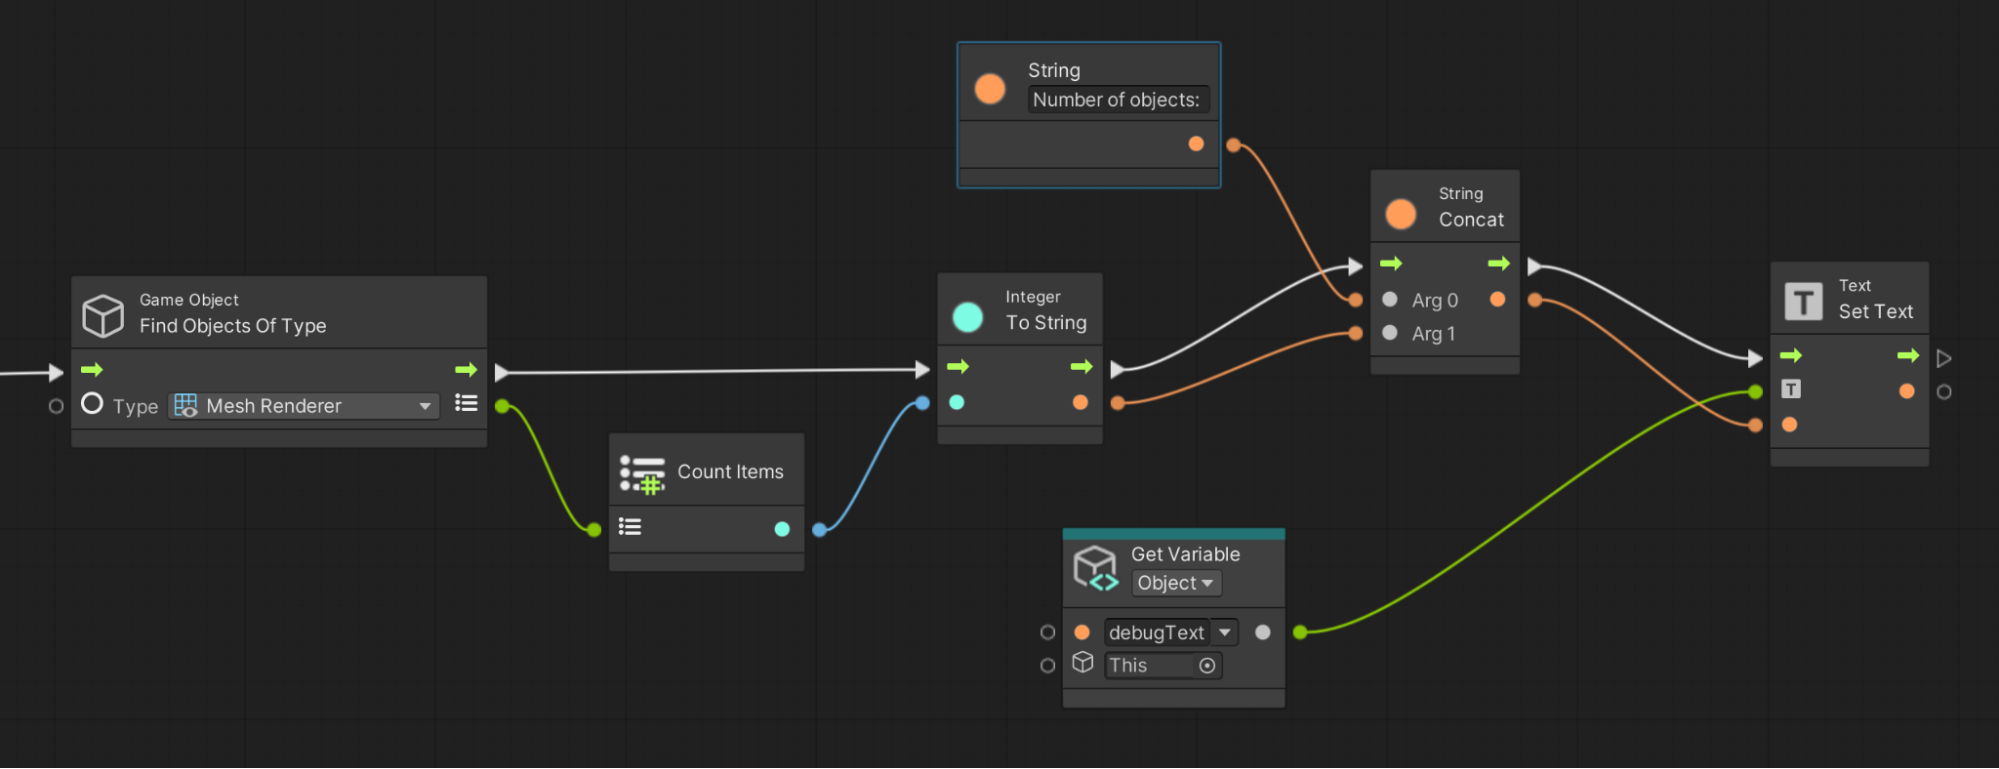
The debug UI in the video below displays the current number of objects in the scene. As you will see, portals are generated continuously while the user’s finger is touching the screen.
Spawning multiple portals may not seem like a huge problem right now, but once you have an entire scene spawned within the portal, instantiating more than one portal could severely slow down the app.
The process to spawn a single portal
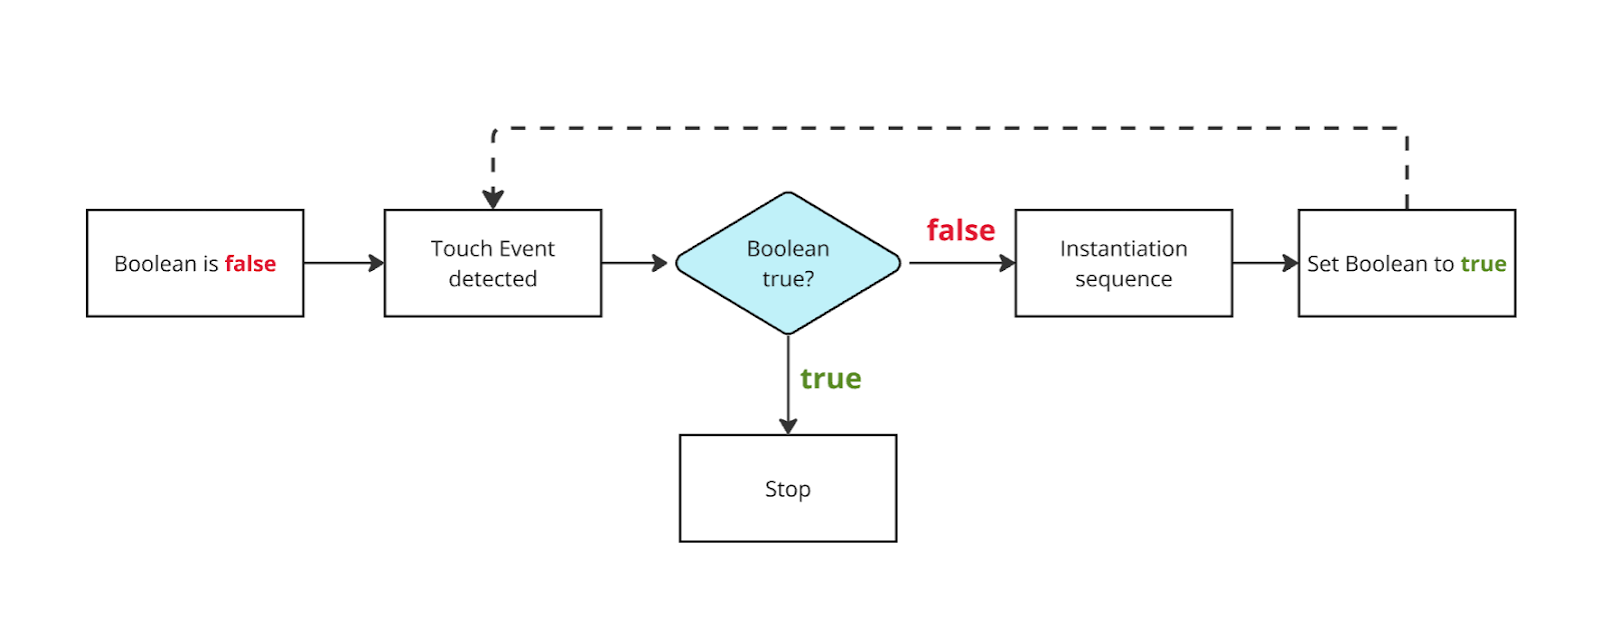
You can avoid spawning many portals by preventing the node sequence from running more than one time. You can use a Boolean to limit the number of times a sequence runs using the following logic:
- Create a Boolean variable and set it to false by default.
- At the end of the node sequence, set the Boolean to true.
- Only run the sequence if the Boolean is false.
The diagram below visualizes the Boolean logic.
Note: If you want to display the number of objects spawned in your own app’s Debug UI, check out the visual script below. This is entirely optional.
6. Set the Boolean values
As you learned in the previous step, setting up this Boolean logic is a three-stage process. Stage one and stage two are laid out below.
Stage 1: Create the Boolean variable and set it to false
Follow these instructions to set up a new Boolean variable:
1. Check that the TapToPlace script is open in the Script Graph window.
2. In the Object tab of the Blackboard, add a new variable named “portalSpawned” and set the Type to Boolean.
3. Make sure to leave the checkbox disabled, which means it is false by default.

Stage 2: Set the Boolean to false at the end of the sequence
Watch the video or follow the instructions below to set the Boolean value to false:
1. After the Instantiate node, connect a Set Object Variable node. Set the variable Name to portalSpawned.
2. Connect the New Value input node to a new Boolean Literal node.
3. Enable the checkbox in the Boolean node to set the new value to true.
7. Use an If node to run the sequence only once
The portalSpawned Boolean will now be set to true after the first instantiation sequence runs. The final stage of this process is preventing the sequence from running again when the portalSpawned Boolean is true. You will use the If node to implement this logic.
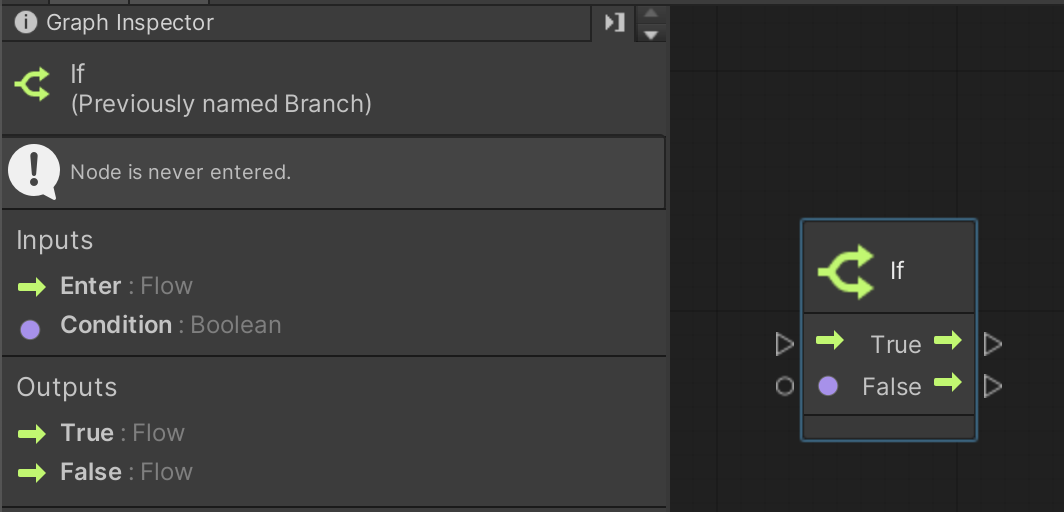
The If node has Boolean Condition input as well as True and False outputs. This allows you to plug in a Boolean, then initiate one sequence if that Boolean is true or another sequence if the Boolean is false.
Watch the video or follow the instructions below to check if the portalSpawned Boolean is false at the start of your script:
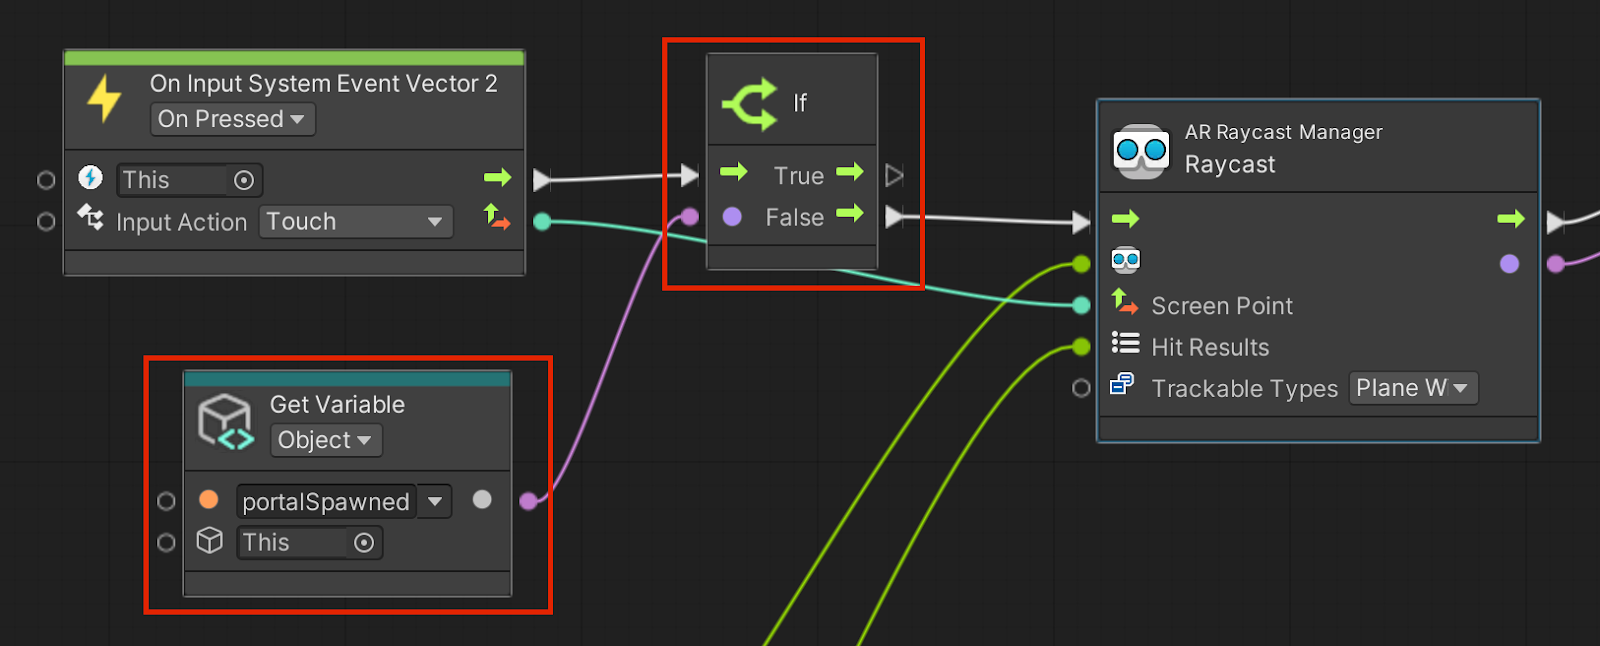
1. At the start of the On Input System sequence, add a new If node directly after the On Input System Event Vector2 node, and connect the Enter input of the If node with the output of the On Input System Event Vector2.
2. Connect the Condition input of the If node to a Get portalSpawned variable node. This is an alternative method to dragging the variable in from the Blackboard.
3. Connect the False output flow of the If node to the rest of the sequence. The rest of the sequence will now only run when portalSpawned is false.
Test the new Boolean control
You should now only be able to spawn a single portal in the scene. To test this, try to spawn a portal on the first plane that appears, then try to spawn a second portal on the second plane that appears. You should now not be able to spawn a second portal.
As an optional challenge for your visual scripting skills, you could also use the debug UI to display the current Boolean value, as in the example above.
8. Disable all planes after a portal spawns
After a valid portal appears, all existing AR planes should be removed in the app and no new AR planes should appear. The focus should be entirely on the single portal in the scene — not on distracting, non-functional, semi-transparent planes.
Conveniently, the AR Plane Manager includes the following two nodes:
- AR Plane Manager: Set Trackables Active, which you can use to deactivate all existing planes.
- AR Plane Manager: Set Enabled, which you can use to disable the entire AR Plane Manager, preventing any new planes from generating.
To use these nodes, you need to create a new AR Plane Manager variable.
Watch the video or follow the instructions below to disable all existing and newly-detected planes:
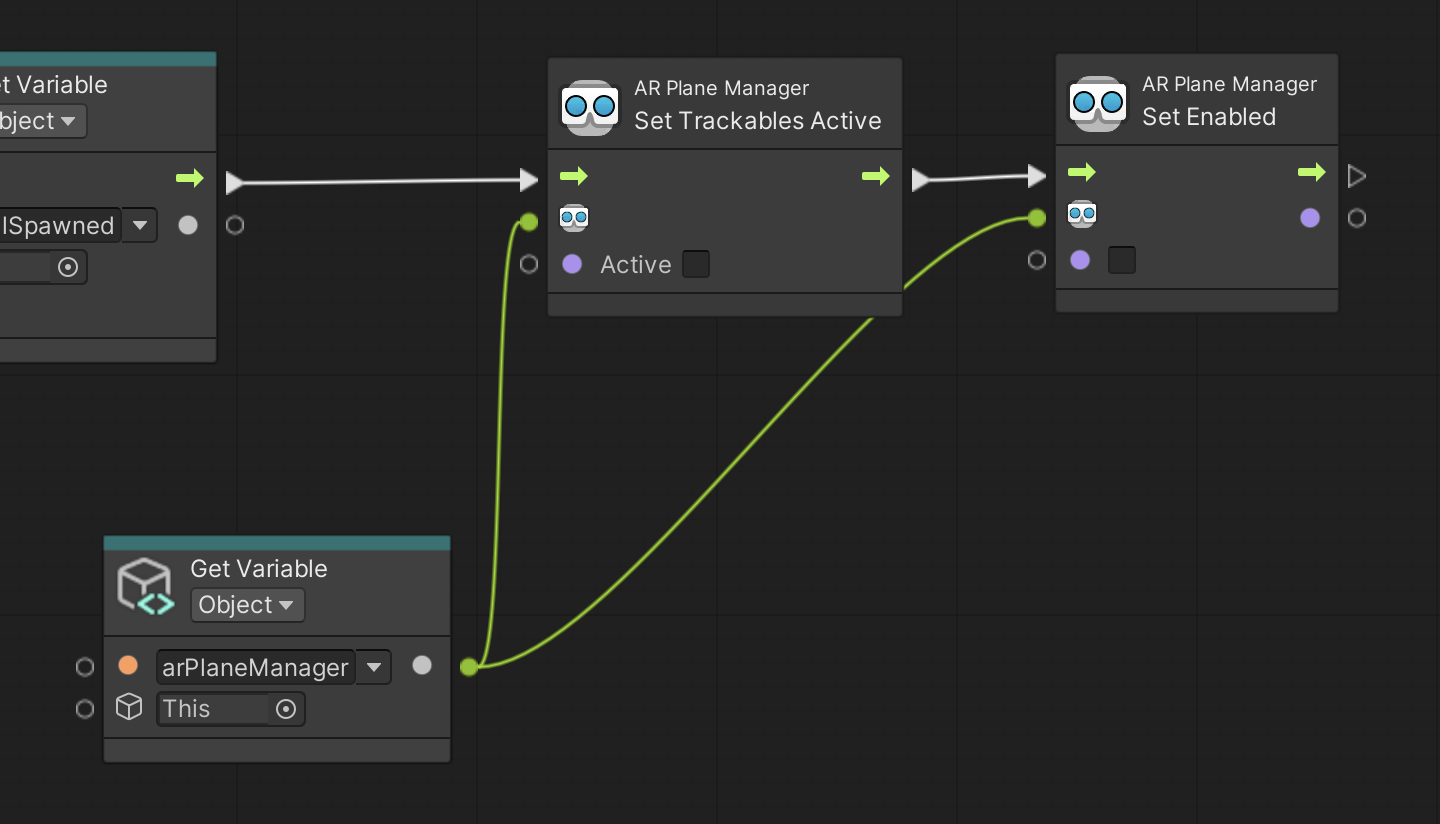
1. In the Object tab of the Blackboard, create a new variable named “arPlaneManager” and set its Type to AR Plane Manager. Use the object picker (⊙) to select the AR Session Origin GameObject.
2. At the end of the sequence, add a new AR Plane Manager: Set Trackables Active node. Make sure the new node’s Active checkbox is disabled, which deactivates the trackable planes.
3. At the end of the sequence, add an AR Plane Manager: Set Enabled node. Make sure the node’s checkbox is disabled, which disables the plane manager.
4. Connect both of the new nodes’ AR Plane Manager inputs to your arPlaneManager Object variable.
5. Build and run the app to preview the new functionality. When a portal is spawned, all planes should disappear and no new planes should be detected.
6. After you have verified that the app is working as expected, it's a good time to disable the Debug Canvas GameObject and disconnect all nodes related to the Debug UI nodes.
9. More things to try
If you want to further develop your skills, explore new concepts, or improve your project, check out some of the optional activities below. Each one is tagged as either Easy, Medium, or Difficult, so you can choose the level of challenge.
These activities are entirely optional, so if you’re not interested, no problem – just skip this step.
We do recommend attempting at least one of them in order to get the most out of this learning experience. Good luck!
Easy: Add a particle effect when the portal spawns
Spawning a portal is a very magical and mysterious experience – it would be much more exciting for the user if there were some visual effects (VFX) to accompany the spawning action. Use the following guidance for help completing this challenge:
- You can create your own particle effect or download one from the asset store.
- You can use the same instantiation technique you used for the portal to instantiate the particle system – or you could even attach the particle system as a child object of the portal window itself.
If you need more guidance, you can learn more about VFX in Creative Core: VFX.
Medium: Add a sound when the portal spawns
It would be more satisfying and apparent to the user if there was a sound that accompanied the spawning event. Try adding a sound to your portal spawn sequence. Use the following guidance for help completing this challenge:
- Create a new Audio Source GameObject in your scene and assign a sound effect to its Audio Clip property.
- Use the Audio Source: Play node to play a sound when your portal spawns.
If you need more guidance, you can learn more about audio in Creative Core: Audio.
Difficult: Only allow one plane at a time
It can be a bit overwhelming for the user if there are a lot of planes detected in the environment. Instead, it might be a better user experience if only one detected plane can be present in the scene at a time. Use the following guidance for help completing this challenge:
- Create a new script machine named “LimitPlanes” to control the functionality. It is helpful to keep this kind of extra functionality separate from your main script.
- Use the Count Items node and the Game Objects: Find Objects of Type node to get the current number of GameObjects of type AR Plane.
- Use the Greater or Equal node and the If node to detect whether there is one or more AR planes in the scene.
- If there are one or more planes in the scene, disable the AR Plane Manager.
- Use the Null Check node to only run this sequence if the AR Plane Manager exists.
Note: The debug UI displaying the current number of planes is only for demonstration purposes. It is not required for this challenge.
10. Next steps
In this tutorial, you successfully controlled the instantiation of a single portal onto a plane detected in the environment. In the next tutorial, you will design an entire scene behind the portal window and make sure it is optimized for mobile performance.