
Explore the example game
Tutorial
intermediate
+10XP
20 mins
(20)
Unity Technologies
In this tutorial you’ll explore an example AR game and make some basic customization to its settings.
1. Overview
In this tutorial, you’ll add a sample platformer game to your project from a Mars template. You’ll explore the game in the Unity Editor, changing its configuration to consolidate your understanding of key Unity Mars concepts.
2. Set up the game template
Follow these instructions to install the sample game in your Unity project:
1. In the main menu, go to Window > Content Manager.
2. Select the Unity MARS Platformer Template.
3. Select Install.
4. When the Import Unity Package dialog window appears. Check that all assets are included and then select Import.
5. In the main menu, go to Window > MARS > Choose Template.
6. Select the Game - Simple template. The game scene will load in the Scene view.
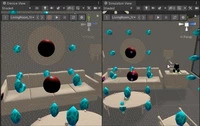
When the template is open, you should see a small robot character and nine blue crystals in a grid pattern on a horizontal plane in the Scene view. You will also see these digital objects in the Simulation view and Device view windows.
3. What are the main features of the sample game?
In the simple sample game for Unity Mars, the player can control a robot character and collect crystals from various surfaces.
The sample game was created to demonstrate the following key concepts for Unity Mars:
- How you can replicate and configure digital objects in your AR experience — for example, to change the position of collectible objects in a game.
- How you can use digital objects to create surfaces over tracked planes and configure dynamic characters to use those surfaces — for example, so that a digital character can travel over a physical table in the app user’s room.
- How you can organize Proxies into Proxy Groups to create more complex AR experiences with greater control.
In this tutorial, you’ll start with the basics and explore the first two concepts. You’ll customize the game yourself with Proxy Groups and learn more about additional Unity Mars concepts in the next tutorial.
4. Replicate digital objects
You can instruct any AR app you create to associate a single instance of a digital object prefab with a particular Proxy (or Proxy Group) that your app discovers. However, if you want to associate multiple instances of a prefab with many matching objects in the real world, it’s most efficient to use a Replicator.
You can use a Replicator to replicate a Proxy whenever the matching conditions that you set are met. For example, you can set up a Proxy with a plane condition so that part of an AR app's digital environment appears on top of it when it gets matched. If you then put this Proxy into a Replicator, it will replicate that Proxy on every other real-world object that matches the condition.
The Proxy for the crystal collectible object in the game is controlled by a Replicator. Follow these instructions to configure the Replicator for the crystal:
1. In the MARS Panel Content Hierarchy, select the foldout to expand Place crystals on all reasonable sized surfaces.
2. In the Content Hierarchy, select the Horizontal Surface GameObject.
3. In the Inspector, find and expand the Alignment Condition MARS component. Alignment is one of the conditions that you can use to control how a proxy matches with real world objects.
4. Set the Alignment property to Nothing. The crystals will disappear from the Simulation view.
5. Set the Alignment property to Vertical. In the Simulation view, the crystals will be displayed on all vertical surfaces.
5. Create surfaces on real world objects
If you want digital objects to be able to interact with the physical world, you need to use Mesh Colliders. For example, for the robot character in the sample game to be able to travel over a table, you need to set a Mesh Collider on all surfaces that match the appropriate Proxy conditions for the character movement. You can do this with Unity Mars using the Build Surface Action Mars component.
Follow these instructions to explore how Build surface action works in the sample game:
1. In the MARS Panel Content Hierarchy, select Put colliders on all walkable surfaces.
2. Expand the Put colliders on all walkable surfaces GameObject to review its replicated Proxy child GameObjects.
3. Select one of the Surface that can fit character (Clone) child GameObjects.
4. In the Inspector, find and expand the Plane Size Condition MARS component. You can use this component to set a minimum size, so the Proxy only matches with objects that meet or exceed that size. This means that the robot character will always have a large enough base to land on.
5. Find and expand the Build Surface Action MARS component. This is used alongside a Mesh Collider or Mesh Filter component to create a mesh from the matched surface.
6. Find and review the Mesh Collider component.
7. Use the Build Surface Action alongside the Mesh Collider to update and set a Mesh Collider on all surfaces that match this Proxy condition.
Note: If you need more guidance on this process, you can select the ? icon on the Build Surface Action component or review the component documentation now.
6. Review how the character movement works
The robot character in the sample game Unit-E, can roll around on surfaces, jump between different surfaces, and collect the spawned crystals.
Now that you’ve explored how Proxy conditions are used so the character can move on surfaces in the real world, follow these instructions to review how the robot works itself:
1. In the MARS Panel Content Hierarchy, select the Unit-E GameObject prefab. The character uses the Colliders generated from the Build Surface Actions in order to navigate around the real world.
2. In the Inspector, find and review the Direct AR Character Controller (Script) component.
Notice the different properties that you can use to adjust the acceleration, deceleration and speed of the character.
Tip: Try making Unit_E move more quickly and reducing its acceleration, then compare that to the current player experience.
7. Next steps
Now you’ve reviewed the example game, you’re ready to learn more about key Unity Mars concepts as you make some changes. In the next tutorial, you’ll create more collectibles and set up a character using our preconfigured assets.