Create and build a testing scene
Tutorial
intermediate
+10XP
25 mins
38
Unity Technologies

In this tutorial, you’ll create and build a testing scene using Unity Mars.
1. Overview
Now that you’ve installed Unity Mars and explored its user interface, you’re ready to start creating. In this learning experience, we’ll guide you through creating a basic app that places an AR sphere on a real-world surface. As you do this, you’ll learn about key concepts for Unity Mars.
In this tutorial, you’re going to get set up first — before you work on the app itself, you need to create a testing scene.
2. What is a Proxy?
A Proxy is a GameObject that acts as a stand-in for a real-world object that your AR app can detect and use. For example, a Proxy could represent the user’s face for a social media video filter or the table on which the sphere will be displayed for your app.
AR app creation relies heavily on associating your digital content with objects or locations in the real world. You can think about Proxies like placeholders that connect the real world with digital content in your app.
3. Create the basic application
You can create all sorts of engaging AR experiences with Unity Mars, but for now let’s start with something simple.
Follow these instructions to create an application that will display a sphere on horizontal planes in the real world:
1. In the main menu, go to File > New Scene and select the Basic (Built-in) Template.
2. Save your new scene and call it "Sample Scene".
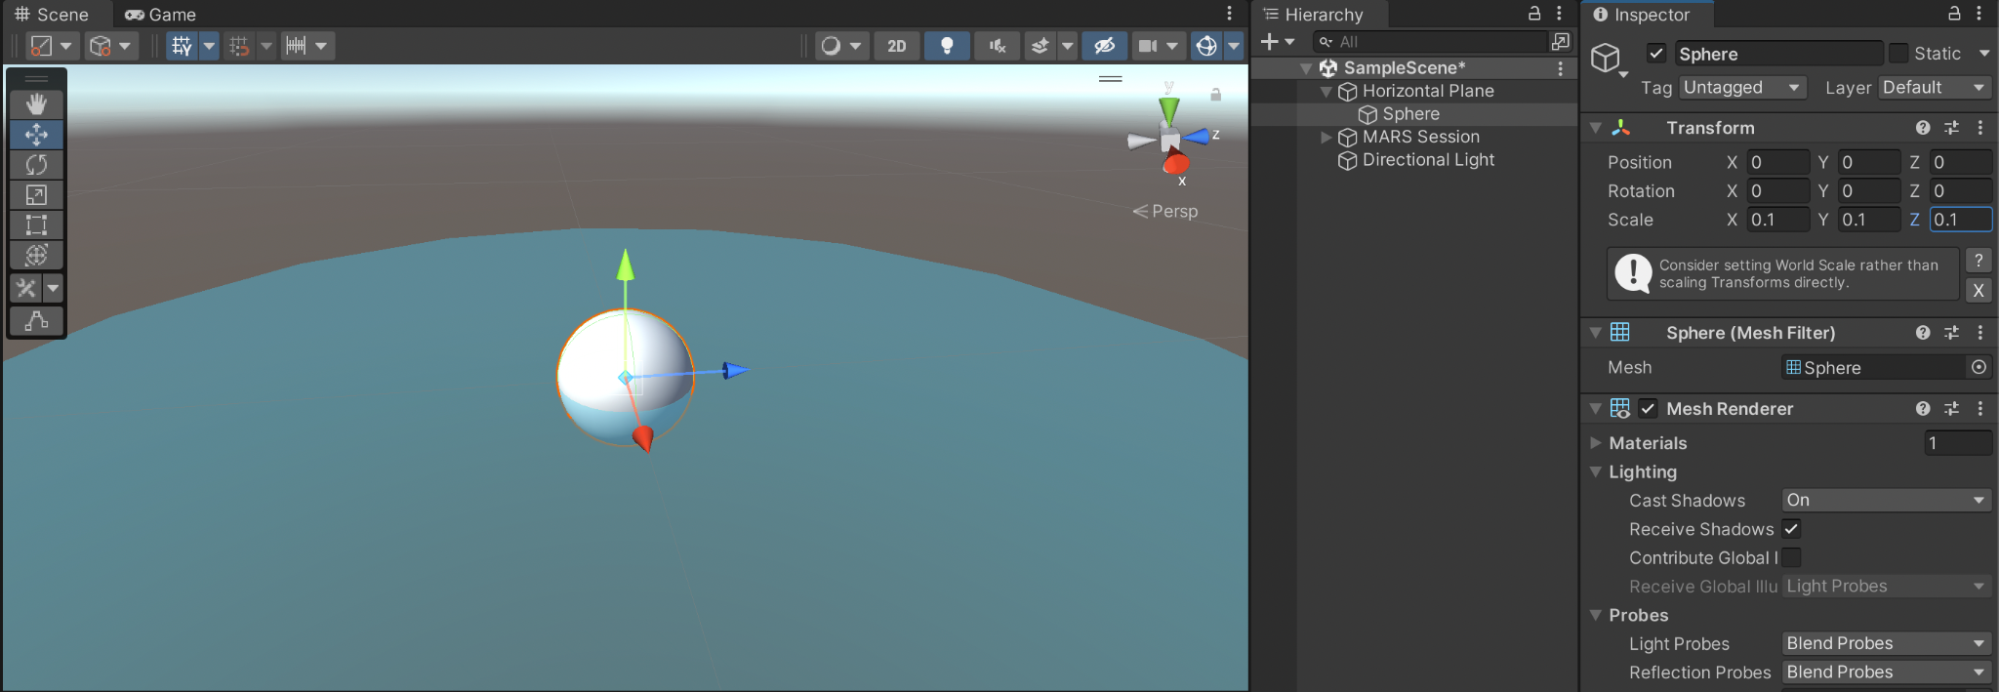
3. In the Hierarchy, select Add (+) and choose MARS > Presets > Horizontal Plane. This GameObject is a Proxy for horizontal surfaces in the real world.
Note: Make sure you use the ordinary Hierarchy window, rather than the Hierarchy sections in the MARS Panel.
4. In the Hierarchy, right-click the Horizontal Plane GameObject and select 3D Object > Sphere to create a new child GameObject.
5. Select the Sphere GameObject. In the Inspector, adjust the Scale values to (0.1, 0.1, 0.1) to scale the sphere to about 10 cubic centimeters.

6. In the Hierarchy, select Add (+) and choose MARS > Data Visualizers > Plane Visualizer. This will add both a Planes Visualizer GameObject and a MARS Session GameObject to the Hierarchy.
With the app you’re going to build from this scene, you’ll be able to see scanned surfaces. When the app detects a horizontal plane, it will position the sphere on it.
4. Set your build platform
Before you can configure platform-specific settings for your project, you need to select the correct platform for your device.
To select your platform:
1. In the main menu, go to File > Build Settings…
2. In the Platform section, select either Android or iOS.
3. Select Switch Platform.
4. If you’re building for an iOS device, skip to the instructions for your platform. For Android device instructions, continue to the next step.
5. Android: Configure your project settings
ARCore is Google’s framework for building augmented reality experiences. Follow these instructions to configure your project settings for ARCore:
1. In the main menu, go to Edit > Project Settings…
2. In the navigation panel (on the left side of the window), select Player. Select the Android tab, if it is not already selected.
3. Locate the Other Settings section, and expand the foldout if it is closed by default.
4. In the Rendering section, find and disable the Auto Graphics API property.
Note: If you are using a version of Unity older than 2022.2 LTS, the Graphics API list may already be displayed.
5. In the Graphics APIs list that is now displayed, select Vulkan and then select Remove (-). This might trigger a project re-import.
6. In the Identification section, set the Minimum API Level to Android 7.1 ‘Nougat’ (API level 24).
7. In the Configuration section, set the Scripting Backend to IL2CPP.
8. Further down the Configuration section, find the Target Architectures property. Enable ARM64.
You are now ready to build your app — skip the next step to go straight to the relevant instructions.
6. iOS: Configure your project settings
ARKit is Apple’s framework for building augmented reality experiences. Follow these instructions to configure your project settings for ARKit:
To configure your project settings:
1. In the main menu, go to Edit > Project Settings…
2. In the navigation panel (on the left side of the window), select Player.
3. Locate the Other Settings section, and expand the foldout if it is closed by default.
4. In the Configuration section, locate the Camera Usage Description property. If the field has not been automatically populated, enter the following description: “Camera access required for AR functionality”.
5. Further down the Configuration section, find the Target minimum iOS version setting and enter “11.0”.
7. Build and run your app
Now you’ve configured your project settings, you’re ready to build and run your Unity Mars app.
Important: If you have not installed the correct package for your chosen mobile platform, you will not be able to build your app. If you encounter any other difficulties when building your app, refer to the troubleshooting guidance in the next step.
Follow these instructions to build and run your app:
1. In the main menu, go to File > Build Settings….
2. Select Add Open Scenes to include your Sample Scene in the build.
3. Confirm that you have selected the correct platform for your device — Android or iOS.
4. Connect your mobile device to your computer, if you have not already done so.
5. Select Build And Run.
6. Name and save your build depending on your platform requirements:
- For Android, name your .APK file.
- For iOS, name the folder for your XCode project.
7. Follow any necessary steps for your specific platform:
Try your testing scene
When you start the app, you should see the Unity splash screen and then a video stream of your camera.
Start moving your device to scan surfaces in the room around you. The surfaces that you scan should display a blue dotted pattern — this is the default effect of the Plane Visualizer that you added. When a horizontal plane is detected, the sphere you created as a child of the Horizontal Plane Proxy will appear as shown in the image.
8. Troubleshoot the testing scene
If you encounter any issues when you build and run your app, this guidance is a good place to start.
Tool: Mars Project Validation
Unity Mars has a built-in Project Validation tool that you can use to avoid common configuration issues with your scenes and project. You can access this tool in your project settings (Edit > Project Settings > MARS > Project Validation).
The Project Validation tool checks against rules that run at build time or in your current scene if the Project Validation tool is open in the Project Settings window.
Note: Some issues will display a Fix button which you can use to automatically fix the error. Other issues need to be manually addressed — these will display an Edit button, which will take you to the area of the UI where you can correct the issue.

Issue: Blank screen after building
If you are getting a black screen after building your project, check that you have installed these packages:
- com.unity.mars-ar-foundation-providers
- com.unity.xr.arfoundation
And one or both of the following:
- com.unity.xr.arkit
- com.unity.xr.arcore
If you are still seeing a black screen, please refer to the FAQ in the Unity Mars manual for some common causes.
Issue: Compile errors
If you receive several compile errors, make sure your ARFoundation, ARCore and/or ARKit packages have the same major and minor versions and that you are using a version of Unity that supports that version of AR Foundation. Note that some issues can be caused by using ARFoundation in older Unity 2019.4 versions.
If you have errors when generating a build, check that the version you have specified for ARCore / ARKit is supported by the SDK version. If your version is not supported, you will not be able to build to your device.
Additional resources and guidance
For more information on configuring Unity to build for mobile platforms, please refer to the relevant section of the Unity Manual:
If you encounter any issues building and running your app, you may also find Deploy your project to iOS or Android a useful reference — this is an introductory tutorial from the Create with AR: Face Filters course.
9. Next steps
In this tutorial, you created a testing scene for a basic application based around a Horizontal Plane Proxy. Next, you’ll build on this work by being more specific about how you want your Proxy to match against the real world.