
Explore the Unity Mars UI
Tutorial
intermediate
+10XP
20 mins
(61)
Unity Technologies
In this tutorial you’ll learn about each of the major features of the Unity Mars interface and how to position your Unity Editor windows to start creating with Unity Mars.
1. Overview
When you install Unity Mars to a project, a number of different windows and menus will become available to you in the Unity Editor interface. This tutorial will guide you through the key features of Unity Mars:
- The MARS Panel
- The Simulation and Device views
- The Proxy Rule Set view
You’ll also explore key concepts for Unity Mars as you do so.
By the end of the tutorial, you’ll be ready to start creating an AR application.
2. Open the MARS panel
The MARS panel is the main entry point for accessing all Unity Mars functionality in the Unity Editor. You’ll use this panel to create AR objects, access shortcuts and presets, and review an overview of what is going on in your scene. Adjusting your Unity Editor layout can make it easier to establish a smooth workflow with the MARS panel and other Unity Mars windows.
Follow these instructions to configure Unity Editor for the MARS panel:
1. In the top right of the Unity Editor window, set the Layout to Tall using the dropdown.
2. In the main menu, go to Window > MARS > MARS Panel.
3. Dock the MARS Panel to the left side of the Unity Editor window, where the Hierarchy is located in the default layout.
3. The Scene view and Unity Mars
When you’re working with Unity Mars, the Scene view serves the same purpose it always does in the Unity Editor. The Scene view is your interactive view in the AR application you are creating. You’ll use the Scene view to create and configure digital content for use in AR applications.
The Scene view is one of Unity’s default views. It should be in the center of the Editor.
When the MARS Panel is open, you can navigate in Scene view (change your view) with the arrow keys, or by holding down the right mouse button and using the WASD keys.
4. Try the Simulation view
The Simulation view displays your AR app running in a simulated environment, showing the entire Scene that you are working in. You can use the Simulation view to test your app against a variety of data sources, including synthetic environments and pre-authored recorded streams. This functionality of the Simulation view reduces the need for you to build your app to a real-world device for testing while you iterate.
The Simulation view separates your AR content from the simulated environment, mimicking rendering and interaction behavior of real AR devices. You can interact with your AR content or with the simulated environment.
It can be helpful to add assets to the project before you open the Simulation view, so there’s something for you to view there.
Follow these instructions to set up an example in the Simulation view:
1. Open the Content Manager and install the Basic Simulation Environment Pack. When the Import dialog window appears, select Import.
2. When the installation is complete, go to Windows > MARS > Simulation View. The first sample will display in the window when it opens: a house and backyard scene.
3. Dock the Simulation view window below the Scene view.
Note: At the bottom of the Simulation view window, a warning that the current Scene can’t be simulated in Edit mode will be displayed. This is expected behavior.
4. In the Simulation view toolbar displayed at the top center of the window, select the Source dropdown displaying the name of the Scene source (Backyard_45ftx40ft).
5. Set the Source to LivingRoom_18ftx13ft using the dropdown menu. The Simulation view will now display an indoor living room. This simulated environment could be helpful for testing an AR app which lets users explore different placements for wall art.
6. You can navigate the Simulation view as you do the Scene view, including holding the right mouse button and using WASD or the arrow keys to change the camera view.
Later, you will learn how to add digital object prefabs into the Simulation view and configure them in the simulated environment.
5. Try the Device view
The Device view simulates the view from a physical mobile device running your AR app. You can use this window to navigate as if moving around with a device in the simulated environment. This device simulation means you can do things like detect planes or point clouds.
The Device view is a sub-mode of the Simulation view, but it has its own separate window.
Important: Unity Editor is not in Play mode when you use the Device view — you can save changes made while the device simulation is running.
Follow these instructions to try the Device view:
1. Right-click the Simulation view tab and select MARS > Device View.
2. Dock the Device view window to the right side of the Simulation view.
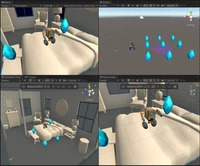
3. In the MARS Panel, go to the Visualizers section and select the Planes Visualizer and Point Cloud Visualizer to add these to your scene. They will appear as GameObjects in the Hierarchy.
The Planes Visualizer creates planes as you scan your environment to preview the scanned data MARS has gathered. The Point Cloud Visualizer visualizes scanned data through a point cloud and displays each point confidence through colors within a gradient.
4. In the Device view, find the menu toolbar and select Start Simulation (play icon). This starts the device simulation.
5. To simulate the user moving their device in Device view, hold down the right mouse button and use the WASD keys. As you move your cursor over the environment, planes and raycast points will be discovered.
The blue dotted pattern is the default effect of the Planes Visualizer. The small dots in various colors are the Point Cloud Visualizer.
6. Select Stop Simulation (the same button) to end the simulation.
6. Unity Mars and Play mode
In Unity Mars, select the Unity Editor’s Play button to enter Play mode as you would normally. The Game view in Play mode has the same controls and data discovery as Device view. The Game view is rendered from the MARSCamera in your application and represents your final published application.
When you use Unity Mars, the active simulation environment is piped into the Game view along with the Device view controls. This means that you can fully test your AR application in a variety of environmental contexts without needing to deploy your app to a device. Unlike the Device view, all of your game logic and scripts will be active in the Game view.
As with any other Unity application, during Play mode all of your application and game logic will run, which means that you can complete an end-to-end test in a Unity Mars simulation environment.
Important: When you make changes whilst Unity Editor is in Play mode, these changes will not be saved. Make sure that you select Play again to exit Play mode when you have finished testing.
7. Next steps
In this tutorial, you’ve set up the Unity Editor and explored the key Unity Mars windows in a specific layout. While you might find that you prefer a different layout as you get used to working with Unity Mars, this is a helpful starting point and this is the layout used in the rest of the Unity Mars tutorials.
In the next tutorial, you’ll create and build a testing scene using Unity Mars. You’ll then use this to create a simple AR app.