Scripting Player Movement
Tutorial
·
Beginner
·
+0XP
·
10 mins
·
(1134)
Unity Technologies
Unity's Input System Package offers improvements in setting up, configuring, and handling player input in a more efficient way. With the Input System Package installed, you are able to script player movement by easily taking advantage of the specific commands needed to get your input devices working. In order to give the player movement along the ground plane, and to take advantage of physics properties from the player’s Rigidbody component, you will need to write a C# script.
1. Overview
Unity's Input System Package offers improvements in setting up, configuring, and handling player input in a more efficient way. With the Input System Package installed, you are able to script player movement by easily taking advantage of the specific commands needed to get your input devices working. In order to give the player movement along the ground plane, and to take advantage of physics properties from the player’s Rigidbody component, you will need to write a C# script.
2. Scripting Player Movement
1. Create a new C# script by right-clicking in the Project window, and selecting Create > C# Script. A new C# script with the title NewBehaviourScript will be added to the Project’s assets. With the NewBehaviourScript title still highlighted, type: “PlayerController” to rename the script, and then press the Return key.
2. Attach the PlayerController script to your player, by first selecting it in the Project window, and then dragging and dropping it onto your player GameObject in the Hierarchy window.
3. Open the PlayerController script in your script editor IDE by double-clicking the PlayerController C# script in the Project window.
4. At the top of the PlayerController C# script, add the new Input System namespace in order to access the Input System Package’s classes and methods. After line number 3, type in the following command:
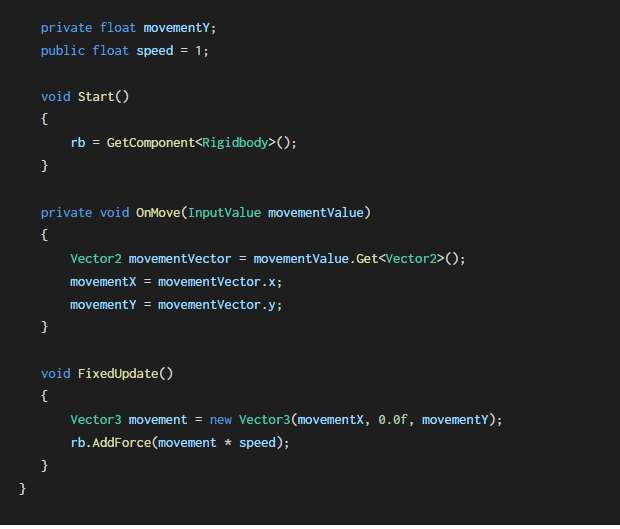
using UnityEngine.InputSystem;5. Inside the class container at the top of your script, create a variable of the type Rigidbody.
public class PlayerController : MonoBehaviour
{
    private Rigidbody rb;
6. Next, enable the Rigidbody component in your script by adding the following line inside the Start() method. This will make use of the Rigidbody component attached to the player, enabling physics forces applied to the X and Y axes.
void Start()
{
   rb = GetComponent<Rigidbody>();
}
7. In order to begin scripting movement along the X and Y axes, create two more variables of the type float, and name them “movementX” and “movementY”.
public class PlayerController : MonoBehaviour
{
   private Rigidbody rb;
   private float movementX;
   private float movementY;
8. Next, add a speed variable. Make it a public variable so you can later adjust the values from within the Inspector.
public class PlayerController : MonoBehaviour
{
   private Rigidbody rb;
   private float movementX;
   private float movementY;
   public float speed = 1;
9. After the Start() method, create a new method called OnMove(). Type in the following lines of code:
private void OnMove(InputValue movementValue)
{
   Vector2 movementVector = movementValue.Get<Vector2>();

     movementX = movementVector.x;
     movementY = movementVector.y;
}
10. in order to better handle physics movements to run at a more consistent frame rate rather than a fluctuating or varying frame rate, modify the Update() method to become FixedUpdate(). For further information on the FixedUpdate() method, refer to this page in the Unity Documentation.
void FixedUpdate()11. Inside the FixedUpdate() method, add the following lines of code.
void FixedUpdate()
{
    Vector3 movement = new Vector3(movementX, 0.0f, movementY);
    rb.AddForce(movement * speed);
}
12. Save your Script, and switch back to your Unity Project.
13. Enter Play Mode, and test out the movement of your player using the WASD keys on your keyboard to control the direction of the player’s movement. Your player should move corresponding to the direction of the left thumb-stick on your game controller as well. You will also notice that the speed of the player’s movement is currently slow. Exit out of Play Mode.
14. To increase the speed, change the Speed field to 10 in the Player Controller script component.
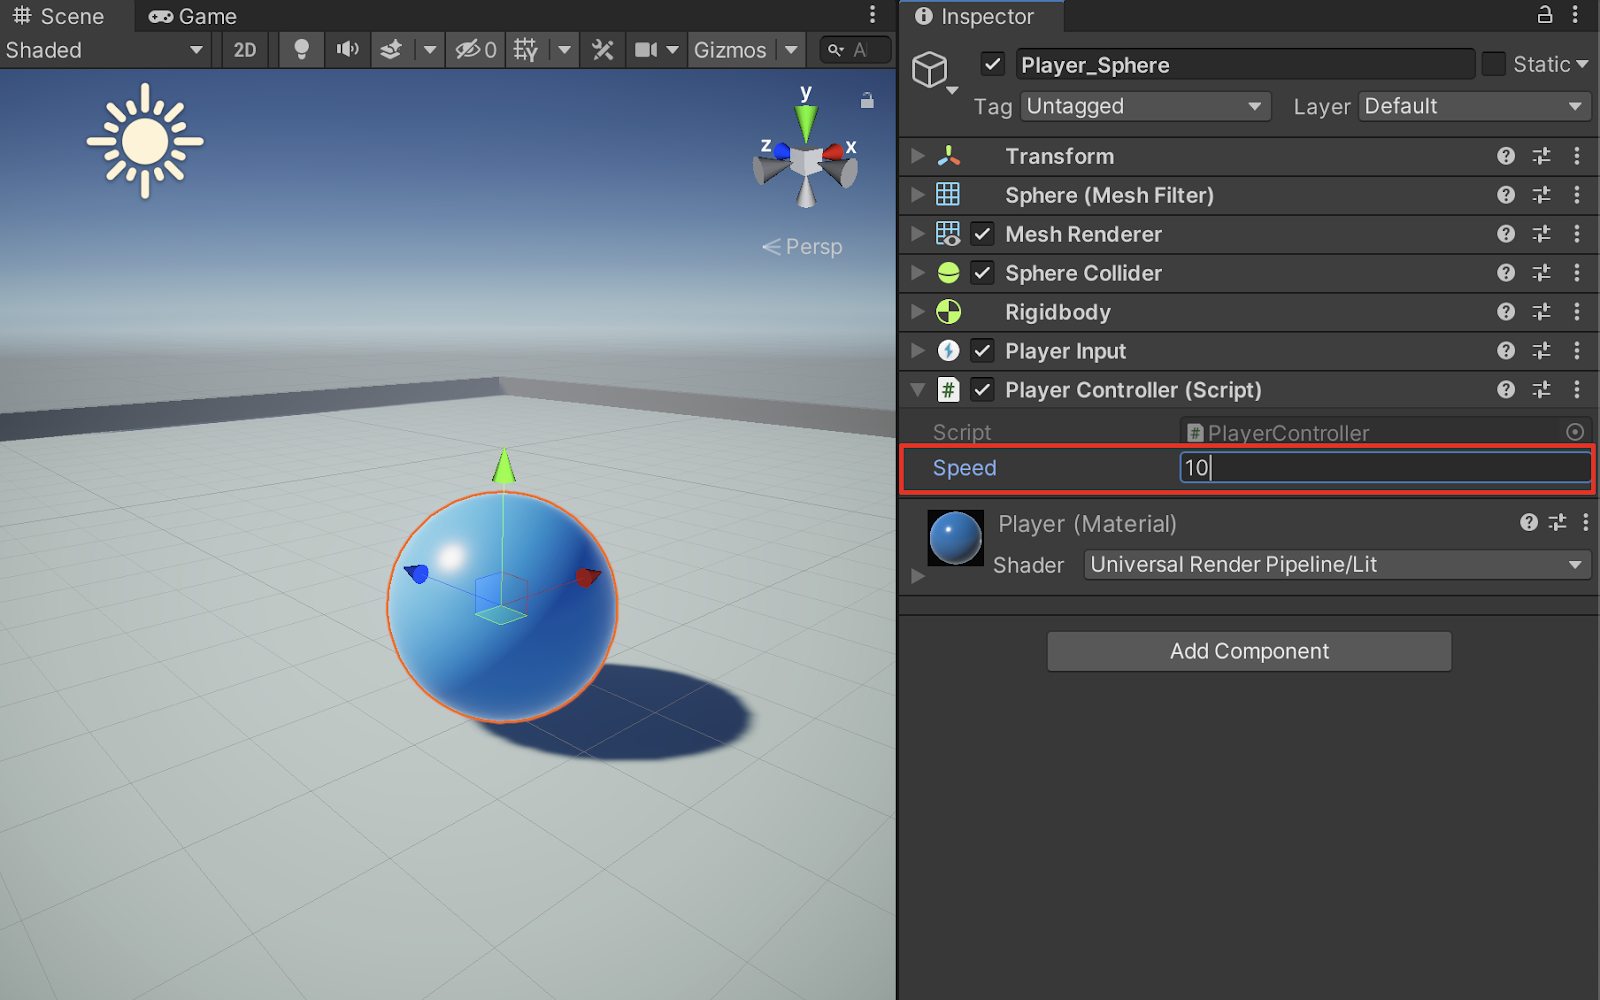
15. Test your player’s movement by entering Play Mode. Either move the game controller’s left thumb-stick or use the WASD keys on the keyboard. You should be able to see the player’s movement speed dramatically increase.
The full PlayerController C# Script reads:
using System.Collections;
using System.Collections.Generic;
using UnityEngine;
using UnityEngine.InputSystem;

public class PlayerController : MonoBehaviour
{
   private Rigidbody rb;
   private float movementX;
   private float movementY;
   public float speed = 1;

   void Start()
   {
       rb = GetComponent<Rigidbody>();
   }

   private void OnMove(InputValue movementValue)
   {
       Vector2 movementVector = movementValue.Get<Vector2>();
       movementX = movementVector.x;
       movementY = movementVector.y;
   }

   void FixedUpdate()
   {
       Vector3 movement = new Vector3(movementX, 0.0f, movementY);
       rb.AddForce(movement * speed);
   }
}
3. Next Steps
By invoking the Input System Package in your PlayerController C# script, you are able to use device inputs to apply movement to your player and to take advantage of your player’s Rigidbody component by adding force in both the X and Y axes.