Taking Advantage of the Input System Scripting API
Tutorial
·
Beginner
·
+0XP
·
20 mins
·
(598)
Unity Technologies

In this tutorial we will be taking a more streamlined approach to scripting device inputs via the Input System Scripting API.
1. Overview
The Unity Input System Package offers a more streamlined approach to scripting device inputs. If you have ever worked with Unity’s built-in Input Manager previously, recall that inputs were triggered using strings. For example, the: if (Input.GetButtonDown("Fire1")) command was used to recognize the left mouse click. This old system can become cumbersome, especially when setting up multiple devices with many inputs. Fortunately, you can now take advantage of a more efficient way of scripting input commands.
2. Taking Advantage of the Input System Scripting API
1. With the PlayerControls input action asset selected in the Project window, select to enable the checkbox next to Generate C# Class in the Inspector, and then select the Apply button.
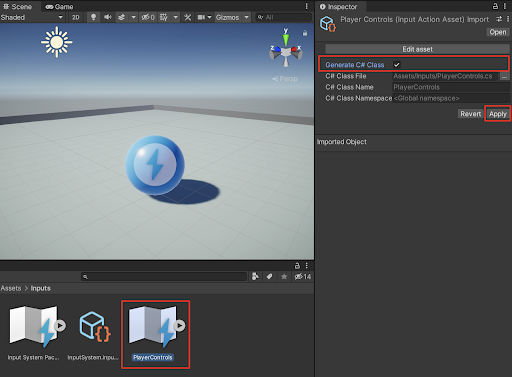
A PlayerControls C# script is automatically saved with generated code. You don’t need to change or modify it at all. This script will provide a reference class that enables you to streamline your commands from other custom scripts you write.
You will next create another C# script to move your player; however, this time the commands will be different from the example practiced in the previous section. It will instead take advantage of commands specifically designed for the Input System.
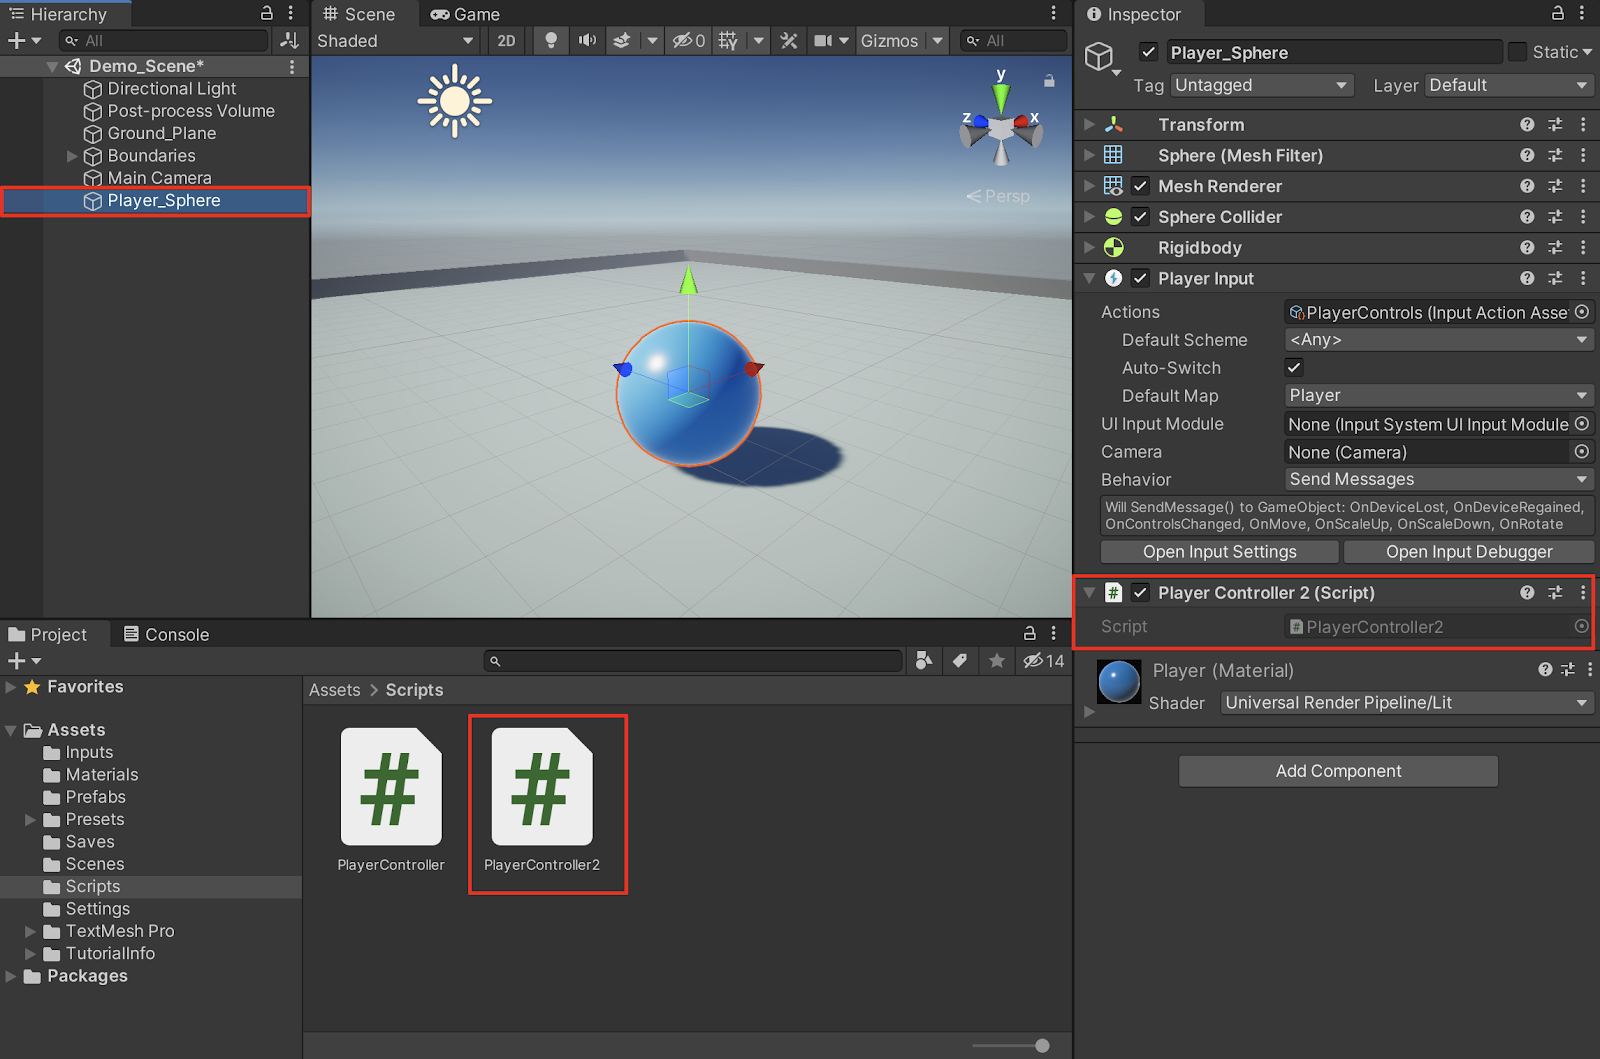
2. Create a new C# script by right-clicking in the Project window, and selecting Create > C# Script. A new C# script with the title NewBehaviourScript will be added to the Project’s assets. With the NewBehaviourScript title still highlighted, type: “PlayerController2” to rename the script, and then press the Return key.
3. Attach the PlayerController2 script to your player, by first selecting it in the Project window, and then dragging and dropping it onto your player GameObject in the Hierarchy window. Ensure you remove the original Player Controller script from your Player.
4. Open the PlayerController2 script in your script editor IDE by double-clicking the PlayerController2 C# script in the Project window.
5. At the top of the PlayerController2 C# script, add the new Input System namespace in order to access the Input System Package’s classes and methods. Add the following command:
using UnityEngine.InputSystem;6. Inside the class container at the top of your script, invoke your newly generated C# Script created previously in step 1.
PlayerControls controls;7. Add a variable of the type Vector2, and name it “move”.
PlayerControls controls;
Vector2 move;
8. Again as before, add a speed variable. Declare it a public variable so you can later adjust the values from within the Unity Editor.
 PlayerControls controls;
 Vector2 move;
 public float speed = 10;
9. Change the Start() method to an Awake() method. Commands inside the Awake() method will always be called before the Start() method. This will allow the PlayerControls input asset to initialize right away.
void Awake()
{

}
10. Inside the Awake() method, invoke the PlayerControls input asset by adding the following line of code:
 void Awake()
 {
     controls = new PlayerControls();
 }
11. For the Input System commands to work, you will need to add both the OnEnable() and OnDisable() methods next. Because the Input System is modular, you will be able to swap between different input assets or Control Schemes in the future. Below the Awake() method, add the following methods:
 private void OnEnable()
 {

 }
 private void OnDisable()
 {

 }
12. Add the following lines to enable and disable the player controls.
 private void OnEnable()
 {
     controls.Player.Enable();
 }
 private void OnDisable()
 {
     controls.Player.Disable();
 }
13. You are able to test the PlayerControls input, by using a command to trigger a method. Add the following line of code inside the Awake() method.
void Awake()
{
    controls = new PlayerControls();
    controls.Player.Buttons.performed += context => SendMessage();
}
Notice that the controls.Player.Buttons.performed command follows the naming convention established in the Input Actions window, when you originally established the name of the Action Map, followed by the name of the Action. Because you generated the PlayerControls C# script in step 1, you are able to invoke the PlayerControls class in a straightforward manner.
To understand the syntax of the new controls.Player.Buttons.performed command, notice that the variable context is used. This use of a context variable is known as a Lambda Expression, and in this instance, the variable context is not yet set to anything. (You can substitute it with “ctx” for shorthand, or even anything you want to name it.)
Additionally, the SendMessage() method will highlight in red and will show an error in the console. This is to be expected, and is fixed in the next step.
14. Because the line of code is calling a method named SendMessage(), the actual method hasn’t yet been created. Script this method now, underneath the OnDisable() method. Add the Debug.Log command to send a message to the console.
 void SendMessage()
 {
     Debug.Log("Button Pressed");
 }
15. Save your C# Script, switch back to the Unity Editor, and enter Play Mode. Physically press The X or B buttons on the game controller, and the input will send a message to the console window.

16. Exit Play Mode, and switch back to the script editor.
17. Next, test the inputs of the thumb stick to measure their vector coordinates. Revise the previously coded line in the Awake() method, to instead read as follows:
 void Awake()
 {
     controls = new PlayerControls();
     controls.Player.Move.performed += ctx =>
     SendMessage(ctx.ReadValue<Vector2>());
 }
Here in this revision, you are now taking advantage of the context ctx variable, passing in the parameters to read the value of the Vector2 coordinates.
18. You will also need to modify the SendMessage() method to incorporate the Vector2 parameters, as well as include it inside the Debug.Log command.
void SendMessage(Vector2 coordinates)
{
    Debug.Log("Thumb-stick coordinates = " + coordinates);
}
19. Save your C# Script, switch back to the Unity Editor, and enter Play Mode. Physically move The left thumb-stick on the game controller, and the input will update messages to the console window.
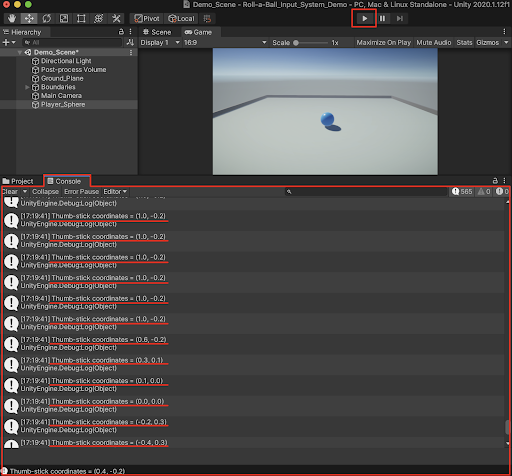
20. Exit Play Mode, and switch back to the script editor.
21. In order to script movement to the Player GameObject, modify the command in the Awake() method to read:
void Awake()
{
    controls = new PlayerControls();
    controls.Player.Move.performed += ctx => move =
    ctx.ReadValue<Vector2>();
}
22. Next, you will zero out the Vector2 values in the next line, using the controls.Player.Move.cancelled command.
void Awake()
{
    controls = new PlayerControls();
    controls.Player.Move.performed += ctx => move =
    ctx.ReadValue<Vector2>();
    controls.Player.Move.canceled += ctx => move = Vector2.zero;
 }
23. Next, change the Update() method to a FixedUpdate() method.
void FixedUpdate()
{

}
24. Add the following lines of code inside the FixedUpdate() method. On the first line, instantiate a new object of the type Vector3, and read the Vector3 values. On the next line, apply the values with the transform.Translate command.
void FixedUpdate()
{
    Vector3 movement = new Vector3(move.x, 0.0f, move.y) * speed *
    Time.deltaTime;
    transform.Translate(movement, Space.World);
}
25. Save your Script, and switch back to your Unity Project.
26. Enter Play Mode, and test out the movement of your player using either the WASD keys on your keyboard or the left thumb-stick on your game controller. Exit out of Play Mode.
You have successfully scripted your player GameObject to move using the Input System
The full PlayerController2 C# Script reads:
using System.Collections;
using System.Collections.Generic;
using UnityEngine;
using UnityEngine.InputSystem;

public class PlayerController2 : MonoBehaviour
{
   PlayerControls controls;
   Vector2 move;
   public float speed = 10;

   void Awake()
   {
       controls = new PlayerControls();
       controls.Player.Move.performed += ctx =>
                                      SendMessage(ctx.ReadValue<Vector2>());
       controls.Player.Move.performed += ctx => move =
                                      ctx.ReadValue<Vector2>();
       controls.Player.Move.canceled += ctx => move = Vector2.zero;
   }

   private void OnEnable()
   {
       controls.Player.Enable();
   }
   private void OnDisable()
   {
       controls.Player.Disable();
   }

   void SendMessage(Vector2 coordinates)
   {
       Debug.Log("Thumb-stick coordinates = " + coordinates);
   }

   void FixedUpdate()
   {
       Vector3 movement = new Vector3(move.x, 0.0f, move.y) * speed
                                                            * Time.deltaTime;
       transform.Translate(movement, Space.World);
   }
}
3. Next Steps
Unity's Input System is modular and configurable, allowing you to add inputs from various devices using a more streamlined approach. You are now able to script movement by taking advantage of the Input System Package API commands.