
Code the scanning functionality
Tutorial
intermediate
+10XP
1h
(217)
Unity Technologies
For work in VR development, it’s important to have a deep understanding of 3D vectors and how to work with them. You often need to calculate distances, angles, and directions – and one of the most useful techniques for getting these values is raycasting.
In this tutorial, you will do the following:
- Use raycasting to identify an object the scanner is pointing towards
- Reference online documentation to use code in line with best practices for VR development
1. Overview
The main outcome of the scanner functionality is to display the name and position of the object it’s pointing to.
To get this right, you need to find a way to determine what the scanner is pointed at and then grab the relevant information from that GameObject to display it on the scanner screen. This will require the use of raycasting.
Raycasting is a critical technique that shoots an invisible straight line and detects which object that line collides with. It’s useful for hit detection in shooting games, proximity detection, UI, and most importantly for our purposes, interactions with objects at a distance.
2. Make the text appear and disappear with the laser
First, you need a way to display the information on the scanner screen, so you need to set up the text that will be updated when you scan an item. Conveniently, there are already TextMeshPro objects on a Canvas on the screen. So, you just need to follow the steps below to make the text appear and disappear when the trigger is pressed:
1. To be able to use the TextMeshPro library, add the TMPro namespace to your script.
using System.Collections;
using System.Collections.Generic;
using UnityEngine;
using UnityEngine.UI;
using UnityEngine.XR.Interaction.Toolkit;
using TMPro; // add this line of code
2. Add two new variables so that you can reference the TextmeshPro GameObjects.
[Header("Scanner Data")]
public Animator animator;
public LineRenderer laserRenderer;
public TextMeshProUGUI targetName; //add this line of code
public TextMeshProUGUI targetPosition; //add this line of code
3. Save your script and go back to the Unity Editor. The two new variables will show up as empty slots in the Scanner Inspector. Assign the Name and Position GameObjects to those new fields by dragging them over from the Hierarchy.
Currently, when the scene loads, the default text will show up on the scanner screen before anything has actually been scanned. The text should only appear when the scanner is used.
4. Use the code below in the Awake function to deactivate the two text objects when the app starts.
protected override void Awake()
{
  base.Awake();
  laserRenderer.gameObject.SetActive(false);
  targetName.gameObject.SetActive(false); // add this line
  targetPosition.gameObject.SetActive(false); // add this line
}
5. To make the text reappear when the trigger is pulled, set the active state to true for both text fields in the OnActivated function.
protected override void OnActivated(ActivateEventArgs args)
{
  base.OnActivated(args);
  laserRenderer.gameObject.SetActive(true);
  targetName.gameObject.SetActive(true);
  targetPosition.gameObject.SetActive(false);
}
6. To make the text disappear again when the trigger is released, set the active state to false for both text fields in the OnDeactivated function.
protected override void OnDeactivated(DeactivateEventArgs args)
{
  base.OnDeactivated(args);
  laserRenderer.gameObject.SetActive(false);
  targetName.gameObject.SetActive(false);
  targetPosition.gameObject.SetActive(false);
}
Save your script and test your app again. The text should now appear and disappear when the trigger is pressed, along with the laser.
3. Clean up your redundant code
Clean code allows for faster iteration, easier management, and better scalability in the long run.
Looking at this code, there are a lot of repeated lines related to setting GameObjects as active and inactive. Follow the steps below to clean up this redundant code:
1. Make a new method called something like “ScannerActivated” that takes a bool parameter. You will use this parameter to enable or disable all the relevant GameObjects, depending on the bool passed.
Add the following code to your script to do this:
private void ScannerActivated (bool isActivated)
{
  laserRenderer.gameObject.SetActive(isActivated);
  targetName.gameObject.SetActive(isActivated);
  targetPosition.gameObject.SetActive(isActivated);
}
2. Next, replace code in your Awake, OnActivated, and OnDeactivated methods with the much simpler ScannerActivated method. That bool parameter should only be set to true in OnActivated (when the trigger is pressed).
protected override void Awake()
{
  base.Awake();
  ScannerActivated(false);
}

protected override void OnActivated(ActivateEventArgs args)
{
  base.OnActivated(args);
  ScannerActivated(true);
}

protected override void OnDeactivated(DeactivateEventArgs args)
{
  base.OnDeactivated(args);
  ScannerActivated(false);
}
Your code should work just like before, but now follows a cleaner and more scalable structure.
4. Raycast to get the object name and position
As is explained in its documentation, raycasts work by casting a ray from an origin point in a given direction, that is of a set length, and that detects any collider it intersects with.
If you’ve used raycasts a lot in previous projects, this will be pretty straightforward. If this is your first time using them, make sure to go through this step carefully.
Follow the steps below to shoot an invisible ray out of the scanner and detect the name and position of the object it hits:
1. Start by creating a new private void method called ScanForObjects, then call that method from inside the OnActivated method.
protected override void OnActivated(ActivateEventArgs args)
{
  base.OnActivated(args);
  ScannerActivated(true);

  ScanForObjects(); // add this line
}


private void ScanForObjects() // add this new method
{

}
2. In your new ScanForObjects method, declare a new local RaycastHit variable named “hit”.
private void ScanForObjects()
{
  RaycastHit hit;
}
A RaycastHit variable provides information about the object hit by a ray.
Next, you’ll add an if-statement that checks whether the raycast actually collided with something using the Physics.Raycast method, which returns true if something is hit.
3. Add the code below cast the ray from the ray’s original position forward, checking for collisions.
private void ScanForObjects()
{
  RaycastHit hit;

  if (Physics.Raycast(laserRenderer.transform.position, laserRenderer.transform.forward, out hit))
  {

  }

}
If this is your first time using this method, you may be confused by the out hit syntax here. This method helpfully passes out information about the closest collider that was hit (its “hitInfo”), which you can then store in your local hit variable. This allows you to get access to the collider that was hit, and from that collider, you can get the object’s name and position.
4. Inside this Raycast check, add the following code to set the TargetName and TargetPosition to the name and position of the collider hit by the Raycast:
RaycastHit hit;
if (Physics.Raycast(laserRenderer.transform.position, laserRenderer.transform.forward, out hit))
{
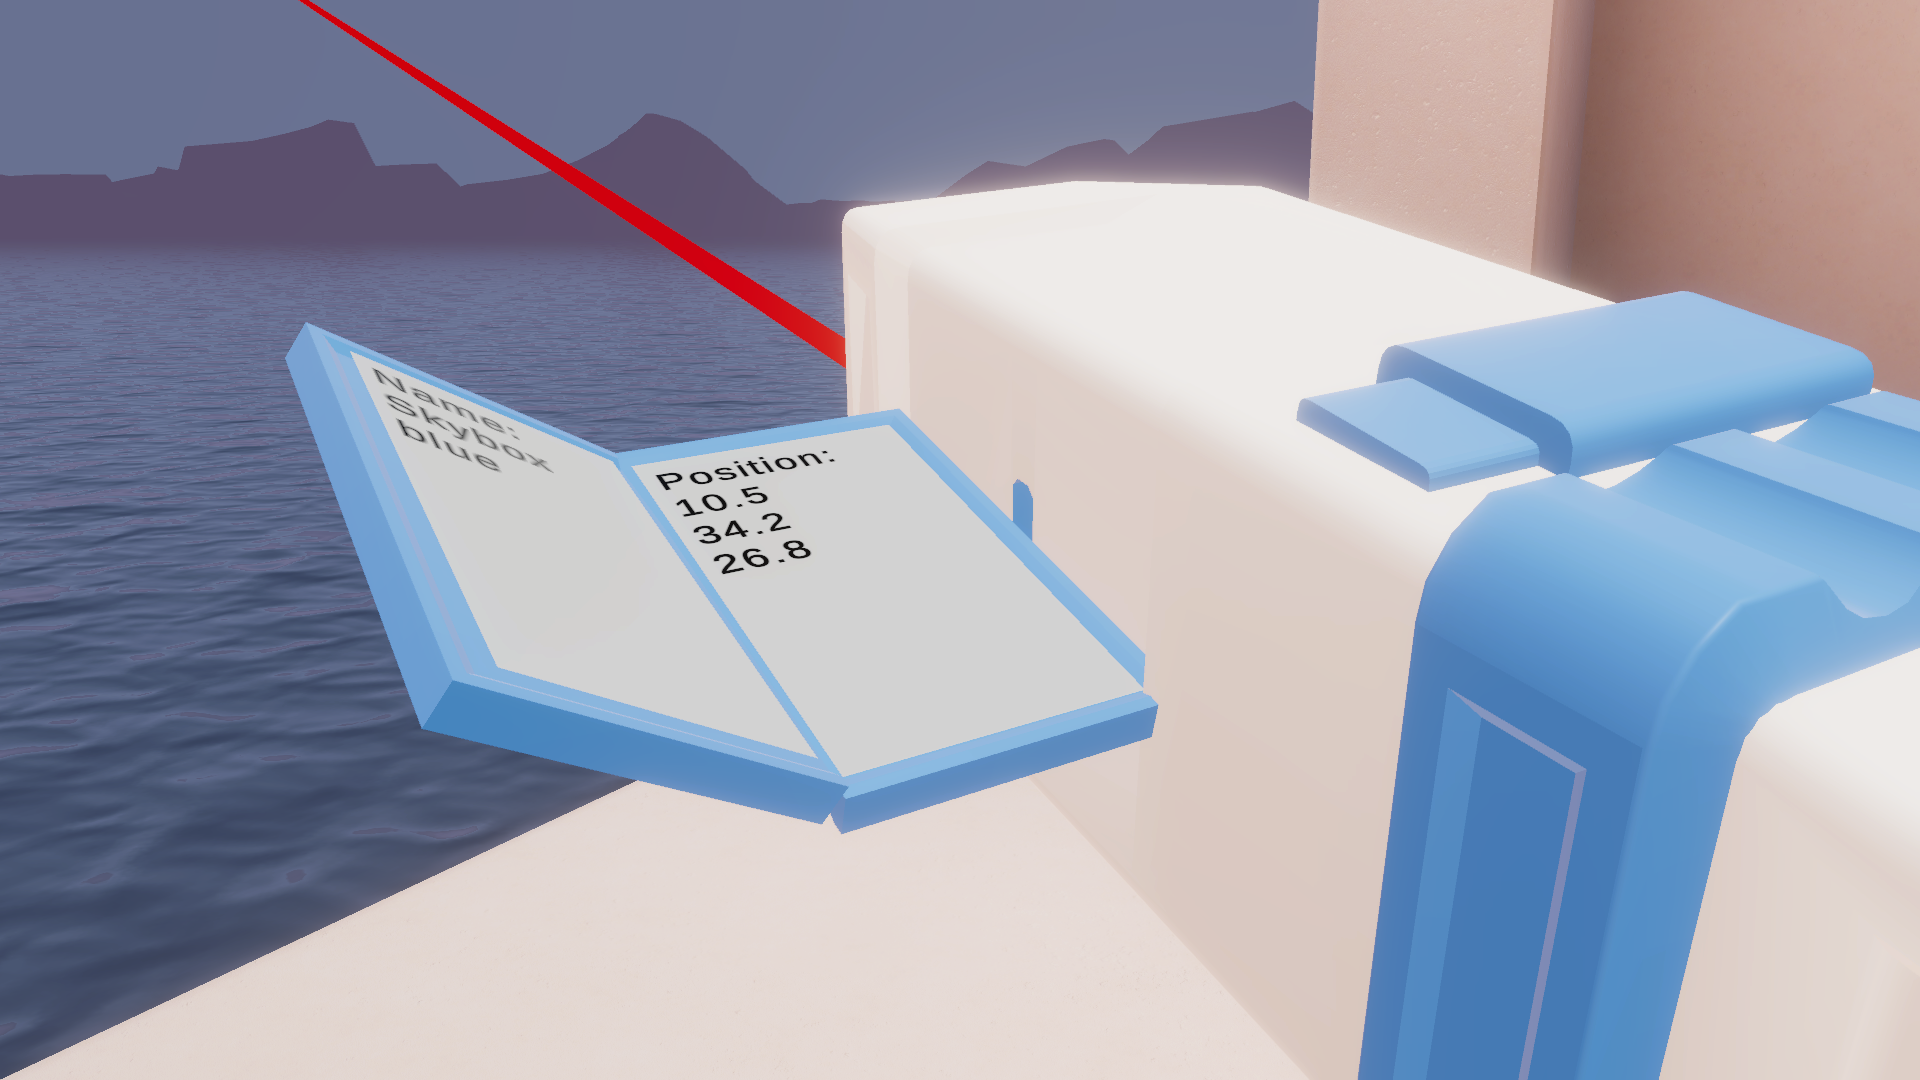
targetName.SetText(hit.collider.name); //add this
targetPosition.SetText(hit.collider.transform.position.ToString()); //add this
}Test your app now. When you press the trigger, the text should now appear and display the name and position of whatever was hit.
5. Dynamically change the size of the laser
Your raycast is working, but the actual visual representation of the Ray is still not scaling appropriately. It stays the same size regardless of what you point it at. Follow the steps below to fix that:
1. In the ScanForObjects method you created earlier, create a new Vector3 position variable called worldHit, which will be 1000 units away in the direction of the laser.
RaycastHit hit;

Vector3 worldHit = laserRenderer.transform.position + laserRenderer.transform.forward * 1000.0f; // new line
This will be the hard-coded endpoint of the laser if it doesn’t collide with anything. It should be far enough into the distance to make it look like it goes on forever.
Next, you need to set the line render component to use that new Vector3 variable as the visual endpoint of the laser.
2. Use the LineRenderer.SetPosition method to set the position of the second vertex on the line to that new worldHit variable. Put the following line of code after the Physics.Raycast check:
private void ScanForObjects()
{
  RaycastHit hit;

  Vector3 worldHit = laserRenderer.transform.position + laserRenderer.transform.forward * 1000.0f;

  if (Physics.Raycast(laserRenderer.transform.position, laserRenderer.transform.forward, out hit))
  {
    targetName.SetText(hit.collider.name);
    targetPosition.SetText(hit.collider.transform.position.ToString());
  }

  laserRenderer.SetPosition(1, laserRenderer.transform.InverseTransformPoint(worldHit)); // new line
}
The first parameter sets the index value as 1, which specifies the second point on the line. The InverseTransformPoint method is necessary to transform the worldHit position from Local to World space coordinates.
Test your app and notice that the laser now extends very far into the distance; however, it stays at a set length and also goes through objects. It should end at the point it collides with something.
3. To fix the problem of the laser moving through objects, set the worldHit variable to the new hit location whenever the Raycast collides with something using the line of code below.
if (Physics.Raycast(laserRenderer.transform.position, laserRenderer.transform.forward, out hit))
{
  worldHit = hit.point; // new line

  targetName.SetText(hit.collider.name);
  targetPosition.SetText(hit.collider.transform.position.ToString());
}
When a hit is detected, the laser endpoint will be set to that collision point and your laser length should update accordingly.
There is still a problem, though. Once the laser hits something, it stays that same length, even if you move the laser away from that location. That is because we are only scanning for objects when the trigger is pressed – you should be scanning the entire time the trigger is held.
6. Scan for objects every frame
To scan constantly, you would typically just call ScanForObjects in the Update method. However, as you were reading the documentation, you may have noticed that XRIT API has its own special version of the Update method called ProcessInteractable().
Developing for XR requires highly optimized applications. Having control over how updates are processed gives the developer fine-grained control of when, and how often, things happen in their code. Follow the steps below to implement the ProcessInteractable method instead of the Update method in your code:
1. Locate the base ProcessInteractables method declaration in the XRInteractionManager Class and read its description.
According to the documentation this method is “automatically called each frame to process all interactables registered with this manager.” It requires one parameter to specify its Update Phase, which is very similar to the distinctions between Update, FixedUpdate, and LateUpdate.
2. To make use of this method, copy and paste the declaration for ProcessInteractable() into your code and call the base method just like you have done when overriding other methods.
public override void ProcessInteractable(XRInteractionUpdateOrder.UpdatePhase updatePhase)
{
  base.ProcessInteractable(updatePhase);
}
If you don’t call the base method, the interactable won’t work at all, since it won’t inherit any of the default behaviors from its base classes to process every frame.
3. Next, call the ScanForObjects method, but for optimization reasons, only do so when the laser is actually active. There’s no need to scan for anything when the laser is inactive.
base.ProcessInteractable(updatePhase);

if (laserRenderer.gameObject.activeSelf) // new if-statement
ScanForObjects(); // new line
4. You can now go ahead and delete the ScanForObjects call you initially did in the OnActivated method. You don’t need it anymore now that you’re scanning in ProcessInteractable.
protected override void OnActivated(ActivateEventArgs args)
{
  base.OnActivated(args);
  ScannerActivated(true);
  //ScanForObjects(); line removed
}
Test your app. The text and laser should now respond dynamically and change as you point to different objects while the trigger is held.
7. More things to try
If you want to further develop your skills, explore new concepts, or improve your project, check out some of the optional activities below. Each one is tagged as either [Easy], [Medium], or [Difficult] so you can choose the level of challenge.
These activities are entirely optional, so if you’re not interested, no problem – just skip this step.
We do recommend attempting at least one of them in order to get the most out of this learning experience. Good luck!
[Easy] Add text when nothing is being scanned
Right now, the screens are blank when nothing is being scanned. Instead, it should say something like, “Ready to scan.”
[Medium] Get additional information about the object being scanned
You could display all kinds of information about the object being scanned. You could display its distance from you, its size, or the angle at which the ray is striking it. Challenge yourself to come up with interesting data to display on the scanner.
[Difficult] Change the material of the object being scanned
To more easily visualize what is being scanned, the object being scanned could change material.
8. Next steps
Congratulations!
You successfully explored and navigated your way around the API now and should have a good understanding of how to use it in your own projects. You even learned about the XR Interactions Toolkit’s custom implementation of an Update function that runs every frame. If you’re new to Raycasts, you learned how to use rays to detect and interact with objects at a distance.
In the next tutorial, you will explore how to access the active controller and create relevant interactions based on more specific inputs, and you’ll do all that while inflating balloons!