Add 2D Lighting
Tutorial
intermediate
+10XP
30 mins
17
Unity Technologies

In this tutorial, you’ll learn how to create a Spot Light 2D in a pixel art style.
1. Explore Spot Light 2D
In the previous tutorial, you added a Global Light 2D GameObject, which illuminated evenly the entire scene. In this tutorial, you’ll add another type of light: the Spot Light 2D, which casts light in a cone-shaped area, similar to a lamp. Let's use it to add some lighting to the dark dungeon to enhance its atmosphere.
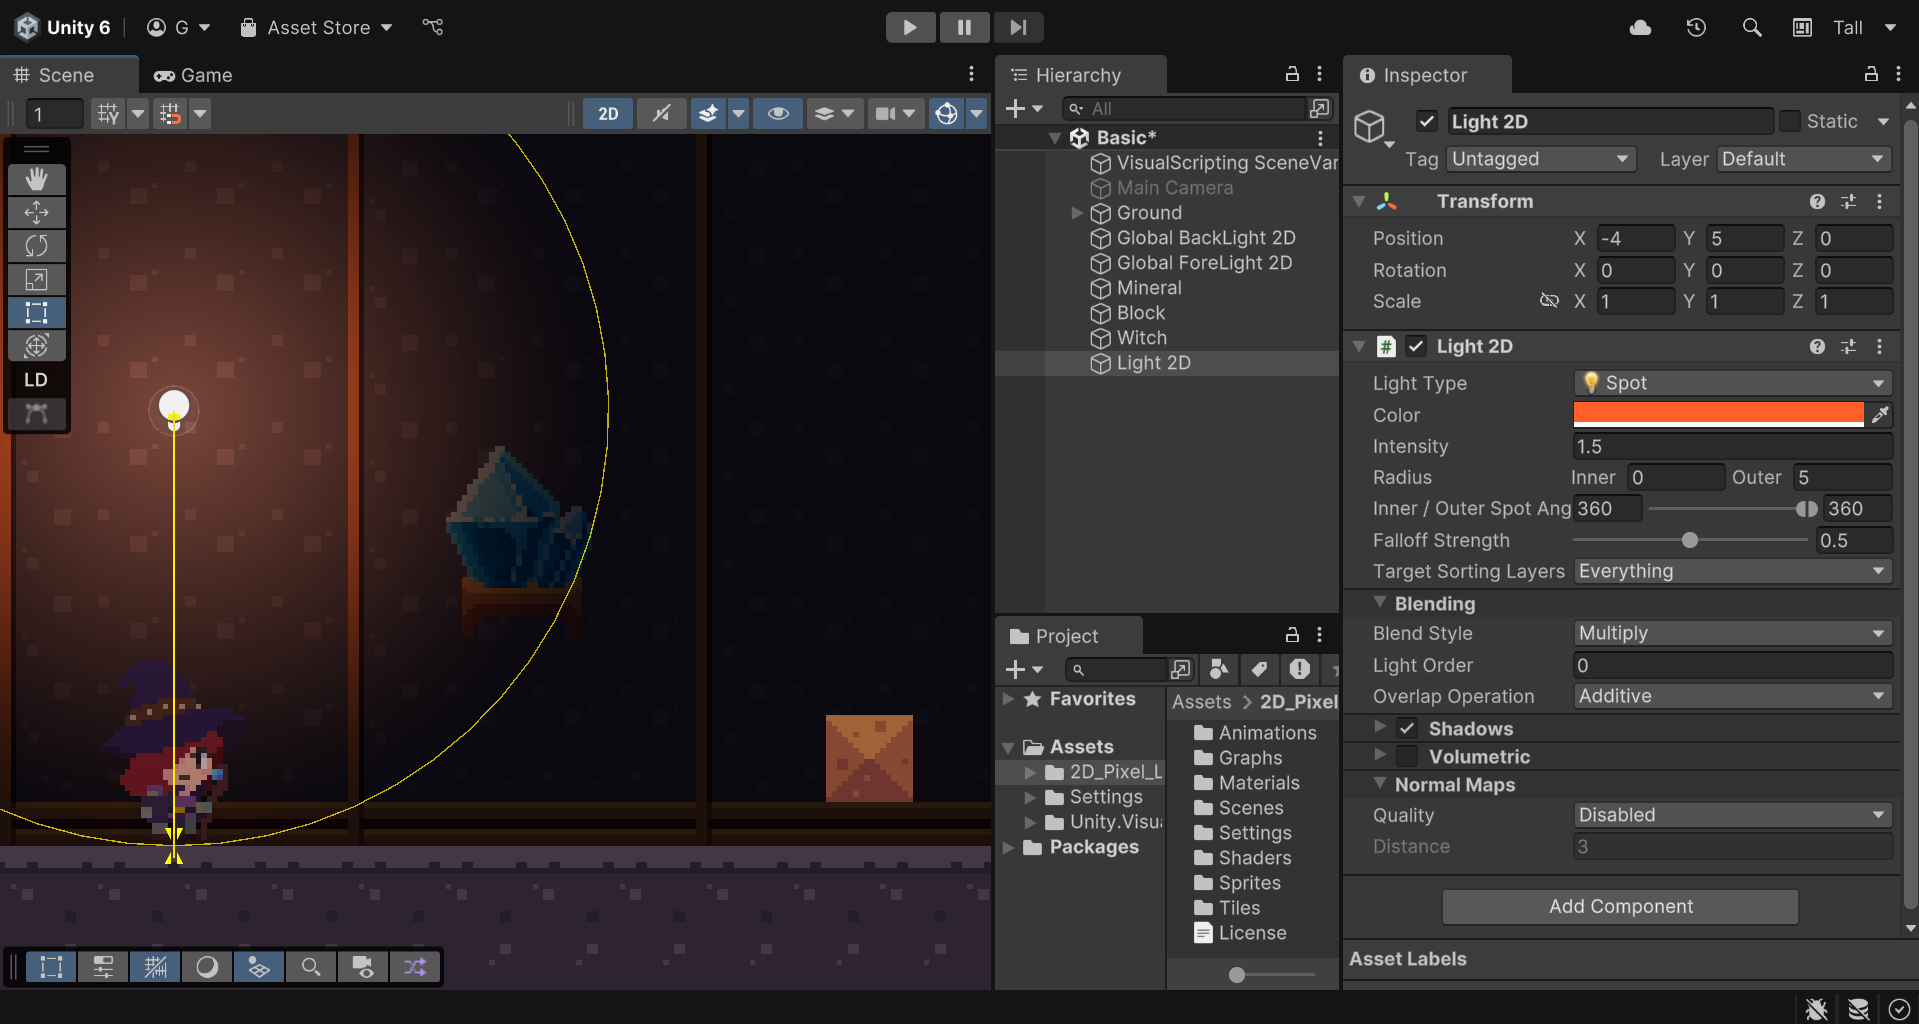
1. Right-click in the Hierarchy window and select Light > Spot Light 2D.
This will create a new GameObject with a Light 2D component attached to it.
Important: Make sure you add the correct light source (a Spot Light 2D GameObject). A Spot Light GameObject is used for 3D environments and won’t work in a 2D environment.
Just like with the Global Light 2D GameObject, you can adjust the Color and Intensity properties of the Spot Light 2D GameObject's Light 2D component to create the tone you want. You can also modify the Outer value of the Radius property to expand the range of the light.

You can intuitively edit the Spot Light 2D GameObject directly in the Scene view. By adjusting the yellow cursor and the triangles’ position, you can create a spotlight that only lights up a specific area.
Note: These icons will only be visible if you have your Gizmos in Scene view enabled.
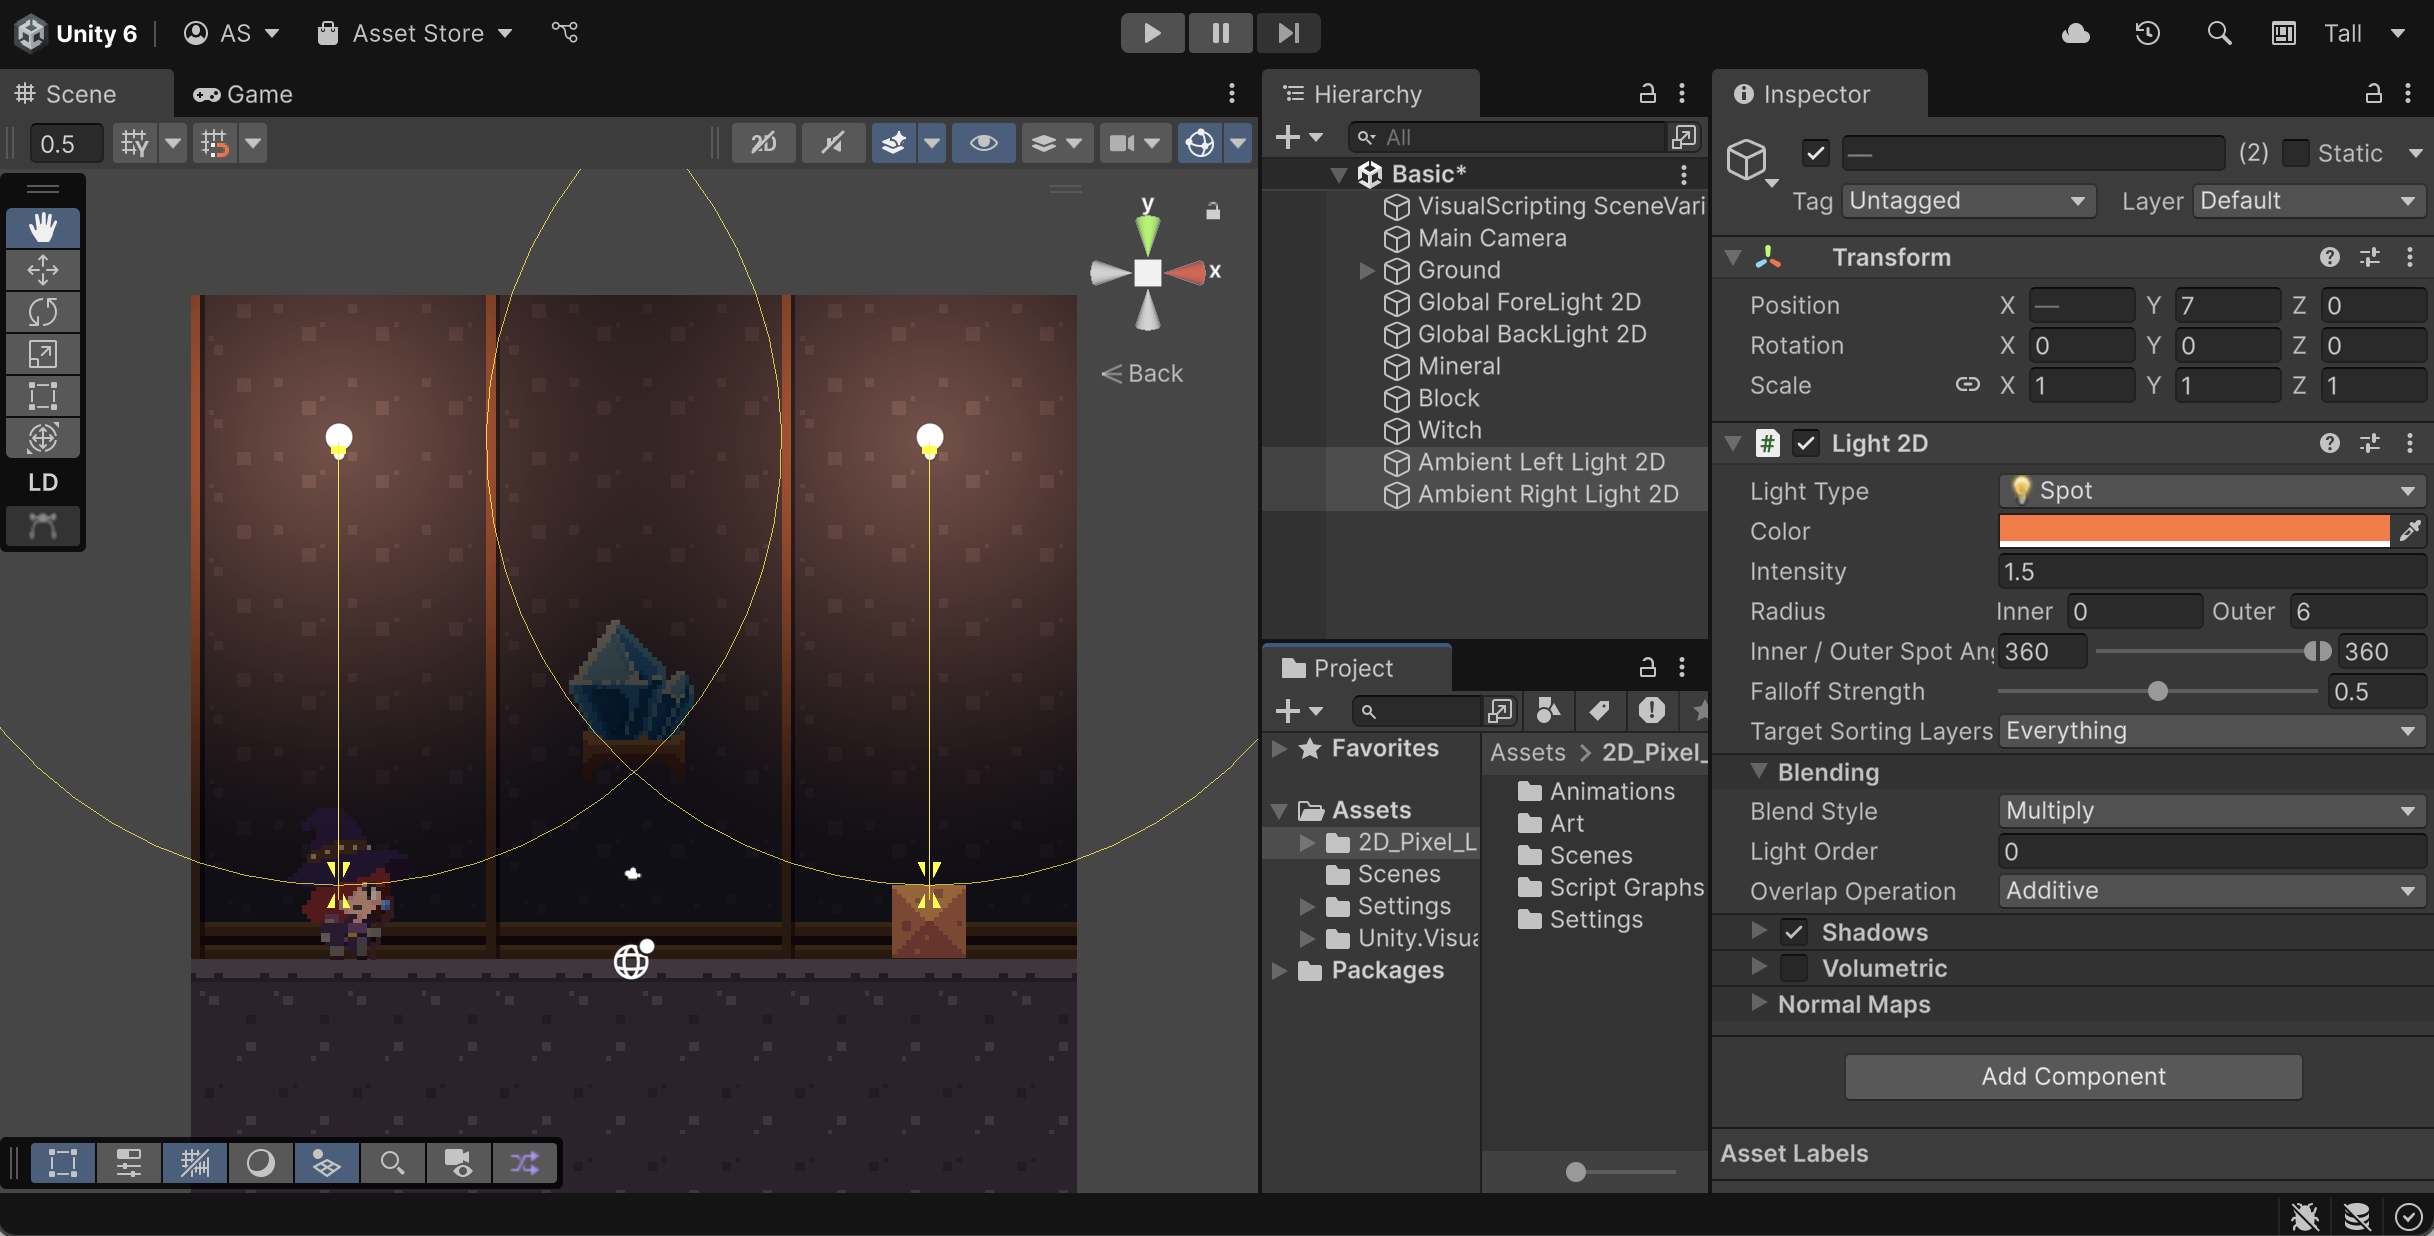
To replicate the lighting setup in the Complete scene:
- Add two Spot Light 2D GameObjects, and set each of their Color properties to HEX value #FF7539.
- Set their Intensity to 1.5 and Outer Radius to 6.
- Place one light at the upper-left and the other one at the upper-right side of the scene.

Other properties of the Light 2D component you can change are the Inner / Outer Spot Angle and the Falloff Strength. The smaller the difference between the Inner / Outer Spot Angle property values and the lower the Falloff Strength property value, the sharper the edge of the spot light becomes.
2. Use Sprite Light 2D
Adding those Spot Light 2D GameObjects has already made the atmosphere feel more alive, and depending on your artistic direction, this type of lighting might be enough. However, as we mentioned at the beginning, modern pixel art games can take advantage of new engine tools to enhance the pixel style instead of being limited by it. One way to achieve this is by using a Sprite as the source shape for the Light 2D component, which makes the light itself look pixelated and consistent with the rest of your art.
This project includes a sprite prepared for you to test this functionality. To use it as a light source, follow these instructions:
1. Right-click in the Hierarchy window, select Light > Sprite Light 2D, and rename the new GameObject “Mineral Light 2D”.
2. In the Inspector window, locate the Light 2D component’s Sprite property, select the Sprite property picker (⊙), and search for and select the SpotLight sprite.
3. Set the Mineral Light 2D GameObject’s Transform component’s Position values to match those of the Mineral GameObject (X = 0, Y = 3.5, Z = 0).
Since the Mineral Light 2D GameObject represents the light coming out of the Mineral GameObject, changing the color of the light to blue would make the effect look even better.
4. In the Inspector window, locate the Mineral Light 2D GameObject’s Light 2D component’s Color property, select the swatch or the dropper, and select a colour that matches the Mineral GameObject. The value used in the Complete scene is HEX code #009DFF.
3. Make Sprite Light dynamic
You’ve achieved a pixelated light effect, but it currently has one major limitation: the light doesn’t react dynamically in real time when you enter Play mode. To add this dynamism, you can configure it through code. In this project, we’ve included a simple Visual Script Graph that makes the Mineral Light 2D behave with a sense of naturality.
1. With the Mineral Light 2D GameObject still selected, in the Hierarchy window, select the Add Component button and search for and add the Script Machine component.
This will also add the Variables component.
2. In the Script Machine component, select the Graph property picker (⊙) and select the Scale Wave asset.
3. In the Variables component, enter “Speed” in the (New Variable Name) box and select the Add (+) button.
4. Open the Type dropdown and select Float, then set the Value property to 3.
5. Enter Play mode.
You’ll see that the light from the Mineral Light 2D GameObject pulses smoothly, mimicking the natural radiance of a glowing object.
You can experiment with the Value property until the light behaves the way you want it to.
Tip: Remember to exit Play mode before changing the Value property, as changes made in Play mode aren’t saved on exit.
6. Save your scene using File > Save or Ctrl+S (macOS: Cmd+S).
4. Next steps
Congratulations!
You’ve added different Spot Light 2D GameObjects to your scene and learned how to adjust their properties to light specific areas and cast shapes in different ways. In the next tutorial, you’ll learn how to add brightness and enhance the appearance of light using Emission Shaders.