Add a turn system
Tutorial
Beginner
+0XP
20 mins
492
Unity Technologies

This game is a turn based game, which means it needs a way to manage those turns.
By the end of this tutorial you'll have done the following:
- Created a TurnManager script that will track every time the player character moves and count that as one turn.
- Reworked the initialization code for the game to accommodate the new system.
1. Overview
Now that you have a player character that you can move across the game board, the next step is to add the turn system to this turn based game. In this tutorial, you’ll add and code the system that will handle counting turns down each time the player character moves and that will notify your game that a turn has happened so you can create other game mechanics around this functionality.
2. Turn manager
If you go back to your list of tasks, the next step after having a moving player is implementing a turn system when the player character makes a move.
To create a turn system, follow these instructions:
1. Right-click the Scripts folder in the Project window and select Create > Scripting > Empty C# Script. Name this script “TurnManager”
In this instance, you don’t need to use a MonoBehaviour script because, unlike the other scripts you’ve written so far, this one is a pure data class that just handles data and is not linked to a GameObject, so it doesn’t need to inherit from MonoBehaviour.
TurnManager
using UnityEngine;

public class TurnManager
{

}
Because this is not a MonoBehaviour script and doesn’t exist in the scene, there is no Start or Update method, so you'll need to create/initialize it manually, like you would when you initialize a Vector3 or your CellData.
There are several ways you might do this:
- Inside your BoardManager’s Start method.
- Inside your PlayerController’s Spawn method.
- Inside a new system that takes care of initializing everything needed for a level at start.
That last solution seems to be the cleanest, as there will probably be other things you need to initialize when the game gets more complex.
Think about the startup of your game. Right now you rely only on the Start method of the BoardManager to initialize everything, but later on when you want to handle multiple levels, you might need to call the initialization code again.
Instead of this, let’s create a GameManager GameObject that will be the entry point for everything the game needs when starting. It will consist of a script whose Start method will do the following:
- Initialize the TurnManager.
- Trigger the BoardGeneration.
- Spawn the Player.
So you have some new code to write and some refactoring to do first!
1. In the Main scene, create a new empty GameObject and name it “GameManager”.
2. Right-click the Scripts folder in the Project window and select Create > Scripting > MonoBehaviour Script. Name this script “GameManager”.
3. Add the GameManager script as a component to the GameManager GameObject.
4. Inside the script create two public references:
- One for the Board of type BoardManager.
- One for the Player of type PlayerController.
5. Create a private variable of type TurnManager.
6. Inside GameManager script’s Start method do the following:
- Initialize the TurnManager (it’s just a normal class, so you can use “new”)
- Initialize the level (you’ll have to rename the Start method in the BoardManager to Init and make it public to be able to call it from this Start method)
- Spawn the player at (1,1), so you'll have to remove the call to spawn the player from the BoardManager Init method.
You should be able to do it all by yourself, and here is what the final scripts look like:
BoardManager
public class BoardManager : MonoBehaviour
{
   public class CellData
   {
       public bool Passable;
   }

   private CellData[,] m_BoardData;
   private Tilemap m_Tilemap;
   private Grid m_Grid;

   public int Width;
   public int Height;
   public Tile[] GroundTiles;
   public Tile[] WallTiles;

   public void Init()
   {
       m_Tilemap = GetComponentInChildren<Tilemap>();
       m_Grid = GetComponentInChildren<Grid>();

       m_BoardData = new CellData[Width, Height];

       for (int y = 0; y < Height; ++y)
       {
           for(int x = 0; x < Width; ++x)
           {
               Tile tile;
               m_BoardData[x, y] = new CellData();

               if(x == 0 || y == 0 || x == Width - 1 || y == Height - 1)
               {
                   tile = WallTiles[Random.Range(0, WallTiles.Length)];
                   m_BoardData[x, y].Passable = false;
               }
               else
               {
                   tile = GroundTiles[Random.Range(0, GroundTiles.Length)];
                   m_BoardData[x, y].Passable = true;
               }

               m_Tilemap.SetTile(new Vector3Int(x, y, 0), tile);
           }
       }
   }

   public Vector3 CellToWorld(Vector2Int cellIndex)
   {
       return m_Grid.GetCellCenterWorld((Vector3Int)cellIndex);
   }

   public CellData GetCellData(Vector2Int cellIndex)
   {
       if (cellIndex.x < 0 || cellIndex.x >= Width
           || cellIndex.y < 0 || cellIndex.y >= Height)
       {
           return null;
       }

       return m_BoardData[cellIndex.x, cellIndex.y];
   }
}
GameManager
public class GameManager : MonoBehaviour
{
   public BoardManager BoardManager;
   public PlayerController PlayerController;

   private TurnManager m_TurnManager;

   // Start is called once before the first execution of Update after the MonoBehaviour is created
   void Start()
   {
       m_TurnManager = new TurnManager();

       BoardManager.Init();
       PlayerController.Spawn(BoardManager, new Vector2Int(1,1));
   }
}
Don’t forget to assign the BoardManager and PlayerCharacter references in the Inspector window of the GameManager, and enter Play mode to check you can still move the player character properly across the board.
Important: If the game doesn’t work properly in Play mode, carefully read the errors that appear in the console and try to understand them:
- The Null reference error means something is not assigned properly, so you may have forgotten to assign the reference in the Inspector window of your GameManager GameObject.
- Expected or does not exist errors are usually typo errors: you have made a mistake in a variable name or are missing a bracket or semicolon somewhere in your code.
3. Ticking turn
Now that you’ve reworked your initialization phase, let’s finally make the turn system tick.
To do this, you’ll need a private member variable that saves the current turn number, initialized at 1 in the constructor, and a Tick method that increases the count by 1 and writes the current turn count using the Debug.Log method, like the following:
public class TurnManager
{
   private int m_TurnCount;

   public TurnManager()
   {
       m_TurnCount = 1;
   }

   public void Tick()
   {
       m_TurnCount += 1;
       Debug.Log("Current turn count : " + m_TurnCount);
   }
}
Then you’ll need to call Tick every time the player moves. But how to do this? The only place that has a reference to the TurnManager is inside the GameManager.
You could pass the GameManager to our Player, like you did for the BoardManager, but as a lot of other things in your game may require access to the GameManager, it’s a better idea to explore another method: the singleton pattern.
Using a singleton pattern means that there can only be one instance of a given class in your game/application and you can access it through a static member accessible from anywhere.
Like every decision you make in code architecture, singleton patterns have their drawbacks: they’re hard to use with multithreading and can make unit testing harder. Those are advanced use cases that are of no concern to you in this project, but because coding is about building good habits, , it’s often best to use them sparingly. However, in certain cases, they’re a powerful tool that makes code faster to write and simpler to understand. In the case of the TurnManager script, the drawbacks of a singleton pattern are worth it in exchange for not having to pass the GameManager all around your application code to every object that needs it.
This is our new singleton GameManager:
public class GameManager : MonoBehaviour
{
   public static GameManager Instance { get; private set; }

   public BoardManager BoardManager;
   public PlayerController PlayerController;

   private TurnManager m_TurnManager;

   private void Awake()
   {
       if (Instance != null)
       {
           Destroy(gameObject);
           return;
       }

       Instance = this;
   }

   void Start()
   {
       m_TurnManager = new TurnManager();

       BoardManager.Init();
       PlayerController.Spawn(BoardManager, new Vector2Int(1,1));
   }
}
There are a couple of new things in this code, so let’s check them out:
- There is a static GameManager property member called Instance. This will store a reference to your GameManager. You can see that there are two keywords: get and set. set is preceded by the private keyword. What this means is that accessing that member variable (get) is available for all parts of the code, but writing the value of that member variable (set) can only be done from inside the class.
- A new method called Awake was added. This is called before Start when the GameObject is created. In this method, the following happens:
- The code tests if Instance is null. If it’s not, that means there’s already a GameManager. This shouldn’t happen because a singleton pattern needs to be unique, so we destroy this GameManager and exit the method (as this is a void type method, “return;” doesn’t return anything).
- If there is no GameManager stored yet (Instance is null) we store that GameManager in Instance.
Now you can use the following instance anywhere in your code to access the GameManager:
GameManager.InstanceNow if you change the TurnManager variable of the GameManager to be public, other scripts will also be able to access it through GameManager.Instance. Note that in the code example below, we use the same trick used for the Instance variable, and define the TurnManager set property as private so only the GameManager script can change this variable, but leave the get property public so other scripts can access the TurnManager.
public class GameManager : MonoBehaviour
{
   public static GameManager Instance { get; private set; }

   public BoardManager BoardManager;
   public PlayerController PlayerController;

   public TurnManager TurnManager { get; private set;}

   private void Awake()
   {
       if (Instance != null)
       {
           Destroy(gameObject);
           return;
       }

       Instance = this;
   }

   void Start()
   {
       TurnManager = new TurnManager();

       BoardManager.Init();
       PlayerController.Spawn(BoardManager, new Vector2Int(1,1));
   }
}
Then in the Update method of your PlayerController, you can “tick” the TurnManager just before calling MoveTo:
if(hasMoved)
{
   //check if the new position is passable, then move there if it is.
   BoardManager.CellData cellData = m_Board.GetCellData(newCellTarget);

   if(cellData != null && cellData.Passable)
   {
       GameManager.Instance.TurnManager.Tick();
       MoveTo(newCellTarget);
   }
}
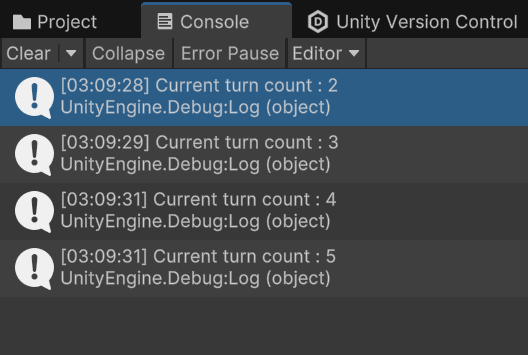
Now you can try to play the game and check that a new turn count is printed in the console every time you move.

Tip: Remember to check in all those changes in the Unity Version Control system!
4. Next steps
Your game now has a turn system and is becoming a lot more game-like! In the next tutorial, you’ll take this even further and add a food resource to your game.