Set up your project
Tutorial
Beginner
+10XP
10 mins
2282
Unity Technologies

So you’ve finished 2D Beginner: Adventure Game and are now familiar with how Unity works, but what’s next? How do you transform an idea into a working application?
This 2D Roguelike tutorial will do the following:
- Help you organize and prioritize tasks from ideas
- Go over more complex programming concepts
- Explore using a pixel art aesthetic in Unity
In this course you’ll create a project that will use graphical and audio assets that are provided.
This might make this tutorial a bit longer to complete, but by the end of it, you’ll have created and coded an entire vertical slice of a game! A vertical slice is a functioning part of a larger game, used to test how the final game would look and play.
You’ll also follow the same process that you would follow prototyping a game from an idea, writing code and refactoring it to make it more elegant and useful as you stumble on problems or limitations.
Materials
1. Overview
A roguelike is a traditional game genre that has taken many forms over the years, but it usually shares some common elements, such as the following:
- It’s procedurally generated, meaning the levels in the game aren't created by a human and thus always the same, but instead they’re assembled randomly by the code, so every time the game is played, the levels are different.
- The game is played on a grid, meaning all entities (player and enemies) move from cell to cell on that grid.
- The game is turn-based, meaning nothing will happen until the player takes an action (move, attack, etc.), which gives players the chance to think strategically between each action.
In this tutorial, you’ll start by creating the Unity project for this game. You’ll then import the assets that will be used throughout the tutorial, set up all the settings for rendering, and set up Unity Version Control. Lastly, before you start creating, you’ll organize ideas about the game to create a plan on how to make it.
To play an example of the game you’ll be creating, check out our version of 2D Roguelike on Unity Play.
2. Create and prepare your project
To create your project and get it ready to work on, follow these instructions:
1. Open the Unity Hub and install Unity 6.
2. Create a new project using Editor version 6.000 LTS, name it “Roguelike”, and select the Universal 2D template.
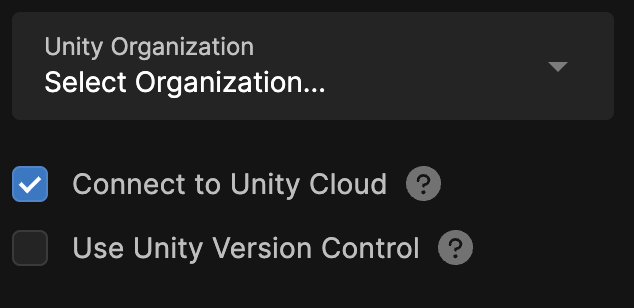
3. Enable Connect to Unity Cloud and Use Unity Version Control.

This will allow you to use Unity Cloud and Unity Version Control in your project.
4. Select Create project.
Once your new Roguelike project is open in Unity, you need to change some default settings for this project.
5. In the Project window, select Assets > Settings, then select the Renderer2D file.
This is all the settings used by the rendering pipeline to display your assets in the game.
6. In the Inspector window, under the General section, change the Default Material Type from Lit to Unlit.
Lit materials are affected by dynamic lighting, where lights can move and be switched on and off for a more realistic look. But Lit materials require additional computation in order to be rendered. As this project uses a traditional pixel art style, where lighting is drawn directly on the sprite, dynamic lighting isn't needed, so Unlit materials should be used, because they are easier and faster to render.
Now every time a new sprite is created, it will be assigned an Unlit material automatically instead of a Lit one.
Your project is now set up for you to start working on it.
Unity Version Control
This tutorial won’t cover Unity Version Control in detail, but you can refer to the Get started with Unity Version Control project for more information on it.
Unity Version Control allows you to take snapshots of the state of your project and save them on a server. This ensures the following things:
- You safeguard your project against loss: if your computer has a problem, the project is safely stored online.
- You can work on multiple machines, as everything is stored online.
- Multiple people can share their changes on the same project remotely.
- You can revert any files to a previous saved state. This is particularly useful when you try new things that don't work and need to revert to the last working state, or when a bug suddenly appears and you need to track down what changes have been made since it appeared.
3. Import assets
We’ve provided you with the assets you’ll need to complete this project. To download these assets and add them to your project, follow these instructions:
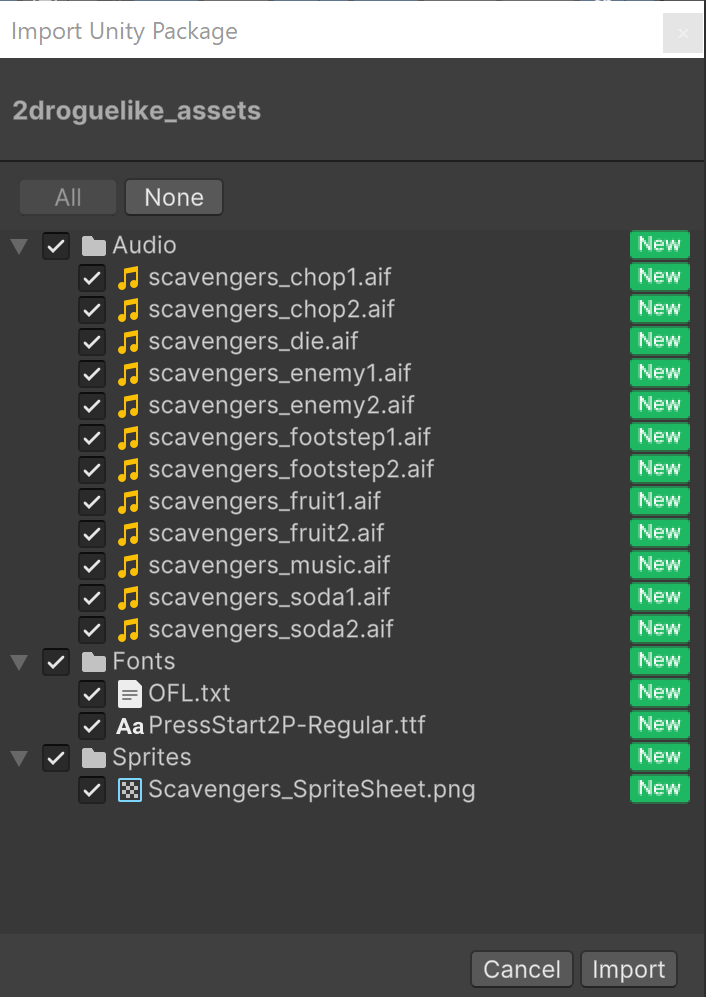
1. Download the asset package, unzip the file and drag and drop it into the Assets folder of the Project window.
The Import Unity Package window will open, listing all the assets this package will import into your project.

This package contains all the assets you'll need to complete this project.
2. Select Import.
There are three different themes for the sprites, so when you’re instructed to use a specific asset, you can pick any of the themes you want.
All of the assets are pre-configured (the Sprite Sheets have already been sliced into multiple sprites, their PPU has been set to the right value so the character is 1 unit in size, etc.). If you want to use your own assets and need a refresher on these settings and how this works, please refer to the [manual] or this tutorial in the 2D Beginner Adventure Game course.
4. Set a Fixed Aspect Ratio
To make sure your game always fits the screen the way you intend, you can set the Game view to use a fixed aspect ratio.
By default, Unity’s Game view uses Free Aspect, which automatically adjusts to the window size and may sometimes stretch or crop your game.

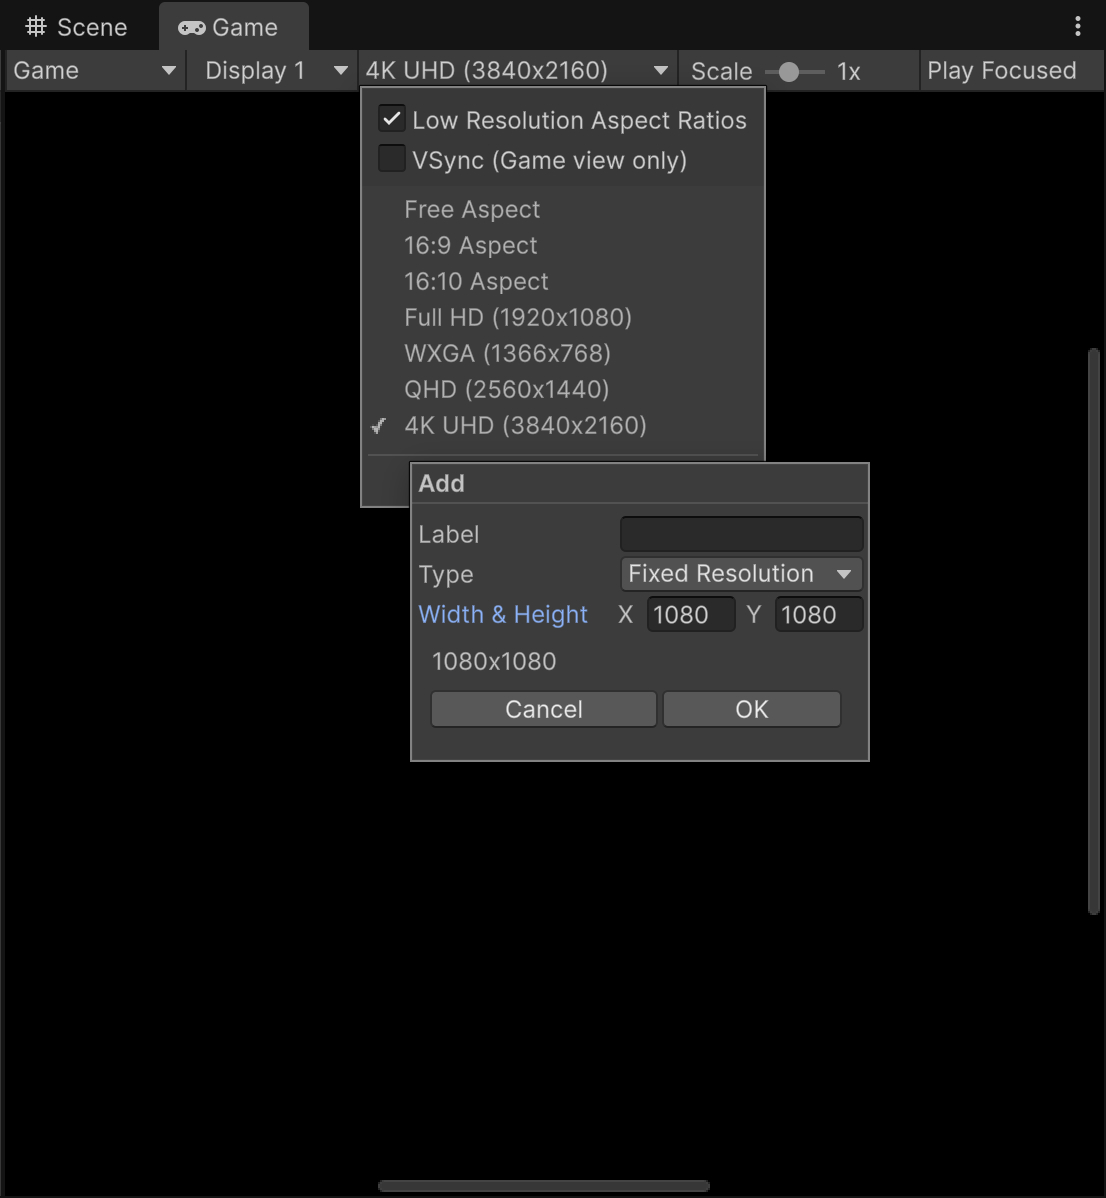
In this step, you’ll set a fixed 1:1 aspect ratio with a 1080 × 1080 resolution, so your layout remains consistent.
You may need to adjust your screen borders afterward to ensure they align correctly with the new display shape.
To set a fixed aspect ratio:
- In the Game window, open the Aspect Ratio dropdown (likely labeled Free Aspect).
- Select Add New Item (+).
- In Type, choose Fixed Resolution.
- Set Width and Height to 1800 × 1800, then select OK.
By locking the aspect ratio, you ensure that your game’s layout always displays as intended, regardless of the player’s screen size or shape.
5. Architecturing
When you have an idea for a new project, you'll often find yourself thinking the same thing: “where do I start?”. Interactive applications are complex systems where things tend to depend on others to function, so a good way to begin is to take some time to break down your ideas into chunks of actionable tasks.
For example, let’s say you’re trying to create a simple racing game. First, you can start with writing a description of what is done inside the game:
“I need the player to drive a car around a circuit and other cars race alongside them.”
From this short description, you can list some of the elements that your game will need:
- A circuit that is the main part of the environment of the game.
- The cars of the player and opponents.
- Computer controlled behavior for the adversaries.
Going through each item you can start finding dependencies between them: a circuit only makes sense if things on it can leave it, and the adversaries need cars to control and a circuit to follow. So the natural order seems to be the following:
- First, code the car control, on an empty space, just to focus on the car physics and movement.
- Then code a circuit that makes controlling the car an actual task (so coding penalties if getting out of it etc.)
- Finally, you can code the behavior of the other cars that try to automatically follow the circuit.
By doing this you just created a task list, and remove the overwhelming feeling of not knowing what needs to be done first. The lists you'll create will never be complete, and order will have to change, which it's normal. No plan survives its contact with the real world, but at least now you have a guiding light!
Let's try to do this process with the game you're trying to make in this tutorial.
Roguelike 2D Game Architecture
Let’s first define some of the aspects that the game is going to have:
- The scenery of the game consists of a board made of square cells.
- The components of this board are generated randomly when the game starts and for each level. This is called procedural generation, so no two scenes will be the same.
- The player can move to any cell directly adjacent: left, right, up, or down.
- The game is played turn based, meaning nothing happens until the user makes an action, which advances (tick) the game one unit. This “tick” is the base unit of time of the game.
- The goal is for the player character to reach an exit cell that will take them to the next level.
- The player starts with a certain amount of food, and with each tick of the game, one unit of food is consumed.
- Walls are placed randomly in the level to stop the player from moving where they want. However, they can be destroyed by repeatedly attacking them.
- If the player ever runs out of food, the game ends; this is game over!
- There are enemies on the board who will move on each tick (so only when the player character moves).
- If an enemy moves into the player character, they will hurt them by consuming a certain amount of food.
- If the player character moves into an enemy, they will hurt the enemy, removing 1 health point from them.
- Once an enemy is at 0 health points, they are removed from the board.
- Some cells contain food. When the player character enters them, they collect the food.
From that game description, you can now list all the tasks you'll need to do, and try to order them based on their dependency from each other. Feel free to try it on your own as an exercise, but this is the order the tutorial will follow:
- Everything happens inside the game board and the cell is the base unit of space, so this is probably the first thing you'll need. You should start by writing the code that generates a game board of square cells randomly on each level.
- You then need to create a player character that can be placed on the board and moves through it. Once this is done you can start adding special rules like not allowing them to move on some special cells.
- The game is turn based and ticks every time the character moves. As you now have a moving character, you can now add a turn system.
- Now that we have a game that “ticks”, we can finally add the food resources.
- We can also add walls now, as collectables inside of cells (food resources) were just added.
- Next step is adding the exit cell to finish the level. Detecting when the player enters a given cell is necessary not only for this part but also for collecting the food collectibles you previously created.
- Now that you have the exit cell, it’s time to start working on the “gameplay loop”. You want to increase the level number everytime the player reaches an exit, generate a new level, and handle the case when the food reaches zero so the game is over. This is where you can create a Gamemanager that will take care of initializing the game (generate the board, place the player etc.), check for and handle the “game over” conditions.
- Finally you can add enemies to increase the complexity of the game.
6. Next steps
You’ve created your project and thought about the way your game will run; in the next tutorial you’ll begin working on your game in earnest by creating a game board that your game will take place on!