
Add win and lose conditions
Tutorial
Beginner
+0XP
15 mins
252
Unity Technologies
The game currently has the following elements:
- A player that can move through the current board.
- A food counter that decreases on each turn and objects on the board that refill that counter.
- Walls that stop the player from moving where they want and can be destroyed.
If you refer back to the task list you made at the beginning of the tutorial, you have everything needed to start adding the end to a level and generating a new one!
Finishing a level is triggered by reaching a certain cell marked as the exit point, and you can use the CellObject to detect if the player enters a certain type of cell!
By the end of this tutorial, you’ll have done the following:
- Added an exit cell that, once the player character touches it, ends the current level.
- Coded the functionality to spawn a new level when the old one ends.
- Added a Game Over state if the player runs out of food.
- Used the UI Builder window to add a Game Over Label to the game when the player loses.
1. Overview
Now your game has some more complicated elements like a turn system, a food system, and obstacles. Now it’s time to bring it all together. In this tutorial, you'll add win and lose conditions to make your game a true game!
2. Finishing a level
Let’s start by writing a new type of CellObject, ExitCellObject, that sets the tile to an exit tile (so the player knows where the exit is) and reacts to the player character entering that cell by generating a new level.
To do this, you’ll need to do the following:
- Create a new ExitCellObject subclass that inherits from CellObject.
- Create a new exit tile (there’s an exit sign sprite you can use for this).
- Give the exit tile as a public reference to your new ExitCellObject.
- Create a prefab of this new type of CellObject.
- Give that prefab as a new public reference to your BoardManager so it can add the object to the exit cell (Use the upper-right empty cell as the exit position).
Now that you know the requirements you need to complete, let's start with the code.You should know everything needed to write the ExitCellObject subclass; you can leave the override PlayerEntered function empty for now, or use a Debug.Log to check if it works. This is what we ended up with:
using UnityEngine;
using UnityEngine.Tilemaps;

public class ExitCellObject : CellObject
{
   public Tile EndTile;

   public override void Init(Vector2Int coord)
   {
       base.Init(coord);
       GameManager.Instance.BoardManager.SetCellTile(coord, EndTile);
   }

   public override void PlayerEntered()
   {
       Debug.Log("Reached the exit cell");
   }
}
1. Add a new empty GameObject to your scene, rename it “ExitCell”, and add the above script to it.
2. In the Inspector window, assign the tile asset you want to use for your exit to the EndTile property, then create a prefab of this ExitCell GameObject and delete it from the scene.
3. Add a reference to the ExitCell prefab in your BoardManager and spawn that GameObject in the upper-right corner (at the opposite end of the player character’s starting position) during the level creation phase.
4. Inside the Init function, after the for loops that generate the board, add the following code:
public class BoardManager : MonoBehaviour
{

public ExitCellObject ExitCellPrefab;

...

public void Init()
{

   ...
   for (int y = 0; y < Height; ++y)
   {
        ...
   }

   m_EmptyCellsList.Remove(new Vector2Int(1, 1));

   Vector2Int endCoord = new Vector2Int(Width - 2, Height - 2);
   AddObject(Instantiate(ExitCellPrefab), endCoord);
   m_EmptyCellsList.Remove(endCoord);

   GenerateWall();
   GenerateFood();
}
You need to remember to remove the exit cell from the empty cell list that you use to place CellObjects, because you don’t want to spawn food or a wall on the exit cell.
Now when you enter Play mode, you should have the exit tile appear in the upper-right corner.
If it doesn’t appear and there are errors in your console, verify you have correctly assigned the references to the ExitCellObject prefab and the BoardManager in your scene.
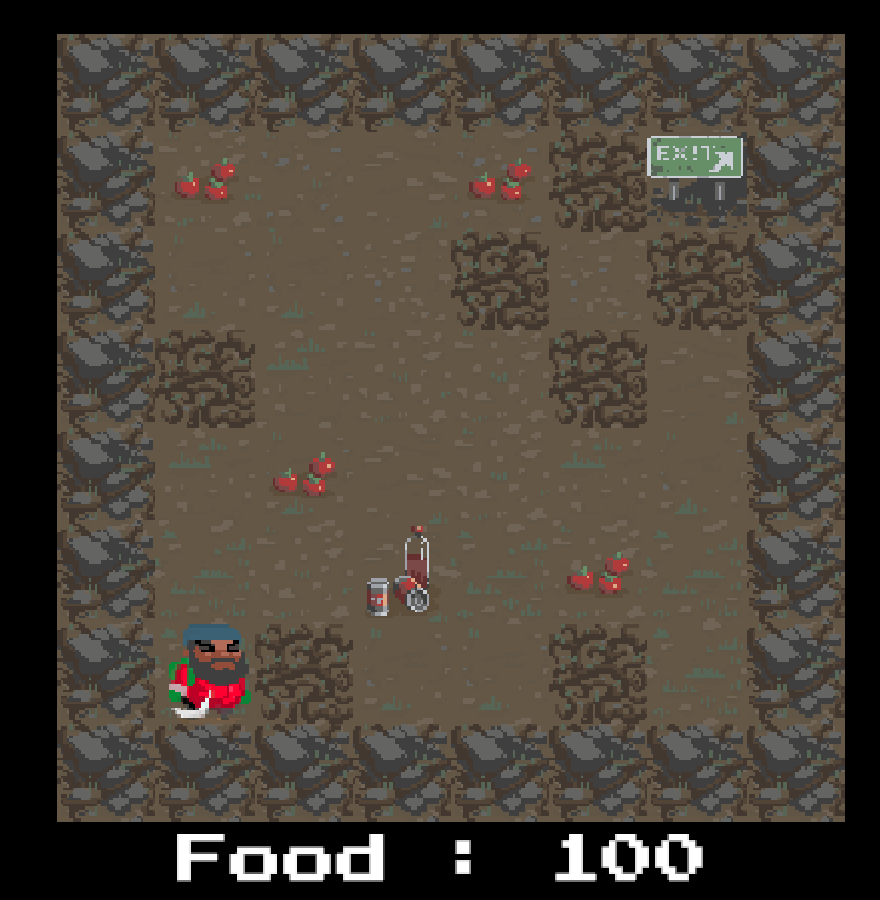
Currently when the player reaches the exit cell, the game only prints a line in the console, but you need to modify the GameManager and the BoardManager so it can regenerate a new level when this happens!
Generating a new level
Feel free to try writing the code from scratch by yourself! Here are some hints to help you list the things you’ll have to do:
- BoardManager will need a new function that cleans the current level. This means going over every cell, removing their tile from the tilemap, deleting the data saved inside them and destroying their CellObject.
Hint: If you pass null as the argument of the SetTile function, it will remove the cell’s tile and leave it empty.
- GameManager will need a NewLevel function that will clean the current board, create a new one, and spawn the player character at the start of this new board.
As a small bonus, you can declare a new int member called m_CurrentLevel that is initialized to 1 and that gets incremented every time you create a new level in order to count how many levels the player has passed.
Here are our solutions to this problem:
BoardManager
public void Clean()
{
    //no board data, so exit early, nothing to clean
   if(m_BoardData == null)
       return;


   for (int y = 0; y < Height; ++y)
   {
       for (int x = 0; x < Width; ++x)
       {
           var cellData = m_BoardData[x, y];

           if (cellData.ContainedObject != null)
           {
               //CAREFUL! Destroy the GameObject NOT just cellData.ContainedObject
               //Otherwise what you are destroying is the JUST CellObject COMPONENT
               //and not the whole gameobject with sprite
               Destroy(cellData.ContainedObject.gameObject);
           }

           SetCellTile(new Vector2Int(x,y), null);
       }
   }
}
GameManager
private int m_CurrentLevel = 1;
...
void Start()
{
   TurnManager = new TurnManager();
   TurnManager.OnTick += OnTurnHappen;

   NewLevel();

   m_FoodLabel = UIDoc.rootVisualElement.Q<Label>("FoodLabel");
   m_FoodLabel.text = "Food : " + m_FoodAmount;
}

public void NewLevel()
{
   BoardManager.Clean();
   BoardManager.Init();
   PlayerController.Spawn(BoardManager, new Vector2Int(1,1));

   m_CurrentLevel++;
}
Note that we replaced the call to BoardManager.Init and PlayerController.Spawn from Start with the NewLevel method that does the same thing!
ExitCellObject
public override void PlayerEntered()
{
   GameManager.Instance.NewLevel();
}
Enter Play mode and watch the player character being transported into new levels of the game each time it reaches the exit cell.
3. Game over
The player can now navigate an infinite number of levels. But if they run out of food, nothing happens.
For your game to have an ending, let’s add a Game Over state to the game. This will occur when the food count reaches 0. After that, this is what needs to happen:
- The UI text display will need to change to a GameOver message that shows how many levels the player survived before running out of food.
- The game will need to be set to a Game Over state that disables reading input so the user can’t move the player character anymore.
- The whole game will need to restart at level 1 when a certain key is pressed to create a game loop.
Let’s start with the UI game over message, which will consist of a semi transparent background that darkens the screen and a text in the middle that shows the number of completed levels:
1. In the UI folder of the Project window, double click the uxml document GameUI to open the UI builder window.
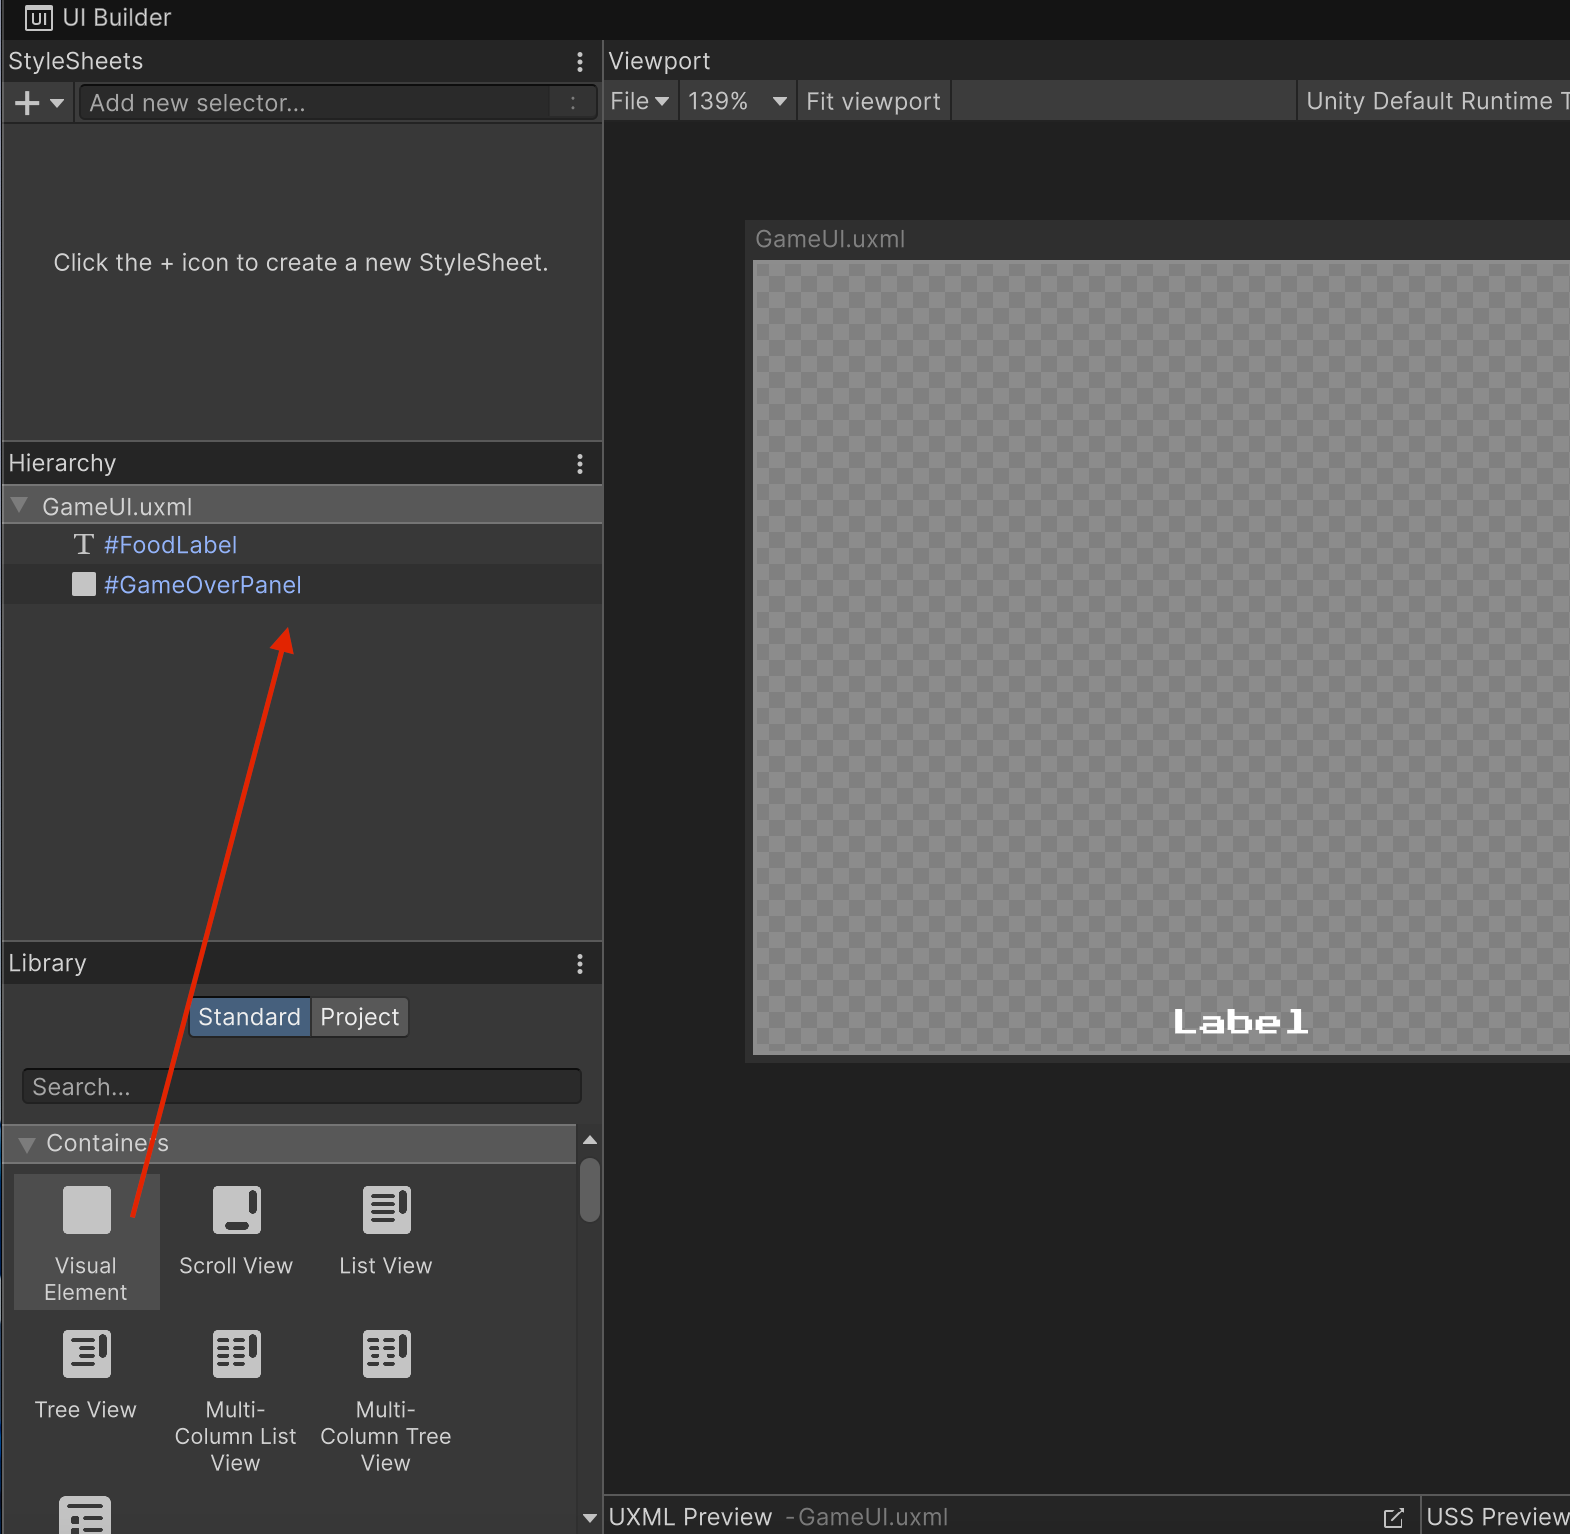
2. In the Library window, in the Containers section, click and drag a VisualElement into the Hierarchy window and rename it “GameOverPanel”.
Make sure it’s placed below after the FoodLabel in the Hierarchy window, as objects are rendered from top to bottom, so being below after FoodLabel means it will be rendered above the FoodLabel.
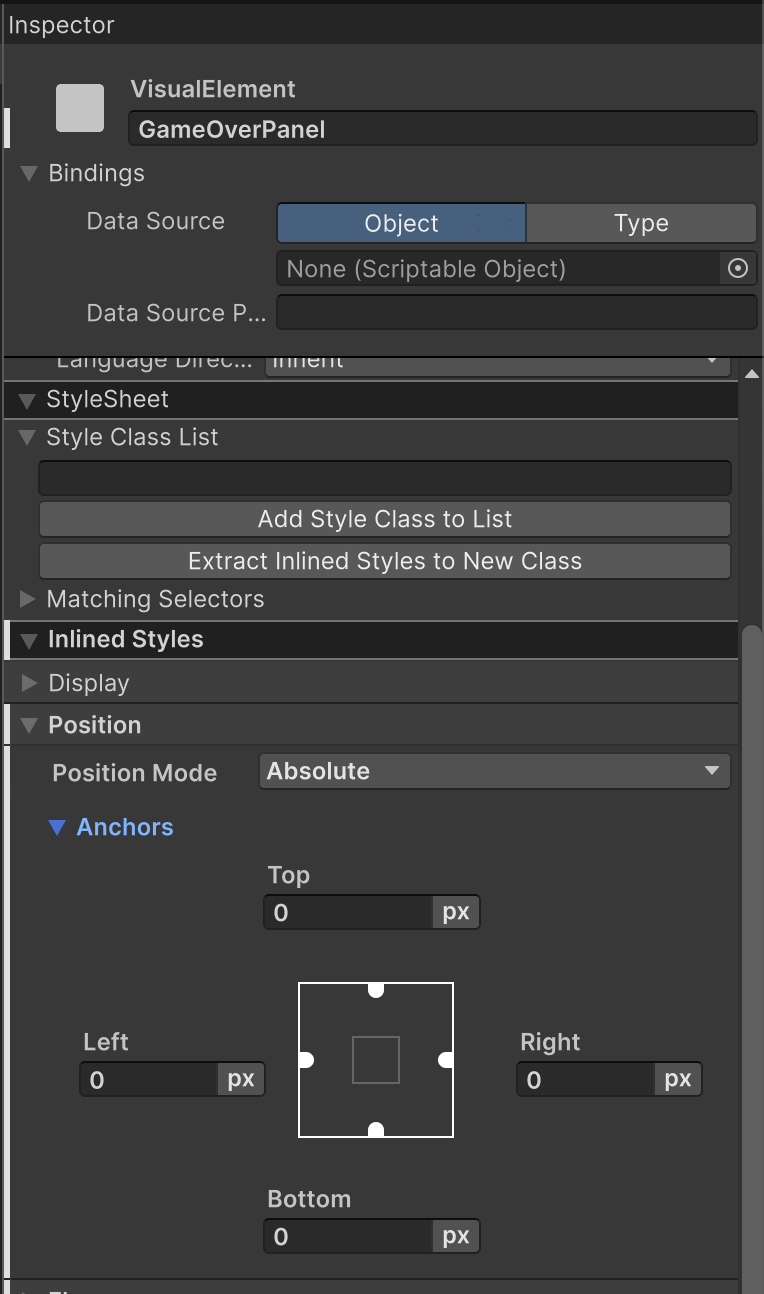
3. With the GameOverPanel Element selected, use the foldout (triangle) to expand the Position section in the Inspector window, then open the Position Mode dropdown and select Absolute and set the Top, Right, Bottom and Left offsets to 0, to make sure it covers the entire screen.
You don’t want the GameOverPanel Element to be part of the layout, you want it to be over everything.
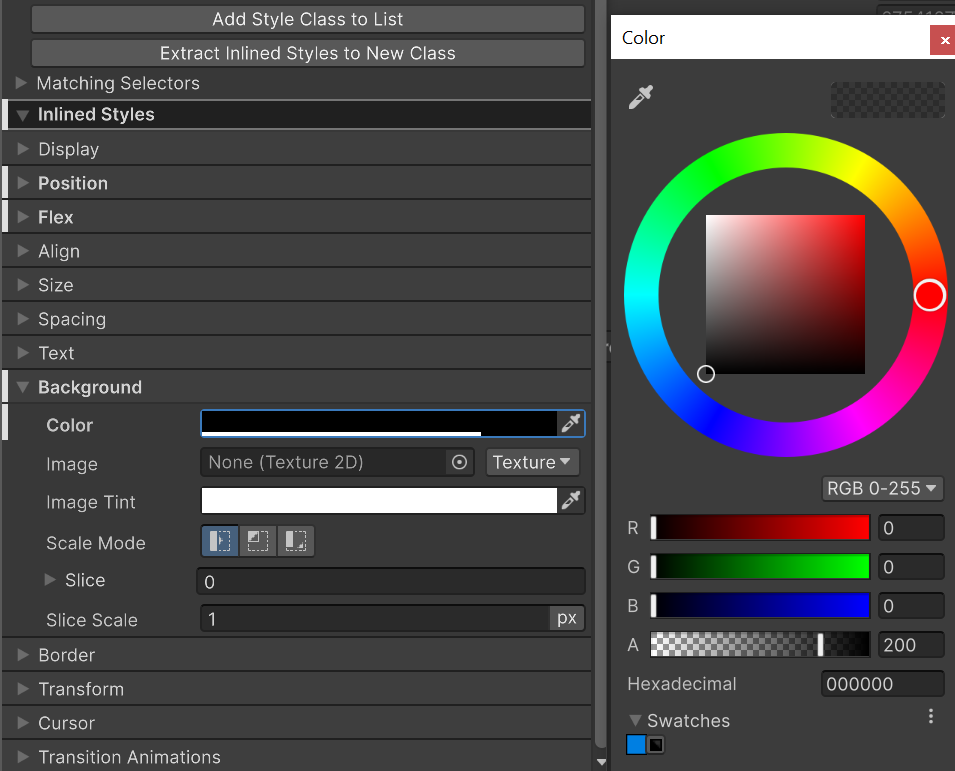
4. Use the foldout (triangle) to expand the Background section and set the Color to black (000000) but with an alpha (A) value of ~200.
Feel free to play with this value; check out the Game view for a preview of how dark it will be.
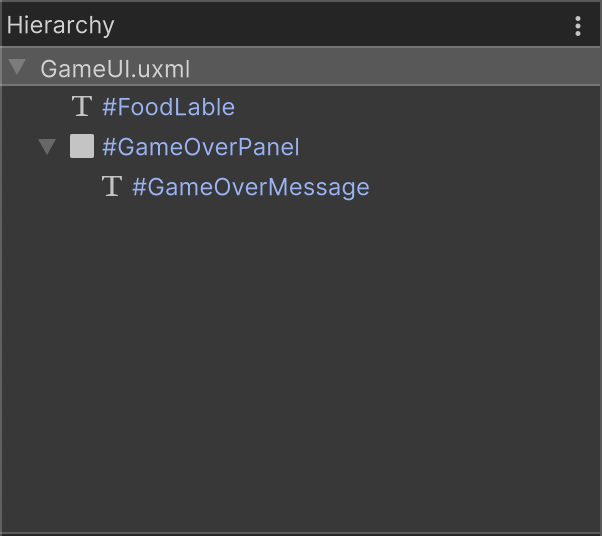
5. In the Library window, in the Controls section, click and drag a Label into the Hierarchy directly on top of the GameOverPanel Element , then rename that Label Element “GameOverMessage”.
This makes the GameOverMessage Element a child Element of the GameOverPanel Element.
Your Hierarchy window should look like the image below. If that’s not the case, you can rearrange it by dragging the elements in the Hierarchy window until it looks like the following example:
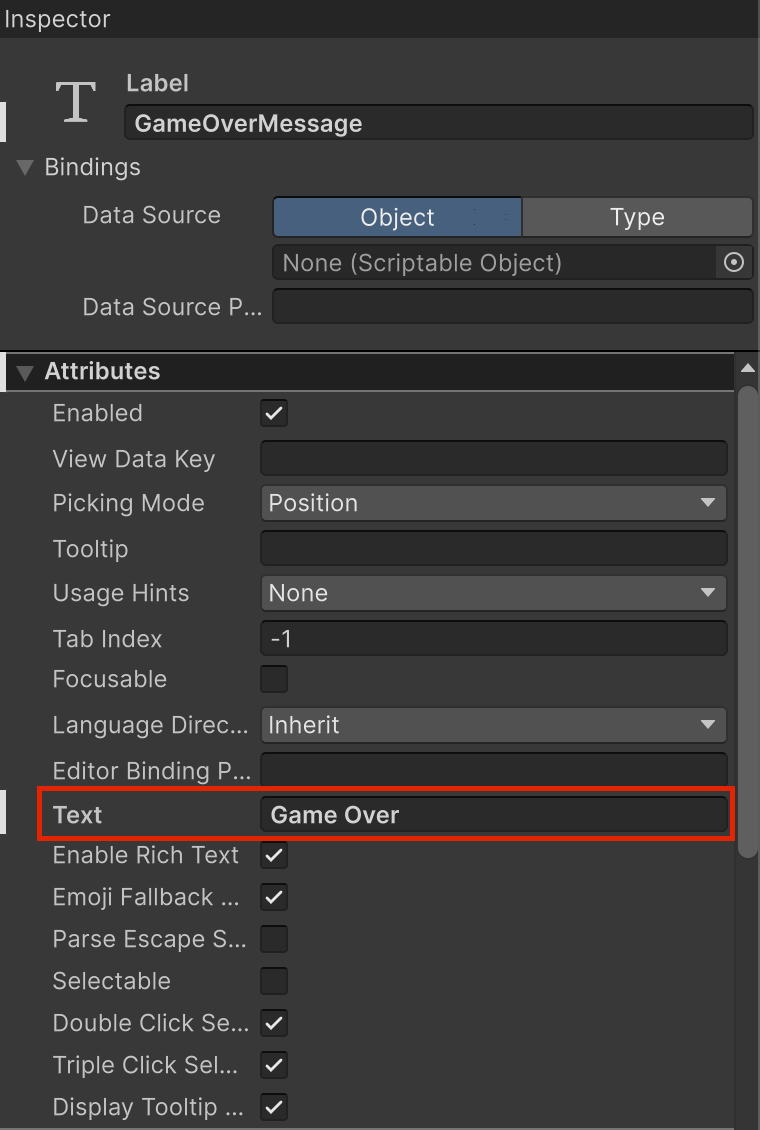
6. With GameOverMessage selected, use the foldout (triangle) to expand the Attributes section and set the Text property to “Game Over”. Then use the foldout (triangle) to expand the Inlined Styles section, then the Text section and change the Font, Size, and Color of the text to make it visible on the dark background.
The Game Over Text property is a placeholder to help you design its look; the real message will be written through code when a game over event happens.
For now, the GameOverMessage is in the upper-left corner of the Viewport window because the default layout is column based, starting from the upper left. But a game over text should be more striking to alert the user, so let’s center it.
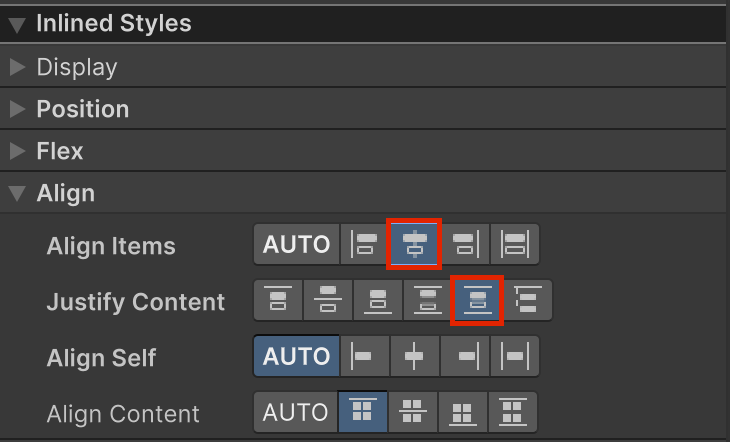
7. Select the GameOverPanel GameObject and use the foldout (triangle) to expand the Inlined Styles section, then the Align section in the Inspector window. Set the Align Items property to center and the Justify Content property to space-around.
If you enter Play mode now, the GameOverPanel GameObject will be all over the game from the start. You need to hide it when the game starts and only display it when the game-over condition happens.
You’ll need two new private members variables in the GameManager to achieve this:
- One of type VisualElement, to store the reference to the GameOverPanel Element.
- One of type Label to store a reference to the GameOverMessage Element so you can update it when the GameOver condition happens.
private VisualElement m_GameOverPanel;
private Label m_GameOverMessage;
8. In the Start function of the GameManager, you need to retrieve The GameOverPanel VisualElement and the GameOverMessage Label from the UI Document root VisualElement and set the visibility of the panel to Hidden:
m_GameOverPanel = UIDoc.rootVisualElement.Q<VisualElement>("GameOverPanel");
m_GameOverMessage = m_GameOverPanel.Q<Label>("GameOverMessage");

m_GameOverPanel.style.visibility = Visibility.Hidden;Note: The reason we use the Query (Q) function on the GameOverPanel to retrieve the message GameOverMessage Label Element is because we know it’s a child Element of the panel; this way, there’s no need to run the query over the whole hierarchy.
9. In the ChangeFood function of the GameManager, you need to test if the food Amount is 0 or less. If it is, this is the Game Over condition, which means you need to set the visibility of the GameOverPanel GameObject to Visible and display the message with the number of completed levels.
public void ChangeFood(int amount)
{
   m_FoodAmount += amount;
   m_FoodLabel.text = "Food : " + m_FoodAmount;

   if (m_FoodAmount <= 0)
   {
       m_GameOverPanel.style.visibility = Visibility.Visible;
      m_GameOverMessage.text = "Game Over!\n\nYou traveled through " + m_CurrentLevel + " levels";

   }
}Note: If you’re unfamiliar with \n, it’s a special character that denotes a new line. Here, after Game Over, we go to a new line, then to another new line (to leave one empty line) before continuing the message.
Enter Play mode now move the player character around the board until you run out of food to test it.
Tip: You can change the number you initialize the food amount at to a smaller value like 10 to speed up the test process.
You’ve now successfully implemented a game over scenario for your game! However, if you continue pressing buttons during the Game Over screen, you’ll see that the player character is still moving behind the Game Over panel and the game can still continue. You’ll fix this next.
Game Over state
To have the game truly end once the Game Over event has been triggered, you need to notify the PlayerController that it needs to enter a Game Over state and stop handling user input. Before you check out the solution below, think about what you need to do to implement this functionality and try to come up with your own solution. Here are some hints about what the PlayController needs to do:
- Create a bool variable in the PlayerController that stores whether the player character is in a Game Over state or not.
- Early exit the Update function to disable input handling. Make the GameManager have a reference to the Player Controller script so it can easily call functions on it.
The following is our solution:
PlayerController
using UnityEngine;
using UnityEngine.InputSystem;

public class PlayerController : MonoBehaviour
{
private bool m_IsGameOver;

. . .

public void GameOver()
{
   m_IsGameOver = true;
}

. . .

private void Update()
{
   if (m_IsGameOver)
   {
       return;
   }
...
}
Note: Make sure you write the if(m_IsGameOver) condition inside the Update function before all the other code related to handling the user’s input so that the code checking for input won’t be run if the game is in a game over state.
GameManager
public void ChangeFood(int amount)
{
     m_FoodAmount += amount;
     m_FoodLabel.text = "Food : " + m_FoodAmount;

     if (m_FoodAmount <= 0)
     {
         PlayerController.GameOver();
         m_GameOverPanel.style.visibility = Visibility.Visible;
         m_GameOverMessage.text = "Game Over!\n\nSurvived " + m_CurrentLevel + " days";
     }

}
And with this, the player character will stop responding to the user’s input when the GameOver condition happens!
Finally, you need to add the functionality that allows the user to restart the game when the Enter key is pressed during game over. This requires some refactoring of the GameManager; see if you can try to make it work by yourself!
To add this functionality, you’ll need to do the following:
- Move the part of the Start function in the GameManager that handles initializing the game into a new function called StartNewGame.
Things like getting references to UI elements or creating new objects like the TurnManager only needs to happen once when the game is launched, not every new game, and can be left in the Start function.
Note: Don’t forget to call that new function in the Start function too so that when the game is launched it starts a new game automatically!
- The PlayerController needs to check if the Enter key is pressed only during game over, and if it's pressed it starts a new game.
There will probably be a lot of errors and small problems as you try to make this functionality work. For example, a lot of things are only initialized at the launch of the game, which will need to be explicitly initialized in a function so they can be put back in the starting state, and you might find your food amount is wrong or you are unable to move the player.
Here is our solution:
GameManager
void Start()
{
   TurnManager = new TurnManager();
   TurnManager.OnTick += OnTurnHappen;

   m_FoodLabel = UIDoc.rootVisualElement.Q<Label>("FoodLabel");

   m_GameOverPanel = UIDoc.rootVisualElement.Q<VisualElement>("GameOverPanel");
   m_GameOverMessage = m_GameOverPanel.Q<Label>("GameOverMessage");

   StartNewGame();
}

public void StartNewGame()
{
   m_GameOverPanel.style.visibility = Visibility.Hidden;

   m_CurrentLevel = 1;
   m_FoodAmount = 20;
   m_FoodLabel.text = "Food : " + m_FoodAmount;

  BoardManager.Clean();
   BoardManager.Init();

   PlayerController.Init();
   PlayerController.Spawn(BoardManager, new Vector2Int(1,1));
}
We’ll keep everything that doesn’t change between two new games in the Start function, like creating objects (like the TurnManager) or retrieving components or UI elements. We’ll move all of the following steps to the StartNewGame function because they need to happen at the start of each new game:
- Hiding the GameOver message.
- Setting the level back to 1 at the start.
- Setting the starting food value (before it was only set through the default value, which would not be reset when just calling that function).
- Initializing the board.
- Initializing the player character and spawning it.
You might see an error appear in the code about the PlayerController.Init() function. This is because this is a new function we need to create. Here is the new content in PlayerController:
PlayerController
public void Init()
{
   m_IsGameOver = false;
}

private void Update()
{
   if (m_IsGameOver)
   {
       if (Keyboard.current.enterKey.wasPressedThisFrame)
       {
           GameManager.Instance.StartNewGame();
       }

       return;
   }

   ...
}
We need this new function to set the IsGameOver variable back to false in order to restart the game. Previously, like the FoodAmount, this was only set by the default value; but like food amount, this means that when you start a new game without relaunching the whole app, the m_IsGameOver variable stays true! So the player character would be unable to move after a restart because for the PlayerController, the game is still in a Game Over state.
Now you just need to check that if the game is in a Game Over state in Update and the Enter key is pressed, then the calls StartNewGame on the GameManager. Just as for inputs, in a full game you’ll probably want to handle this through Input Action so you can remap the button or handle multiple different buttons.
Finally, it’s also a good idea to update the Game Over message to notify the player that they can restart the game by pressing Enter.
4. Next steps
Congratulations, you now have a game that can end and be restarted! The next tutorials will focus on polishing the user experience.