
Scene setup
Tutorial
Beginner
+10XP
30 mins
(2056)
Unity Technologies
Establish a structured and functional Unity scene for the Tanks game by configuring the Unity Editor.
1. Overview
In this tutorial, you’ll configure the foundational elements of your Tanks game. You'll begin by setting up your Unity workspace for efficient development, then create a new scene and import the necessary assets. You'll add the level art, choose your tank, and position the main camera to ensure a clear view of the gameplay area.
2. Preview the finished Tanks game
Before you get started creating, it’ll be helpful to see an example of how your final game could turn out. Check out the video below to see an example or play it yourself in the demo project on Unity Play.
Whether you watched the video or played the game yourself, you probably noticed the following elements of the game:
- A Title screen with a button that takes you to the Player Selection screen.
- On the Player Selection screen, the option to select your tank based on its model and stats.
- The ability to assign up to four tanks as either controlled by P1 (player 1), P2 (player 2), or the computer.
- You can play 1-on-1 local multiplayer on the same keyboard or add additional AI-controlled tanks for an even more epic battle.
- Once the game starts, the tanks can drive around and fire at each other with the ability to charge up a shot for a longer range.
- When a tank’s health bar reaches zero, it explodes.
- The last surviving tank wins that round and then a new round begins.
- The first tank to win a certain number or rounds wins the game.
- The game is easily accessible on Unity Play and compatible with both desktop and mobile devices.
By the end of this course, you’ll have created a game with all of this functionality. If you want to push your skills even further, we’ve included optional challenges that will add more complexity to your game. Also, depending on the choices you make along the way, your game could look and feel very different than the example above.
When you’re done, you’ll build and publish your project on Unity Play, making it easy to share with friends and family.
But before you can do any of this, the first step is creating a brand new Unity project, which you’ll do next.
3. Create a new project and configure the Unity Editor
1. Create a new project
- From the Unity Hub, create a new project named “Tanks” using the Universal 3D template on any version of Unity 6.
- If you’re not sure how to do this, follow these instructions on how to create a new project from the Unity Hub.
2. Set the Layout
- In the upper-right corner of the Unity Editor, open the Layout dropdown and select 2 by 3.
- You can manually resize the height and width of the windows by clicking and dragging their edges.
- Select the Project window and drag and dock it below the Hierarchy window, then drag it up so that it’s about the same height as the Hierarchy window.
- In the Project window, select the More (⋮) menu in the upper-right corner and select One Column Layout.
This layout is popular among game developers because it allows you to see the Scene view and Game view at the same time.
Note: If the layout gets unintentionally misconfigured, reset it by reselecting 2 by 3.
3. Troubleshoot not visible Scene gizmo
Before moving elements in the Scene view, you need to ensure that the Scene orientation gizmo is enabled. This is essential for navigating your scene effectively.
- In the Overlay Menu of the Scene view, make sure the Orientation tool is turned on (highlighted in blue).
Check for the three cone gizmo in the upper-right corner of the Scene view, it should be visible.
Your Editor is now optimized for working with the Tanks project.
4. Import the project assets
We’ve provided you with the assets you’ll need to complete this project. In this step, you’ll download these assets and add them to your project.
1. Download the assets from the Asset Store
- In your internet browser, open the Tanks tutorial assets.
- Select Add to My Assets.
Note: You’ll need to be logged in with your Unity ID.
- When the completion dialog window opens, select Open in Unity.
- The package will open in the Package Manager window in the Unity Editor.
2. Install the package to your project
- Select Download.
Note: If you haven’t accepted the Asset Store EULA in a while, you’ll need to read and accept it before you can continue.
- Select Import [version] to project.
- Select Import. If the asset package requests to install dependencies, select Install/Upgrade.
- A dialog will open, asking you to confirm that this process will overwrite your current project settings. Select Import.
- The Import Unity Package window will open, listing the contents of the package. In the lower-right corner of the window, select Next then select Import.
The assets are now added to the Assets folder of your Unity project. When this process is completed, close the Package Manager window and continue to the next step.
5. Delete unnecessary files from your Assets folder
Everything you need to complete this project is included in the _Tanks folder that you just imported into the Project window. All of the other files and folders you can see in the Assets folder were generated when you created the project and are not necessary. In this step, to stay organized, you’ll delete all those unnecessary files.
1. Delete all of the additional files
- In the Project window, in the Assets folder, select the first item beneath the _Tanks folder.
- Hold Shift, then select the last item in the Assets folder to multi-select all the unnecessary items (not including the Packages folder).
- Right-click any of the selected items, then select Delete to remove them.
Now the only item in your Assets folder should be the _Tanks folder. This is the folder you’ll be working in throughout this course.
6. Create a new scene
Creating a new scene ensures a clean, organized starting point for your Tanks game. In this step, you’ll set up and save a dedicated scene.
1. Create your Main scene
- In the Project window, right click the _Tanks folder and select Create > Folder.
- Rename the new folder “Scenes”.
- Select the Scenes folder.
- Right click and then select Create > Scene > Scene, and rename it “Main”.
2. Open the Main scene
- Double-click Main to open your new scene.
- A dialog stating “Scene(s) have been modified” might appear, referencing the SampleScene. When prompted, select Don’t Save, as you have created a new scene, and this one is no longer needed.
- You should see the name of your scene (Main) appear at the top of the Hierarchy window.
You now have a new scene open, but it’s empty. In the next step, you’ll add an entire level into this empty scene.
7. Add the Level prefab
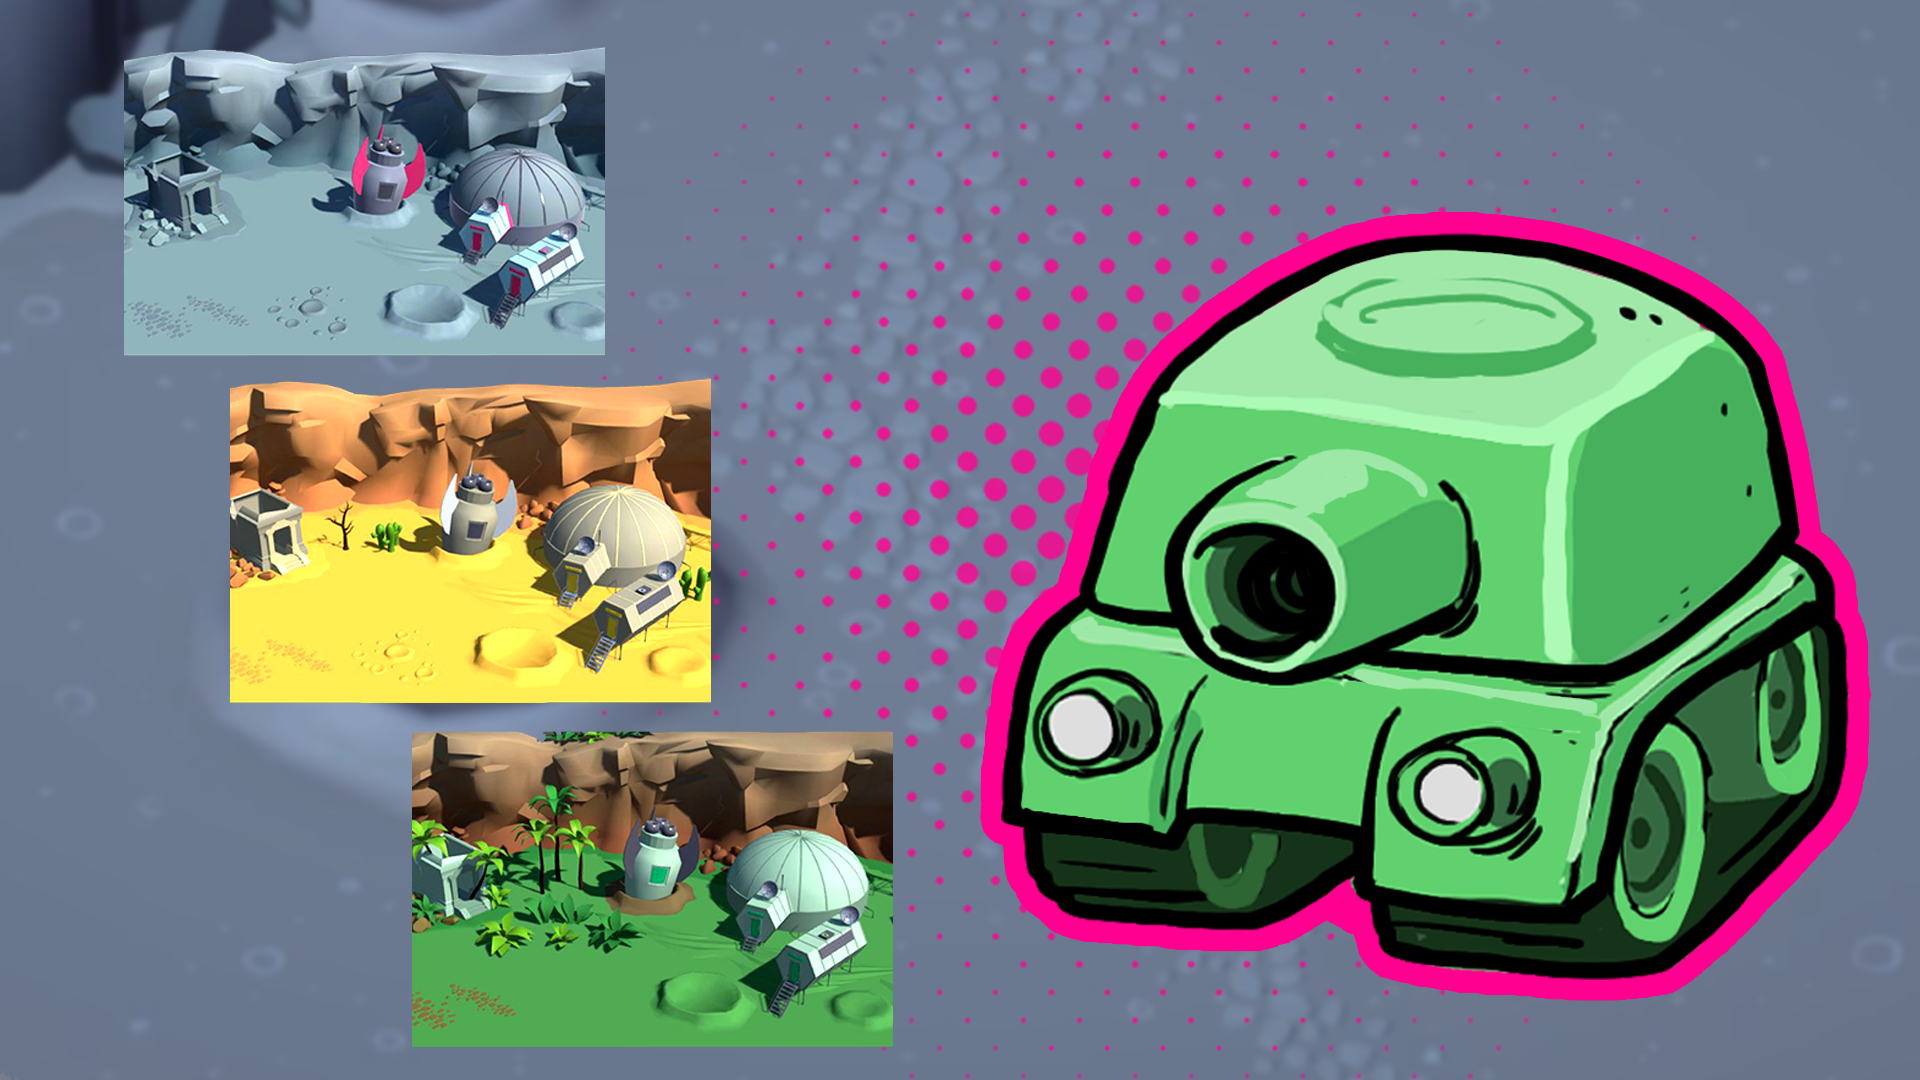
In this step, you'll add a complete level to your scene. You have three themes to choose from:
- Jungle – Explore a green terrain full of life, surrounded by tall palm trees and old ruins. A crashed rocket ship sits near an observation center, while hippos rest in the water, adding to the wild atmosphere.
- Moon – Explore a rocky lunar surface covered in craters and large moon rocks. A crashed rocket ship lies near a space base, adding to the mysterious setting.
- Desert – Move through sand dunes, where an abandoned oil extraction center once operated. Withered trees and a hidden oasis create a lonely and desolate atmosphere.
1. Explore the available Level prefabs
- In the Project window, open the _Tanks > Prefabs > Levels folders and browse the available level prefabs.
- To get a better preview of each level, drag the top of the Preview window up located at the bottom of the Inspector window.
- Left click on the object’s preview while you drag your mouse to rotate it around, allowing you to view it from different angles.
2. Add your desired Level to your scene
- Drag the Level[Theme] prefab into the Hierarchy window.
- Reset its position by setting its Transform component’s Position property to X = 0, Y = 0, and Z = 0.
The level prefab is now centered and ready for further adjustments.
8. Add the Tank GameObject
The tank is the central player-controlled object in the game. In this step, you’ll create a Tank GameObject, assign a tank model, and ensure it’s correctly positioned in the scene.
1. Create an empty container for your tank
- In the Hierarchy window, right click (or open the Add (+) dropdown in the upper-left corner) and select Create Empty. This will create a new empty GameObject on your scene.
- Rename it “Tank”.
- In the Inspector window, set its Transform component’s Position property to X = 0, Y = 0, and Z = 0.
Note: An empty GameObject contains no components except for its Transform component, which defines its position, rotation, and scale in space. Because of this, an empty GameObject is not visible in the Scene view, except for its Transform gizmos (the colored arrows).
2. Add your desired tank model
- In the Project window, open the _Tanks > Art > Models > Tanks folders, inspect all the models we have provided using the Preview window, and choose your favorite.
- Drag the Tank_[type]_Model of your choice onto the Tank GameObject in the Hierarchy window.
- In the Inspector window, make sure that the Transform component of the Tank_[type]_Model has its Position property set to X = 0, Y = 0, and Z = 0.
Note: Make sure you add the model as a child GameObject of the Tank GameObject.
The tank model is now part of the scene.
9. Adjust the camera
A well-positioned camera ensures clear visibility and an optimal gameplay experience. In this step, you’ll adjust the camera’s angle to provide a strategic view of the scene, making it easier to track the action.
1. Find your desired camera’s position
- Select the View tool from the Tools overlay, then drag using both the left-click and right-click until you get a good position in Scene view, with a downward diagonal view of the tank.
- Set your view high enough on the Y axis, positioning it above the walls and other objects in the scene. This ensures that when you set the camera to this position, its view won't intersect with any elements in the scene.
Note: Another way to navigate your scene is using Flythrough mode. You can access it by holding right-click and using the WASD keys.
2. Focus your camera view at that point
- Select the Main Camera GamObject in the Hierarchy window, then from the main menu of the Editor, select to GameObject > Align With View. You can also do this using the shortcut Ctrl+Shift+F (macOS: Cmd+Shift+F).
The camera is now set to provide a clear view of the level, tank, and objects.
10. Set the camera properties
Now that your camera is positioned correctly, we’ll set its projection type. There are two options: Perspective and Orthographic. Perspective projection mimics how the human eye sees depth, making objects appear smaller as they get farther away. Orthographic projection removes perspective distortion, keeping objects the same size regardless of distance. For this tutorial, we’ll use Orthographic projection because it aligns better with the visual style of our game.
1. Set the Projection to Orthographic
- With the Main Camera GameObject selected, in the Projection section of the Camera component, open the Projection property dropdown and select Orthographic.
2. Adjust the camera’s view
- In the Projection section, adjust the Size property’s value while looking at the Game view to see the changes in real time and choose your preferred value.
Note: You can left-click the Size property label and slide left to right to switch on real time different values instead of testing them one by one.
The camera now matches the intended game design and desired visual appearance of the game.
11. Save your scene
You don’t want to lose any of the hard work you’ve done! — Regularly save your progress to prevent data loss.
1. Save your project
- From the main menu, search for File > Save or use the shortcut Ctrl+S (macOS: Cmd+S).
Note: You’ll see that after saving your scene, the asterisk (*) that was next to the scene name in the Hierarchy window will disappear.
Your scene is saved with all the above configurations applied.
12. Optional: More things to try
Try these optional activities to challenge yourself, build your skills, and improve your project!
Each challenge is tagged as Easy, Medium, or Expert difficulty so that you know what to expect. You can do one of them, all of them, or none of them — it’s totally up to you!
Easy: Customize a complete level prefab
Make a level your own by rearranging and modifying its elements.
- In the Scene view, select elements like buildings or trees and adjust their X and Z coordinates to reposition them. Avoid changing the Y coordinates, as this might cause objects to float outside the arena.
Note: When moving elements, always select the entire GameObject parent prefab (for example, moonRocket), rather than its individual child GameObjects (for example, Cylinder002).
- You can also add or remove elements as needed! You can find additional assets in the _Tanks > Prefabs > Environment folder in the Project window. Use these to redesign your level however you like!
Medium: Create a new level from scratch
- Open the _Tanks > Prefabs > Levels folders and navigate to the Empty Levels subfolder. Here, you'll find a prefab for each level theme that contains no objects.
- Drag the Level[Theme] prefab of your choice into the Hierarchy window.
- In the Inspector window, reset its position by setting its Transform component’s Position property to X = 0, Y = 0, and Z = 0.
- In the Project window, open the _Tanks > Prefabs > Environment folders and open the folder that matches your chosen theme.
- Drag environment elements from this folder into the Scene view to design your level.
If you’re not interested in doing these challenges, mark this step as complete.
13. Next steps
Congratulations!
With these steps completed, your scene is fully set up and ready for further development.
In the next tutorial, you’ll move on to creating and configuring your tanks.