Complete the color switching functionality
Tutorial
·
Beginner
·
+10XP
·
45 mins
·
(45)
Unity Technologies

You have completed the functionality for a single color button. You will now expand that functionality to the remaining color buttons. In order to do this efficiently, you will learn about a new important scripting concept: arguments.
In this tutorial you'll do the following:
- Create a new custom event that requires an argument.
- Use the new custom event to finalize the color button functionality.
1. Overview
As you learned in the material switching tutorials, node sequences that will be used repeatedly can be converted into custom events. In the previous script graph, no modifications of the node sequence were necessary. However, in this case the repeated node sequence requires a unique material input for each button. In this tutorial, you’ll learn how to use arguments with custom events to further modularize your graphs.
2. Separate the graph to create a custom event
First, you need to separate all of the Find With Tag and Set Material nodes into their own custom event so they can be called on each material button press.
Watch the video or follow the instructions below to create this custom event:
1. If you closed the Unity Editor between this tutorial and the previous one, check that your MaterialChanger Script Graph is open in the Script Graph window.
2. In the Graph Editor, disconnect the On Button Click node output from the first Find With Tag node (right-click the On Button Click output arrow).
3. Disconnect the material1 Get Variable node from all of the Set Material nodes by right-clicking the material1 Get Variable output connector.
4. Move the Find With Tag and Set Material sequence to the right to make room for a new starting node.
5. Use the fuzzy finder to add a new Custom Event node at the start of the connected node sequence.
6. Name the custom event “ChangeMaterial.”
7. Connect the Custom Event node output to the first Find With Tag node input.

3. What are arguments?
You are about to use arguments in your visual script. Before you do, it’s important to understand them at a conceptual level.
Arguments are additional pieces of data that you can pass into an event or function to customize the outcome. That may sound confusing, so let’s look at an everyday example.
Imagine that every day, you go to a sandwich shop and ask them to make you a custom sandwich. You could call this daily routine the Make A Sandwich event. You wouldn’t just go into the shop and yell, “make a sandwich,” would you? They would ask follow-up questions, like “What would you like in it?”, “On which type of bread?”, or “Would you like that toasted?”. These are additional pieces of data – or arguments – that are required to successfully execute the event.
You see now that the Make A Sandwich event is not so simple; it requires additional data. In programming language, the event should look more like this:
Make A Sandwich (Ingredients list, Bread type, Toasted boolean).
With these arguments in place, you can use this single event to create all kinds of different sandwiches. The Make A Sandwich event could result in a toasted ham and cheese sandwich on whole wheat bread, or an untoasted grilled vegetable sandwich on a bun. Arguments allow for much more varied and specific outcomes, which is necessary for more complex functionality.
4. Add an argument to the custom event
Now that you understand what arguments are at a conceptual level, let’s implement arguments in your visual script.
Examine the ChangeMaterial event you just created.

The three Set Material nodes require a material data input. You want the material applied to be different, depending on which button is clicked.
You can add a data output to the Custom Event node, called an argument, to pass different data to those Set Material nodes.
Watch the video or follow the instructions below to add an argument to your graph:
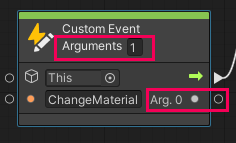
1. At the top of the ChangeMaterial Custom Event node, set the Arguments parameter to 1.

Adding an argument to a Custom Event node adds a data output to the node. Note that the data output is called Arg. 0. In most programming paradigms, a list of items begins with 0.
2. Connect the Arg. 0 output to the material inputs of all three Set Material nodes.

5. Create the custom trigger event
In order to call the ChangeMaterial Custom Event node, you need to add a Custom Event Trigger too. This trigger will also need an argument parameter.
Watch the video or follow the instructions below to create a Custom Event Trigger:
1. In the Graph Editor, use the fuzzy finder to add a Trigger Custom Event node.
2. In the Name field, enter “ChangeMaterial”.
3. Set the Arguments to 1.

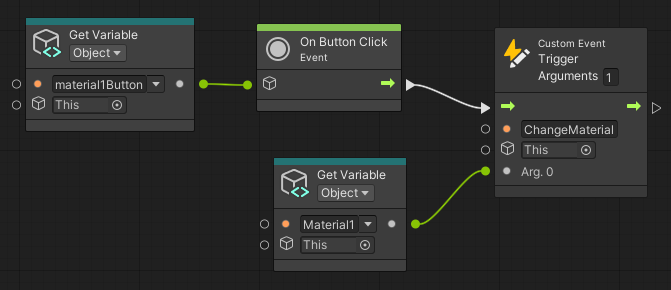
On this node, Arg. 0 appears as a data input rather than a data output.
4. Move the Custom Event Trigger node next to the On Button Click node (you separated this from the sequence at the beginning of this tutorial).
5. Connect the flow output of On Button Click to the flow input of the Custom Event Trigger node.
6. Connect the data output of the material1 Get Variable node to the Arg. 0 input of the Custom Event Trigger node.

7. Test your changes in the Unity Editor. The application should function exactly the same way it did previously — you can apply the first material to all three pairs of glasses.
8. Exit Play mode when you’ve finished testing the app.
6. Call the custom event with all color buttons
You’re almost there! You can now call the remaining materials using the four-node sequence that you set up for the first button. Then, the color switching functionality will be complete.
Watch the video or follow the instructions below to finish your script graph:
1. In the Graph Editor, select the material1Button Get Variable, On Button Click, material1 Get Variable, and ChangeMaterial Custom Event Trigger nodes (click and drag your cursor over them). Remember, you can zoom out if you need to.
2. Duplicate the node group twice. Position the duplicates in two rows beneath the original nodes.
3. In your first duplicated set of nodes, use the dropdowns to set the following parameters:
- The first Get Variable node (for the button) to material2Button.
- The second Get Variable node (for the material) to material2.
4. Repeat this process for the second duplicated node set, updating the variables to material3Button and material3.
5. Test the app in the Editor and confirm that each button now changes the material on the glasses. Remember to exit Play mode when you’ve finished testing.
6. In the Hierarchy window, select the GlassesGroup prefab, and then deactivate it in the Inspector window.
7. Save the scene.
8. Build the app and test it on your mobile device.
7. Next steps
The core functionality of the app is now complete! In the next tutorial, you’ll review what you’ve created, bug test the app, and finalize the functionality so everything works as expected.