Save and load the glasses
Tutorial
·
Beginner
·
+10XP
·
75 mins
·
(42)
Unity Technologies
Right now, it appears that your app is working as expected. However, if a user’s face is momentarily lost by the camera, something unexpected happens: when the user returns after moving out of the camera’s view, the glasses don’t reappear on their face!
In this tutorial you'll do the following:
- Save the user’s choices with a variable.
- Reapply the user’s choices once the user’s face has returned to the camera view.
1. Overview
It’s important to regularly test your applications as you work on them, but often you won’t be able to identify bugs until everything appears to be complete. For this reason, you should always plan to thoroughly test your app after you’ve finished development and before you release it to the public.
Right now, it appears that your app is working as expected. However, if a user’s face is momentarily lost by the camera, something unexpected happens:
When the user returns after moving out of the camera’s view, the glasses don’t reappear on their face! Additionally, when the user reselects one of the glasses buttons, the material they had previously selected is no longer applied.
This problem occurs because whenever a user’s face leaves the camera, the GlassesGroup prefab is deleted by the AR Face Manager component. When the user’s face returns to the camera, the AR Face Manager component instantiates a new version of the prefab. The new version of the GlassesGroup prefab will have the default setting configuration, which means all of the mesh renderers will be turned off and no material will be applied.
In this tutorial, you’ll create the functionality to save the user’s choices and reapply them once the user’s face has returned to the camera view.
2. Create a variable to store the current glasses tag
First, you need to store a reference to the current pair of glasses the user has selected. Each time the user changes the glasses, that reference needs to update as well.
If you need to keep a reference to something, you also need to create a variable to store that reference. So far in these tutorials you’ve used variables to provide data to different nodes in your script graphs. However, the opposite can occur as well: script graphs can add data to variables, which can in turn be referenced by a different graph. The functionality you’ve built for accessing the meshes has been tag-based, so you’ll create a variable that can store the tag of the glasses that are currently visible.
Follow these instructions to create the new variable:
1. In the Hierarchy window, select the GlassesGroup GameObject and then make sure it is enabled in the Inspector window.
2. In the Hierarchy window, select the Visual Scripts GameObject.
3. In the Inspector window, go to the Script Machine component associated with the MeshChanger graph and select Edit Graph.
4. In the Object Variable section of the Blackboard, create a new variable named “currentGlassesTag”.
5. Set the variable’s Type to String.

When you’re using a variable as a reference for a graph, you can drag it from the Blackboard. However, to set a variable requires a different node. Once a variable has been created in the Blackboard, it is available within the fuzzy finder as well.
6. In the Graph Editor, navigate to a new empty area above your other nodes to begin a new node sequence.
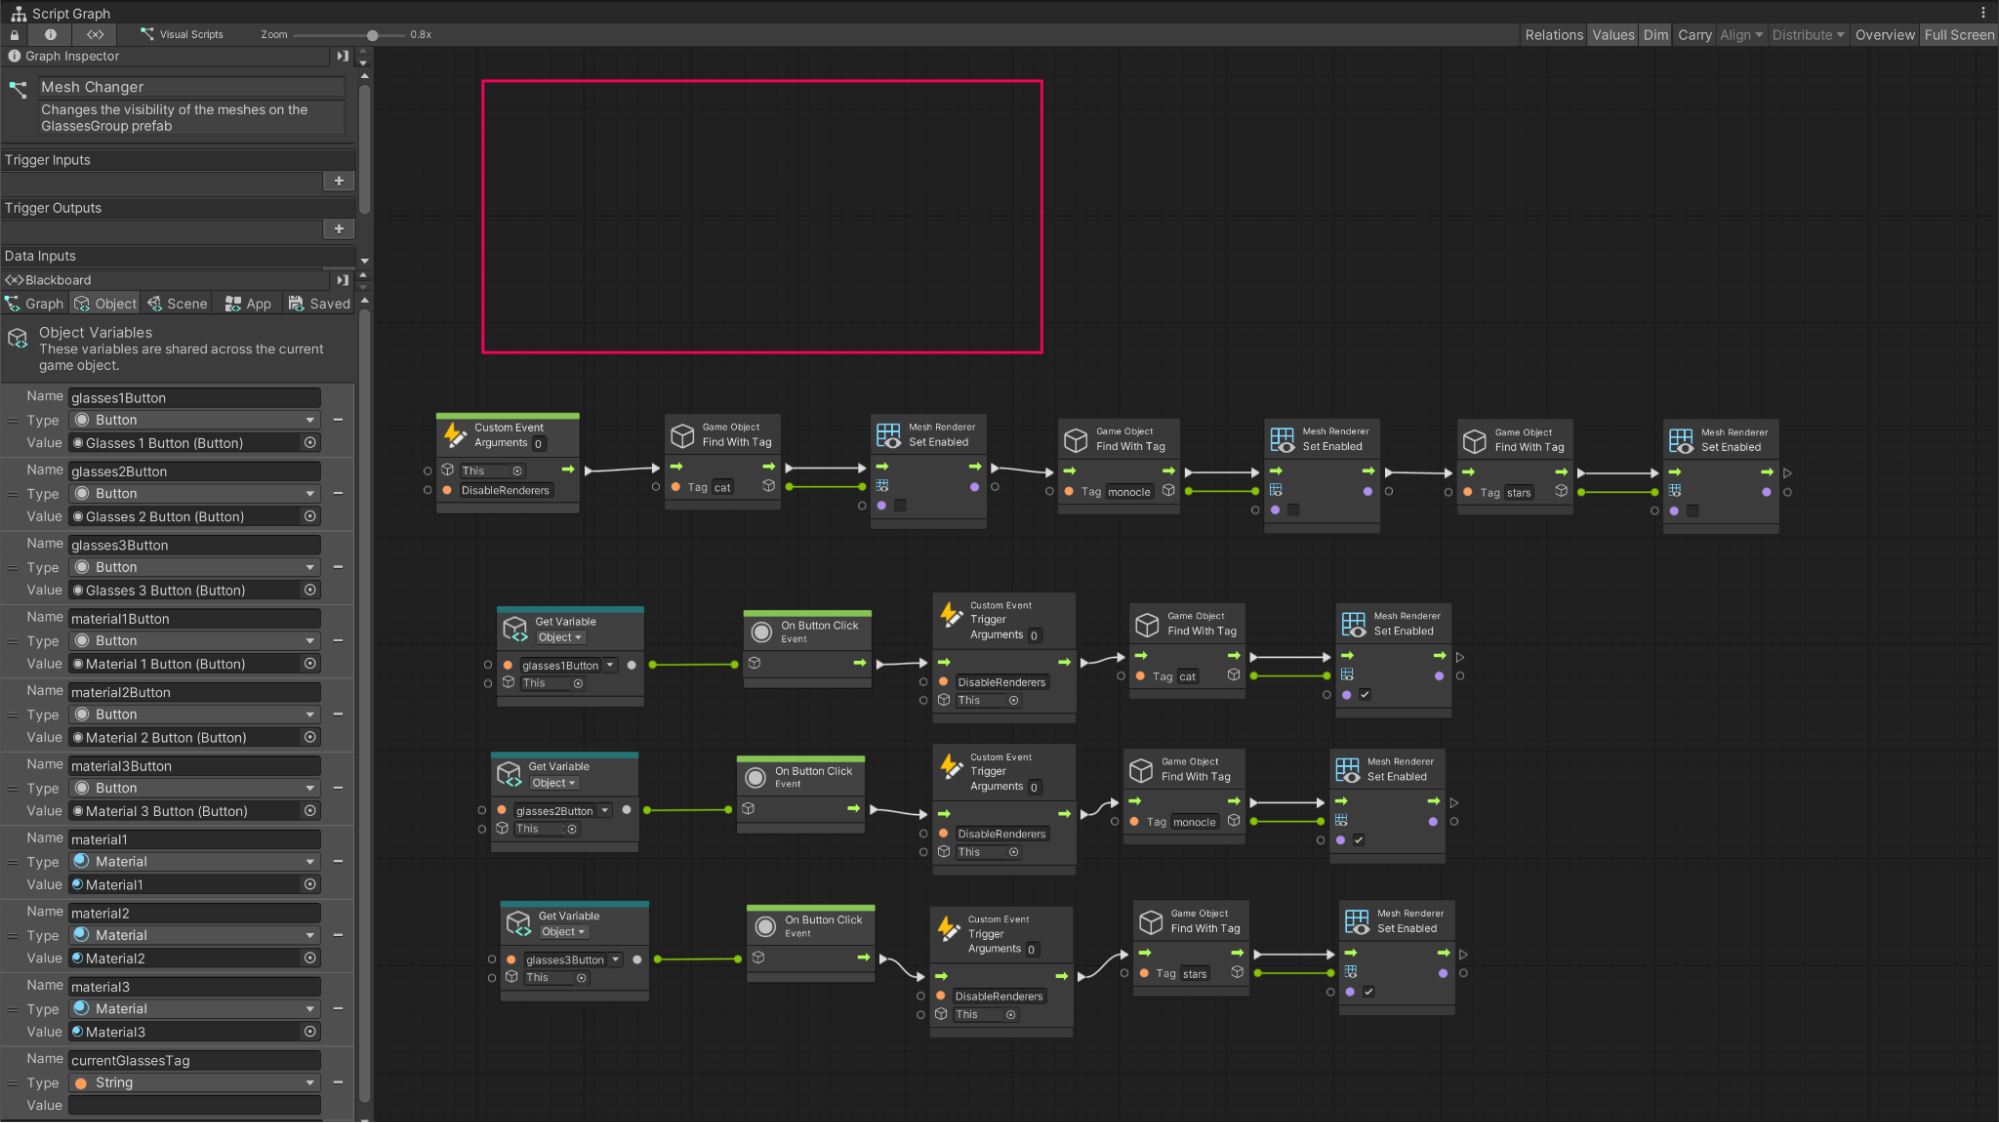
7. Open the fuzzy finder and search for “Set currentGlassesTag” to add it to your graph.
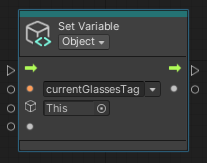
3. Save the value of the currentGlassesTag
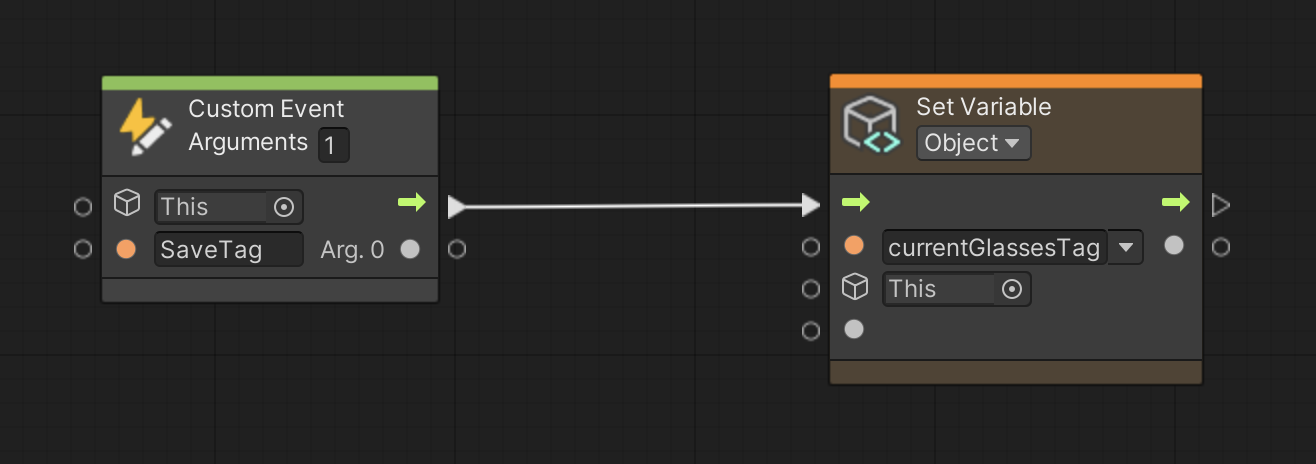
Because the value of currentGlassesTag will need to change based on which button your user selects, you’ll create a custom event that you can call for each button.
Watch the video or follow the instructions below to configure the event:
1. In the Graph Editor, use the fuzzy finder to add a Custom Event node.
2. Name the new node “SaveTag”.
3. Set the Arguments property to 1. Just as you did with the ChangeMaterial event, you’ll use an argument to pass along data. In this case, you’ll pass the tag of the pair of the glasses the user has selected.
4. Connect the SaveTag Custom Event node’s flow output to the flow input of the currentGlassesTag Set Variable node.
5. In the Graph Editor, use the fuzzy finder to add a Game Object Get Tag node.
Arguments on custom events can’t be set to require a specific type of data, so the value you pass to this event will be a reference to the entire GameObject and all of its components. To access the tag specifically, you’ll need to use this Game Object Get Tag node.
6. Connect the SaveTag Custom Event node’s Arg. 0 output to the input of the Get Tag node.
7. Connect the Get Tag node’s output to the value input of the currentGlassesTag Set Variable node (white filled circle icon).

4. Call the SaveTag custom event
The custom event will now save to the currentGlassesTag variable and only needs to be triggered by the On Button Click graphs.
Watch the video or follow the instructions below to add the Event Trigger to the end of the graph chain:
1. In the Graph Editor, use the fuzzy finder to add a Trigger Custom Event node.
2. Name the Trigger node “SaveTag”.
3. Set the new node’s Arguments property to 1.
4. In the glasses1Button On Button Click graph (the first of your three rows), find the final Set Enabled node. Connect the flow output of the Set Enabled node to the flow input of the SaveTag Trigger node.
5. Connect the final Find With Tag node’s result output (cube icon) to the Arg. 0 input of the SaveTag Trigger node.
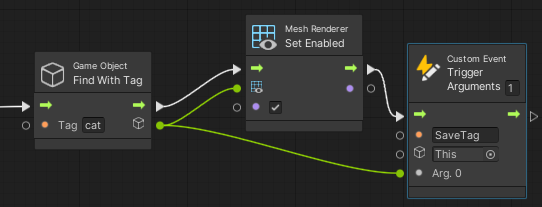
The Find With Tag node provides the custom event with the data it requires as an argument: which GameObject should be saved.
6. Enter Play mode to test your changes. Select the first glasses button.
7. In the Object Variable section of the Blackboard, scroll down to the currentGlassesTag variable and observe the Value. The SaveTag event has added the tag of the first pair of glasses.
8. Exit Play mode.
9. Duplicate the SaveTag Custom Event node twice and repeat steps 4 and 5 for the remaining buttons.
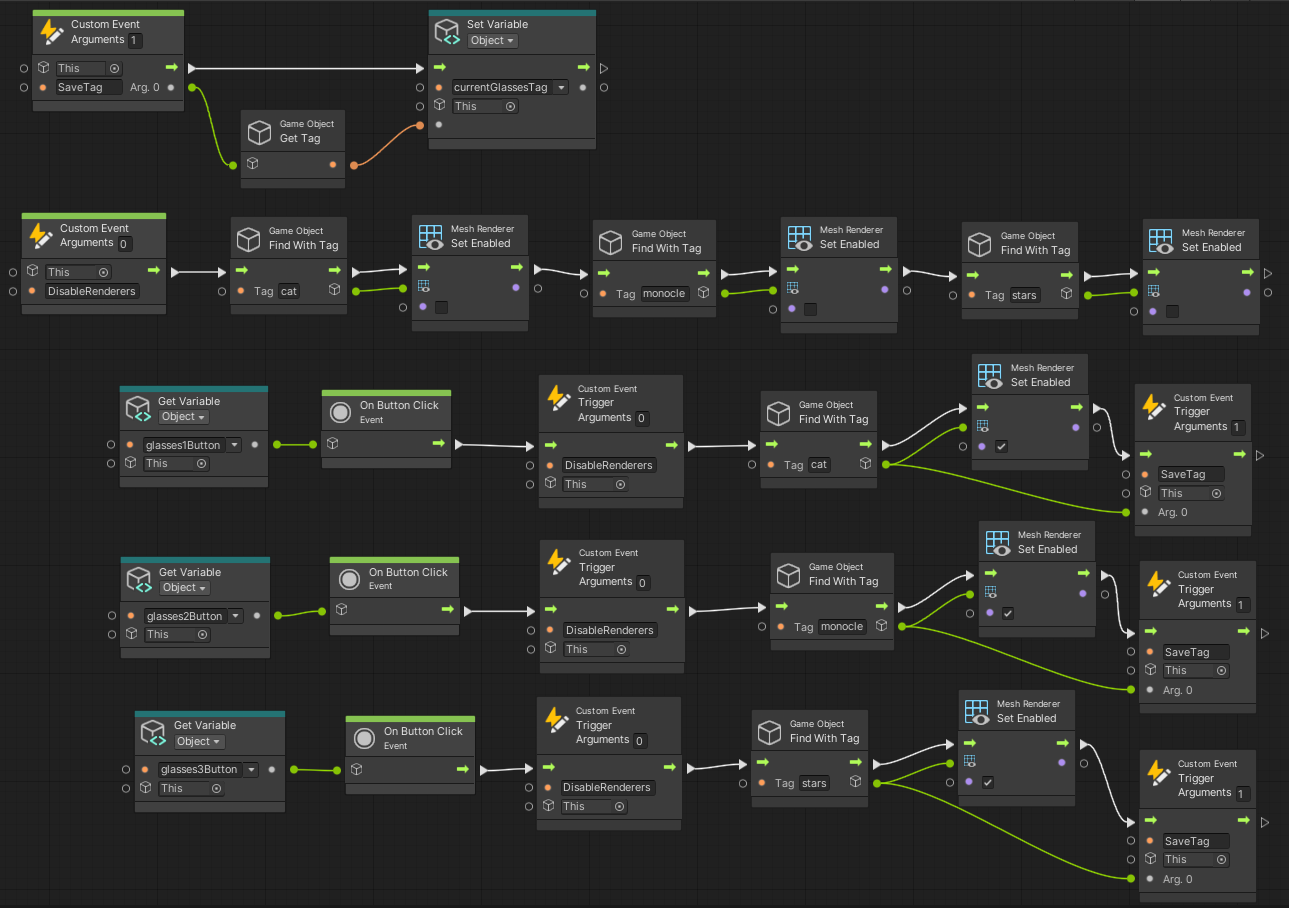
You can now test your app again with each of the glasses buttons. In the Blackboard, notice how the value of the currentGlassesTag variable changes with each button click.
5. Create a graph to load the glasses
You now have a reference to the current pair of user-selected glasses that will update whenever there’s a change in the app. As a next step, you need to create functionality that will reload these changes onto the new GlassesGroup prefab when it’s instantiated (created) by AR Foundation.
Reloading these changes is new functionality, which means that you should create another dedicated graph:
1. In the Hierarchy window, select the Visual Scripts GameObject.
2. In the Inspector window, add a new Script Machine component.
3. Create a new graph named “FilterUpdater” and save it in the Visual Scripts folder.
4. In the Title field, enter “Filter Updater.”
5. In the Summary field, enter “Reloads the last worn pair of glasses and selected material after a user’s face is lost and rediscovered by AR Foundation.”

6. Select Edit Graph to open the new FilterUpdater graph.
7. Delete the On Start node. For this graph, you’ll need the On Update node.
Load the user’s glasses selection
Both the color and the mesh-changing functionality in your app occur in very controlled situations. Specifically, they only occur when the user interacts with the UI buttons. Your script graphs are relatively simple, as your app only detects exactly when the user selects the buttons. Unfortunately, when it comes to managing when the user’s face is lost by the camera, you have zero control. Therefore, you need to build a graph that accounts for the fact that the user may leave and later return to the camera view at any time.
To accomplish this, you’ll use the On Update node.
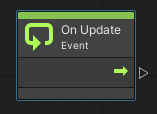
The On Update node runs continually while an application is active, so you can use it to constantly check whether the user’s face has been lost. This continual checking is just what you need for your final app functionality.
6. Enable the current mesh
The FilterUpdater graph will run in a very similar fashion to the original MeshChanger functionality. FilterUpdate will search for a GameObject with a specific tag, and then enable that GameObject’s Mesh Renderer component. The only difference is that where the nodes in the MeshChanger script specify which tag to search for, the FilterUpdater graph will use the currentGlassesTag variable instead.
Watch the video or follow the instructions below to enable the current mesh:
1. In the Graph Editor, after the On Update node, use the fuzzy finder to add a Game Object Find With Tag node.
2. After the Find With Tag node, add a new Mesh Renderer Set Enabled node.
3. In the Blackboard, go to the Object Variable section and drag the currentGlassesTag variable onto the Graph Editor below the On Update node.
4. Connect the On Update node flow output of the to the flow input of the Find With Tag node.
5. Connect the currentGlassesTag Get Variable node data output to the tag input of the Find With Tag node.
6. Connect the Find With Tag node flow output to the flow input of the Set Enabled Node.
7. Connect the Find With Tag node result output (cube icon) to the target input of the Set Enabled node (grid with eye icon).
8. On the Set Enabled node, set the Value Boolean to true.

Now you’re ready to test these changes.
7. Test your changes in Play mode
Follow these instructions to test your changes in Play mode:
1. Select the Play button to test the app in the Editor.
2. Notice that the Find with Tag node turns red to indicate it has encountered an error. It is trying to find an object with a specific tag, but that tag has not yet been assigned (it is null).
3. In the Game view, select one of the glasses buttons.
4. In the Hierarchy window, select the GlassesGroup prefab and delete it.
5. In the Project window, go to Assets > _InteractiveFaceFilter > Prefabs. Drag a new GlassesGroup prefab into the Hierarchy window. The new GlassesGroup prefab will appear in the Game view with the last pair of active glasses visible!
6. Exit Play Mode.
8. Save a reference to the current material
If you were to build the app now, you would find that the glasses are now working as expected and reappearing when the user returns to the camera view. However, something’s missing: the material that the user has selected isn’t saved yet.
To solve this issue, you’ll create a variable to store the currently selected material, and then integrate it into the FilterUpdater graph.
Follow these instructions to save the current material:
1. In the Hierarchy window, select the Visual Scripts GameObject.
2. In the Inspector window, find the Script Machine component associated with the MaterialChanger graph and select Edit Graph.
3. In the Object Variable section of the Blackboard, create a new variable named “currentMaterial”.
4. Set the new variable’s Type to Material.

5. In the Graph Editor, to the right of all your other nodes, use the fuzzy finder to add a Set currentMaterial node.
Note: Rather than create a new Custom Event node to set the currentMaterial variable, you can use the existing ChangeMaterial Custom Event, since it’s already passing along the user’s selected material.
6. Connect the final Set Material node flow output to the flow input of your new Set currentMaterial node.
7. Connect the ChangeMaterial Custom Event node Arg. 0 output to the new value input of the Set currentMaterial node.

The material associated with the button the user selects will now be stored in the currentMaterial variable. You can test this in the app by selecting a material button while monitoring the value of the currentMaterial variable. It should save each time you select a new material.
9. Load and apply the saved material
The final step is to load and apply the saved material when a new face is detected in the scene.
Watch the video or follow the instructions below to add the currentMaterial variable to your FilterUpdater graph:
1. In the Hierarchy window, select the Visual Scripts GameObject.
2. In the Inspector window, find the Script Machine component associated with the FilterUpdater graph and select Edit Graph.
3. In the Graph Editor, to the right of the current node sequence, use the fuzzy finder to add a Mesh Renderer Set Material node.
4. Go to the Object Variable section of the Blackboard, then drag the currentMaterial variable onto the Graph Editor.
5. Connect the Mesh Renderer Set Enabled node flow output (at the end of the existing graph) to the flow input of the new Mesh Renderer Set Material node.
6. Connect the Find With Tag node result output to the target input of the Set Material node.
7. Connect the currentMaterial Get Variable node to the material input of the Set Material node.

8. Test the app in Play mode.
Something appears to have broken! When you select a pair of glasses, it appears in the Game view as a bright magenta rather than the default gray. This magenta color means that the GameObject has a missing material.
If you observe the flow output of the currentMaterial Get Variable node in the Graph Editor, you’ll be able to identify the problem. Until the user selects a material, the currentMaterial variable returns null. The app design doesn’t require the user to select a material first, so to solve this problem, you have to set currentMaterial to have an initial value.
10. Set an initial material and test your app
Follow these instructions to set an initial material for the glasses in your app:
1. Exit Play mode, if you haven’t already done so.
2. In the Blackboard, find the currentMaterial variable.
3. Select the Value property Object Picker (⊙) and choose an initial material for the glasses. You can choose one of the materials you created, or select Lambert1 from the available materials for the default gray starting color.

4. Retest the app in Play mode to ensure everything is working as expected. Remember to exit Play mode when you have finished testing.
5. In the Hierarchy window, select the GlassesGroup GameObject, then disable it in the Inspector window.
6. Save your scene.
7. Open the Build Settings window (File > Build Settings).
8. Make sure that your device is plugged in and then select Build and Run to build the app on your device.
Your app is now complete!
11. Next steps
Congratulations on completing the Interactive Face Filter project! Throughout this project, you learned how to work with visual scripts to build interactive elements for your applications. You performed several rounds of testing and resolved bugs that you encountered.
You now have a feature-complete application that you built yourself! You’re also ready to work independently on an interactive AR face filter for your next submission.