Update your graph to switch between glasses
Tutorial
·
Beginner
·
+10XP
·
45 mins
·
(60)
Unity Technologies

In the previous tutorial, you built functionality for your app to display glasses based on the button that the user selects. However, the glasses’ meshes remain active even if the user selects another button — the glasses are displayed on top of each other.
In this tutorial, you’ll do the following:
- Expand your graph functionality so that only one pair of glasses is visible at a time.
- Learn how to use custom events to make your scripts more efficient.
1. Overview
In the previous tutorial, you built functionality for your app to display glasses based on the button that the user selects. However, the glasses’ meshes remain active even if the user selects another button — the glasses are displayed on top of each other. In this tutorial, you’ll expand your graph functionality so that only one pair of glasses is visible at a time.
2. Disable the glasses’ mesh renderers
You’ve already learned that the Mesh Renderer: Set Enabled node can be used to control the visibility of a GameObject. In your main graphs, you used this node to enable the mesh visibility — now you'll use it to disable mesh visibility.
Watch the video or follow the instructions below to disable the glasses’ mesh renderers:
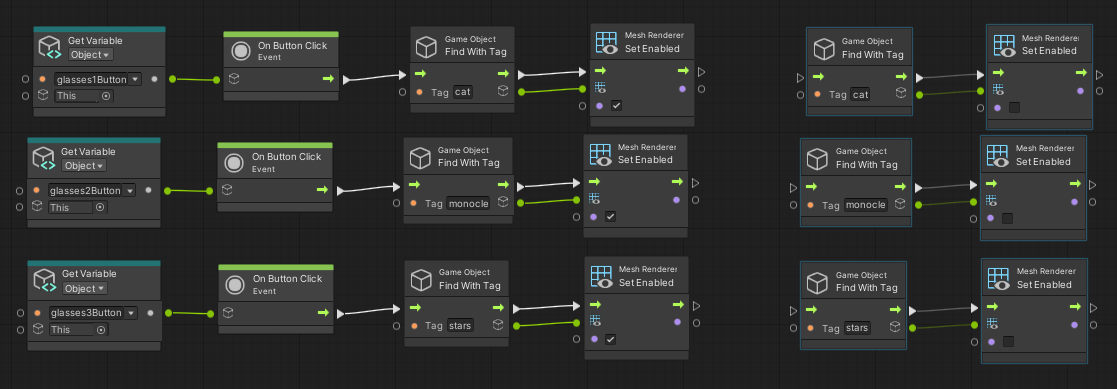
1. In the Graph Editor, click and drag across all three sets of Find With Tag and Set Enabled nodes to select them as a group.
2. Press Ctrl+D (macOS: Cmd+D) to duplicate these nodes and move them to one side of the original set so they aren’t overlapping any other nodes.
3. Disable the Boolean on each of the new Set Enabled nodes (next to the purple circle icon).

You’re going to change the functionality of your script so that every time the user selects a button in your app, the mesh renderers of all the pairs of glasses are disabled. You can’t disable all the mesh renderers at once; you need to do this in a sequence. However, your visual script will run so quickly that it will appear as though all the mesh renderers are disabled at the same time.
4. Arrange your Find With Tag and Set Enabled node sets so they’re all on the same horizontal row. It doesn’t matter what order they are in, but keep the existing pairs of nodes together.
5. Connect the flow output of the first Set Enabled node to the flow input of the second Find with Tag node.
6. Connect the flow output of the second Set Enabled node to the flow input of the third Find with Tag node.

Next, you need to integrate this sequence into the other graph functionality.
3. Create a custom event
The sequence of disabling all of the mesh renderers should occur right after the user selects a button, but before the graph looks for the correct mesh renderer to enable. Therefore, the functionality you just built should be placed between the On Button Click and Find with Tag nodes.

However, the new sequence is already longer than the other graphs you’ve built, and integrating it into each individual button graph will make the Graph Editor cluttered and harder to understand. Just as importantly, this sequence would be identical in all three graphs. In cases like this, rather than duplicating nodes over and over again, you can instead convert the sequence to a custom event. You can then call that event as a single node in your other graphs.
Watch the video or follow the instructions below to integrate a custom event into your node sequence:
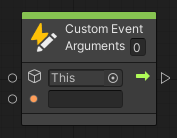
1. In the Graph Editor, open the fuzzy finder and add a Custom Event node.

The Custom Event node requires one of two data type inputs: either a GameObject or a String. You’ll use a String to name the custom event, which will be used to call it in the next step.
2. Set the String of the Custom Event node to “DisableRenderers”.
3. Connect the flow output (arrow icon) of the Custom Event node to the flow input (arrow icon) of the first Find with Tag node in your sequence.

4. Add the custom event to the button graphs
You now have an event that can be called whenever you need it to run. To actually call it, you’re going to use an Event Trigger node:
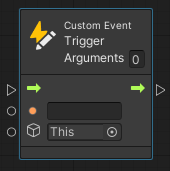
1. In the Graph Editor, open the fuzzy finder and add a Trigger Custom Event node.

You can think of a Custom Event Trigger node like a link. When this node is called, it will initiate the sequence of nodes in the custom event it’s associated with.
2. In the string input on the Trigger node (orange circle icon), add “DisableRenderers”. Just like the Custom Event node, a Trigger node requires one of two data inputs. This data input must match the one associated with the custom event.
Important: The spelling and capitalization of DisableRenderers must be exactly the same in both the Custom Event and Trigger nodes.
3. Duplicate the Trigger node twice more.
4. Disconnect the flow between the On Button Click node and the Find With Tag node in the first button graph by right-clicking on the flow output of the On Button Click node.
Hint: Disconnect nodes by right-clicking on the connectors.
5. Move the Get Variable and On Button Click nodes to make room for the Trigger node.
6. Position the Trigger node in the space and then connect the flow output of the On Button Click node to the flow input of the Trigger node in the first graph.
7. Connect the flow output of the Trigger node to the flow input of the Find With Tag node in the first graph.
8. Repeat the previous steps for the remaining two button graphs.

5. Test your update
Now that you’ve implemented the new functionality for your app, you can test it:
1. Select the Play button to test your changes to the app in the Unity Editor.
2. Select each of the buttons and confirm that the glasses switch as expected.
3. Select the Play button again to exit Play mode.
4. In the Hierarchy window, select the GlassesGroup GameObject, and in the Inspector window, mark it as inactive.
5. Save your scene.
6. Open the Build Settings window (File > Build Settings).
7. Make sure that your device is plugged in and then select Build and Run to build the app on your device.
8. The application will open automatically on your device. Now every time you select one of the UI buttons, the graph will disable all of the mesh renderers before enabling the one associated with the button you selected. Excellent!
Note: For a reminder of how to build to your device, you can review the process for Android or iOS.
6. Next steps
The mesh switching functionality of the app is now complete! In this tutorial you learned how to create reusable groups of visual scripts called Events that you can call from multiple locations in your graphs. In the next tutorial, you’ll move on to building the material changing functionality for the glasses so the user can switch between the different colors of the glasses.