
Voice commands
Tutorial
intermediate
+10XP
30 mins
15
Unity Technologies
Voice commands allow the user to interact with virtual objects and environments using spoken commands. Although the Magic Leap 2 comes with a controller that can handle most of your desired interactions, voice intents can improve convenience, immersion, and accessibility within your application.
In this tutorial, you will learn how to implement custom voice intents for Magic Leap 2 applications, including an example of a typical use case where the user can play or pause a video and activate global dimming using just their voice.
1. Overview
What are voice commands?
A voice command, also known as a voice intent, allows the user to trigger a specific action using a particular spoken phrase. With the ubiquity of smart assistants like Alexa, Siri, and Google Assistant, users are accustomed to being able to speak with their devices.
By default, the Magic Leap 2 includes system-level intents such as “Hey Magic Leap, turn the volume up” and “Hey Magic Leap, take a video”. In addition to these system-level commands, you can add custom voice commands to your experience.
Why include voice commands?
The Magic Leap 2 is designed to maximize immersion in mixed-reality experiences, and voice commands greatly contribute to that effort. Specifically, voice commands are helpful for the following reasons:
- Hands-free interaction: using voice commands allows the user to interact with the virtual world without needing to use their hands, which can be important in situations where their hands or the controller are occupied.
- Convenience: voice commands can be much quicker and more convenient than using a controller or a keyboard, especially if the user needs to enter text or navigate menus.
- Accessibility: voice commands can also be an important accessibility feature for users with disabilities that may make it difficult for them to use traditional forms of input.

What you’ll learn in this tutorial
In this tutorial, you will learn how to implement custom voice intents for Magic Leap 2 applications.
2. Before you begin
Before you begin working through this tutorial, you should make sure your development environment is set up for Magic Leap 2 development and download the example prototype project.
Set up your development environment
If this is your first time developing in Unity for the Magic Leap 2, make sure you have your development environment configured properly using one of the following guided options:
- Follow the Unity: Getting started guide from the Magic Leap 2 developer documentation.
- Follow the Magic Leap 2 in-Editor tutorial project in the Unity Editor.
Download and open the example prototype
This tutorial will guide you through the implementation of this feature in your own application using an example prototype. If you want to explore the code of the prototype yourself, download the accompanying prototype project and open it in Unity.
3. Handle permissions
Which permissions are required?
VOICE_INPUT is one of the device’s Dangerous (Runtime) permissions. Without this permission granted, your voice commands will not work. To determine which permission is required for which feature, you can refer to the documentation on the Magic Leap 2 Developer Portal.
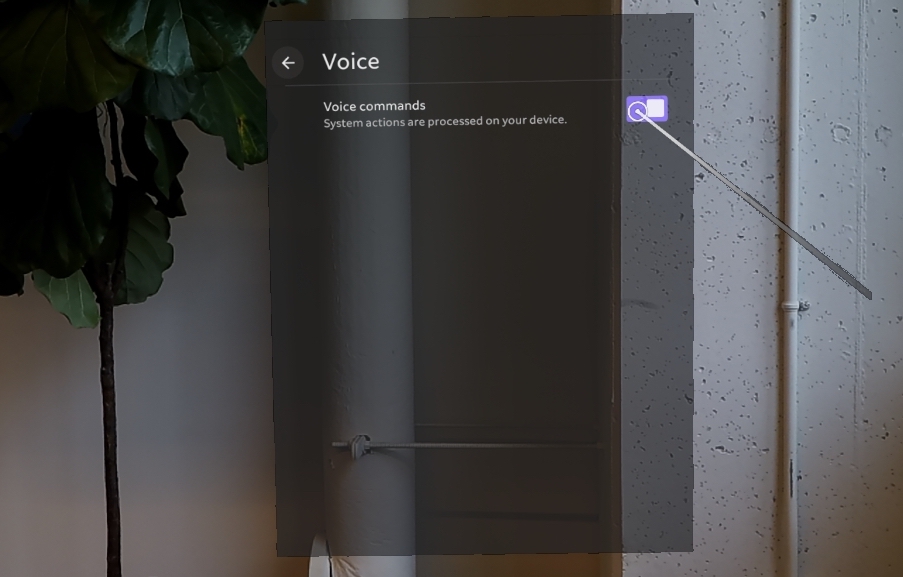
In addition to granting this permission, the user must also manually enable the Voice Commands option in their system settings (Settings > Magic Leap Inputs > Voice > Voice commands)
Request and respond to permissions
To ensure that voice commands will work properly in your app, you have to make sure the VOICE_INPUT permission is granted and that the Voice Commands option is enabled.
The code below performs the following actions:
- Creates a variable for the voice intents configuration object - this needs to be assigned in the Inspector.
- Subscribes and unsubscribes from the permission events.
- Requests permission for VOICE_INPUT at start.
- If permission for VOICE_INPUT is granted, check if the Voice Commands option is enabled.
- If the Voice Command option is enabled, subscribe to voice events.
- If the Voice Command option is not enabled, open the voice settings.
using System;
using UnityEngine;
using UnityEngine.XR.MagicLeap;

public class VoiceIntents : MonoBehaviour
{
    private readonly MLPermissions.Callbacks permissionCallbacks = new MLPermissions.Callbacks();

    // subscribe to permission events
    private void Awake()
    {
        permissionCallbacks.OnPermissionGranted += OnPermissionGranted;
        permissionCallbacks.OnPermissionDenied += OnPermissionDenied;
        permissionCallbacks.OnPermissionDeniedAndDontAskAgain += OnPermissionDenied;
    }

    // unsubscribe from permission events
    private void OnDestroy()
    {
        permissionCallbacks.OnPermissionGranted -= OnPermissionGranted;
        permissionCallbacks.OnPermissionDenied -= OnPermissionDenied;
        permissionCallbacks.OnPermissionDeniedAndDontAskAgain -= OnPermissionDenied;
    }

    // request permission for voice input at start
    private void Start()
    {
        MLPermissions.RequestPermission(MLPermission.VoiceInput, permissionCallbacks);
    }

    // on voice permission denied, disable script
    private void OnPermissionDenied(string permission)
    {
        Debug.LogError($"Failed to initialize voice intents due to missing or denied {MLPermission.VoiceInput} permission. Please add to manifest. Disabling script.");
        enabled = false;
    }

    // on voice permission granted, initialize voice input
    private void OnPermissionGranted(string permission)
    {
        if (permission == MLPermission.VoiceInput)
            InitializeVoiceInput();
    }


    // check if voice commands setting is enabled, then set up voice intents
    private void InitializeVoiceInput()
    {
        bool isVoiceEnabled = MLVoice.VoiceEnabled;

        // if voice setting is enabled, try to set up voice intents
        if (isVoiceEnabled)
        {
            Debug.Log("Voice commands setting is enabled");
        }

        // if voice setting is disabled, open voice settings so user can enable it
        else
        {
            Debug.Log("Voice commands setting is disabled - opening settings");
            UnityEngine.XR.MagicLeap.SettingsIntentsLauncher.LaunchSystemVoiceInputSettings();
            Application.Quit();
        }
    }
}
Demo
With the permission code above included in your project, the app should request permission for voice intents startup. If the voice commands setting is disabled, it should take you to that settings option. Once both of those have been achieved, the app will be able to run successfully.
4. Simple voice intent setup
Add an XR Rig
Just like with any Magic Leap 2 project, the first step is to add the XR Rig prefab to the scene from the Magic Leap 2 SDK package (Packages > Magic Leap SDK > Runtime > Tools > Prefabs) and then delete the Main Camera GameObject.
Create a voice intents configuration
A voice intents configuration is a scriptable object that lists all of the possible custom voice commands you would like to add to your application.
To create and configure a voice intents configuration object, complete the following steps:
1. Right-click in the Project window and select Create > MagicLeap > VoiceIntentsConfiguration.
2. In the Inspector window, select the Add (+) button to add a new voice command, then expand Element 0.
3. Enter a unique integer ID for each command, then enter the options for the phrasing of each command, separated by the pipe symbol ( | ).
You can include multiple phrase options to trigger any one action. For example, you could include command options like, “hide object | deactivate object | remove object” to achieve the same result.
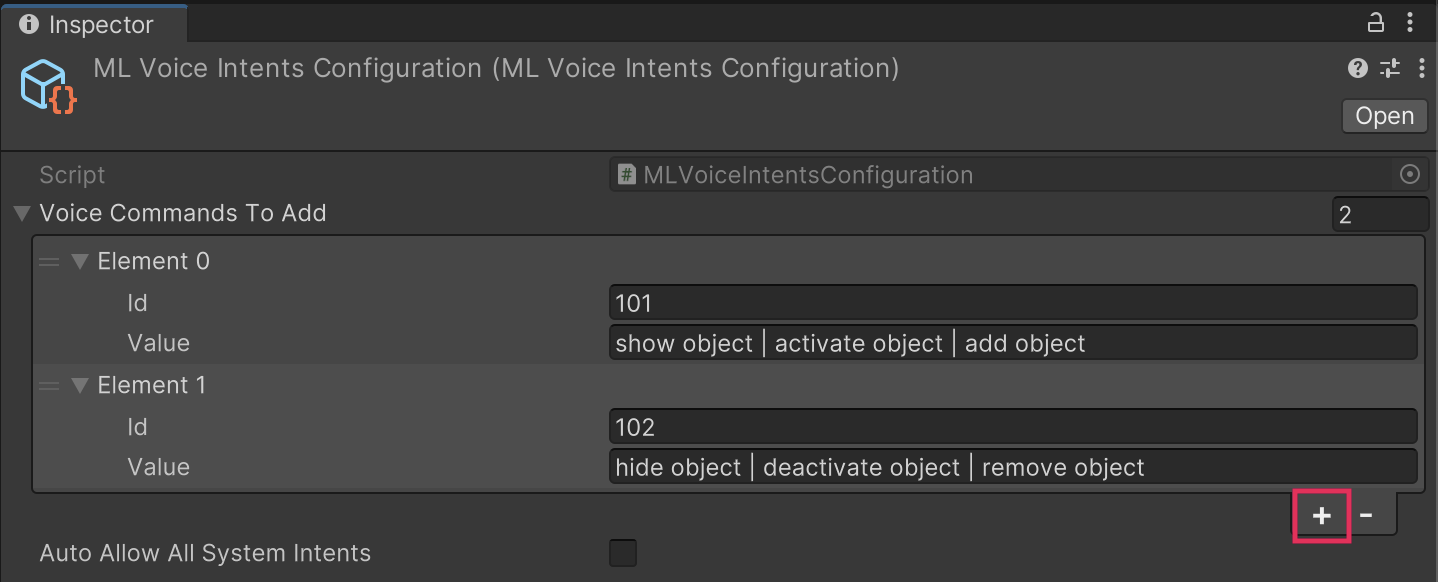
In the above example, we have one command to activate an object and one command to deactivate the object.
Set up your voice intents in a script
In order for the Magic Leap 2 to respond to voice commands, you need a reference to the voice intents configuration object in your script.
// voice intents configuration instance (needs to be assigned in Inspector)
public MLVoiceIntentsConfiguration VoiceIntentsConfiguration;
Remember to assign the object to the variable in the Inspector window.
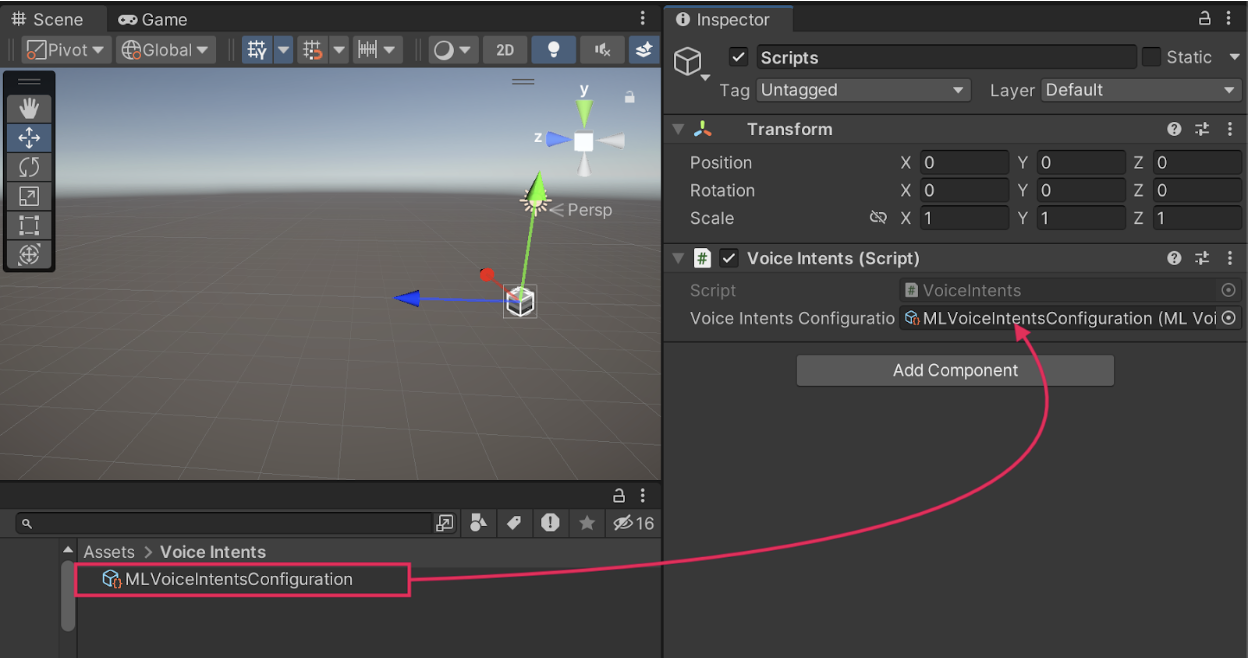
Then, in the InitializeVoiceSetup method from the previous step, you check that the voice intents configuration object is set up properly. If the voice intents configuration object is set up correctly, you can subscribe to the On Voice Event.
// if voice setting is enabled, try to set up voice intents
if (isVoiceEnabled)
{
    Debug.Log("Voice commands setting is enabled");
    var result = MLVoice.SetupVoiceIntents(VoiceIntentsConfiguration);
    if (result.IsOk)
    {
        MLVoice.OnVoiceEvent += MLVoiceOnOnVoiceEvent;
    }
    else
    {
        Debug.LogError("Voice could not initialize:" + result);
    }
}
Respond to voice events
With everything now confirmed and set up properly, you can take action on successful voice events by referencing their event ID’s.
// demo cube that can be activated and deactivated
public GameObject targetObject;


// handle voice events
private void MLVoiceOnOnVoiceEvent(in bool wasSuccessful, in MLVoice.IntentEvent voiceEvent)
{
    if (wasSuccessful)
    {
        if (voiceEvent.EventID == 101)
        {
            Debug.Log("Activate target object");
            targetObject.SetActive(true);
        }
        if (voiceEvent.EventID == 102)
        {
            Debug.Log("Activate target object");
            targetObject.SetActive(false);
        }
    }
}
Demo
5. Voice intents in context
Now that you know how to set up and respond to voice intents, let’s check out an example of how this feature can be combined with other interactive functionality.
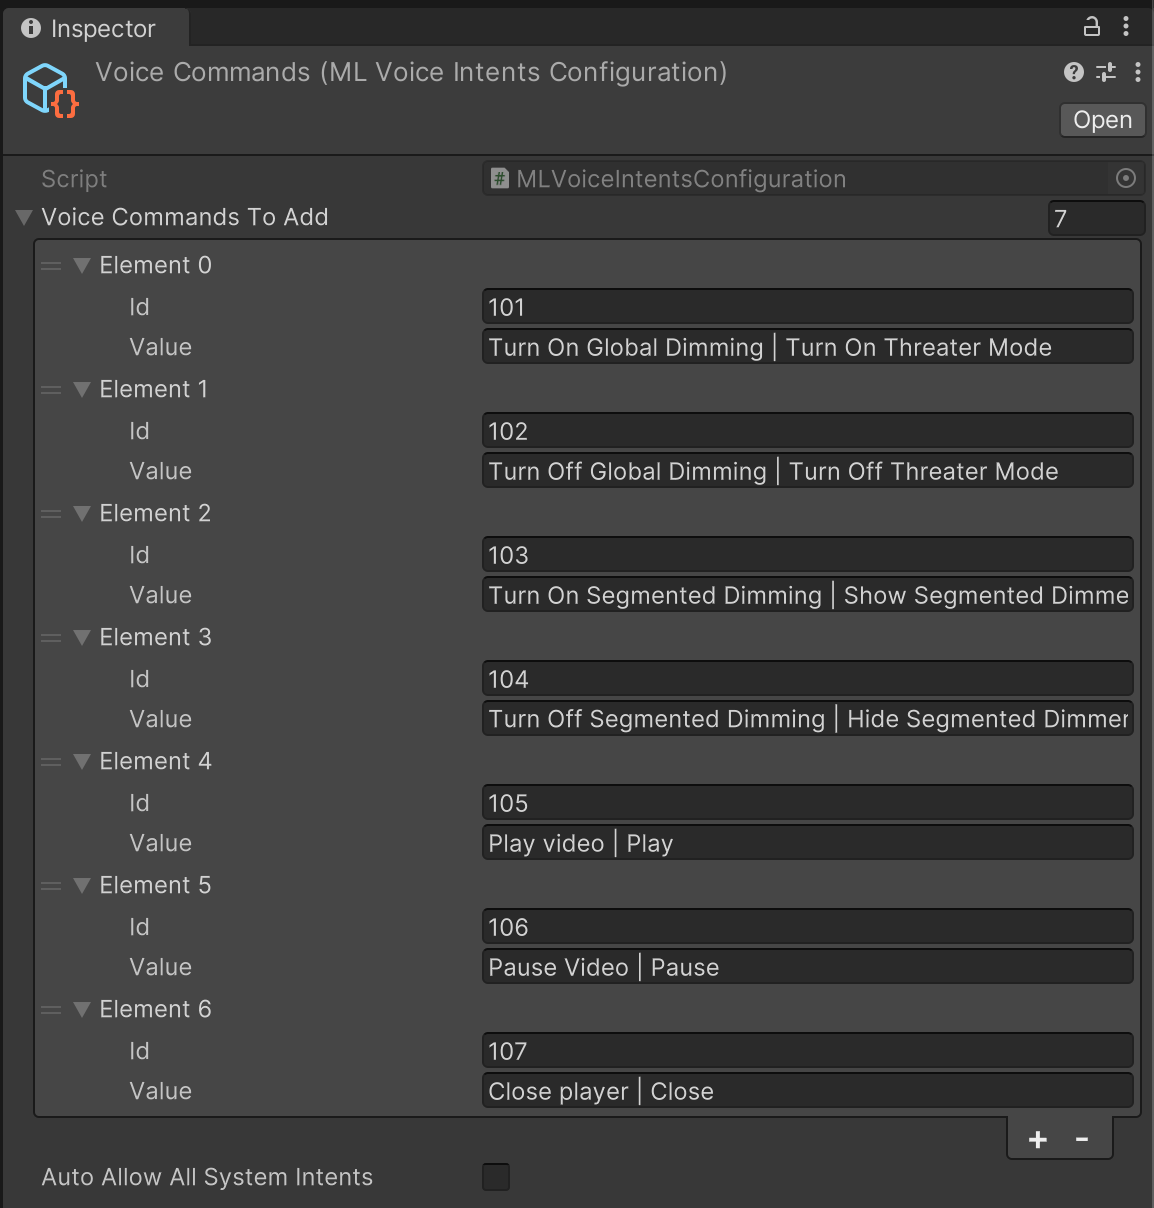
In this example, voice intents are used to play and pause a video in a media player, to toggle segmented dimming, and to activate and deactivate theater mode by toggling Global Dimming.
Below is an image of the voice intents configuration object for this demo.
6. Next steps and additional resources
In this tutorial, you learned about voice commands on the Magic Leap 2. You can learn more about voice commands with the following resources:
- Magic Leap’s voice intents example scene from the samples project
- Magic Leap’s guide on voice intents
- Magic Leap’s scripting documentation on the MLVoice class
You may also want to learn more about out the other features highlighted in the example prototype:
Otherwise, feel free to go back to the overview page, where you can explore other tutorials and resources.