
Extra things to add
Exercise
Beginner
+0XP
1h 15m
Unity Technologies
You’ve now completed all the core functionality of your game and added several enhancements. In this tutorial, you’ll receive high-level guidance on additional features you can implement to further expand your project.
By the end of this tutorial, you’ll be able to do the following:
- Create a counter to track how many enemies are left to fix.
- Add an additional condition to end the game.
- Implement a Main Menu screen.
- Build a WebGL version of your game and submit it to share your project.
1. Overview
You’ve put a lot of hard work into creating this game. Throughout all the units, you’ve learned how to build a 2D environment using tilemaps, create a player and enemy characters, implement a health system, add collectible objects, design UI screens, and put together a fully functional game with a simple but complete core loop!
In this final tutorial, we’ll introduce several optional features you can add to further enhance your game. These additions are not required, but we encourage you to experiment with them. If you want to see these features in action and how they were implemented, you can explore the demo scenes located at Assets > _2DAdventureGame > Tutorial_Demo > Demo_Scenes.
There is one essential step, however: at the end of this tutorial, you’ll learn how to Build and share your game, and then submit your final work to showcase everything you’ve accomplished.
Note: For the purposes of this tutorial, we chose to use the Ruby’s Adventure asset set, and the images used in instructions will reflect this. If you chose another asset set, the file names will be the same, but in your corresponding theme folder.
2. Introduction to C# events
To keep your scripts organized and to help different parts of your game communicate with each other, you can use events. An event is a small callout that lets one script announce that something has happened, without needing to directly reference or depend on another script. This makes communication between systems much cleaner and easier to maintain.
Define a C# event
Let’s say you have two scripts: EventScript and ActionScript. The EventScript is where the event actually happens, and the ActionScript is where you want the reaction to that event to happen.
You start by declaring the event inside the script where the action occurs. You declare it like a regular variable, using the following structure:
public event Action OnAction;- This line creates an event of type Action named OnAction inside the EventScript.
An Action is a special type of variable that can store a function. Instead of holding a number or text, an Action holds a callback: a piece of code that will run later when the event is triggered.
Next, you subscribe to the event in the ActionScript. Subscribing means this script will listen for the moment when the event happens in the EventScript:
EventScript.OnAction += DoingSomething;This means, whenever the EventScript GameObject triggers the action, the ActionScript will react by DoingSomething.
- You first need a reference to the EventScript component.
- DoingSomething is any function you define in the ActionScript; this is what will run automatically when the event is triggered.
The final step is to decide when the event should actually be triggered. Back inside EventScript, when the action happens, you call:
OnAction.Invoke();- This is the EventScript announcing to all subscribers: “The action just happened, you can now act!”
A simple example would be notifying the UI when the player talks to an NPC. You might declare an OnTalkedToNPC event in the PlayerController script, invoke it inside the if condition where the player interacts with the NPC, and then have the UIHandler subscribe so it knows exactly when to activate the UI. This is exactly the kind of behavior you’ll implement in the next steps.
Best practice
Using events is considered a clean and scalable way to connect systems. Instead of making scripts call each other directly through public functions or variables, events let each script stay focused on their own responsibility. Other scripts simply listen and react when needed. This reduces tight coupling between systems, keeps your project organized, and makes it easier to add new features without breaking existing code. It also helps avoid bugs and makes your logic easier to understand and maintain as your game grows.
3. Create a Robot counter
Currently, there’s no way for the player to see how many enemies are left to fix or how many they’ve already repaired. This information is important for navigation and helps prevent the player from feeling lost or unsure about their progress.
To implement a simple robot counter UI, follow these high-level instructions:
RobotCounter UI Document
You’ll start by creating a new UI Document that will display the robot counter on the screen.
1. Create the UI Document:
- Right-click in the Assets folder of the Project window, select Create > UI Toolkit > UIDocument, and name it “RobotCounter”.
2. Add the container element:
- Open the RobotCounter UIDocument.
- Add a new VisualElement to serve as the background container.
- Assign the UICounterBar sprite (provided in the project) as its background.
- In the Size section and set the Size property’s Width and Height values to 100%.
Note: You can customize this element by using your own background sprite.
3. Add the label:
- Create a Label element as a child element of the VisualElement, Then rename the Label to “CounterLabel”.
- Customize the font, size, styling, or colors to match the UI of your game.
4. Add the RobotCounter to the main UI:
- Open your GameUI UI Document and add the RobotCounter as a child element, just like you did for the NPCDialogue in Update the GameUI asset.
Once the RobotCounter has been instantiated, position this element in the upper-right corner of the screen.
Update the UIHandler script
1. Create a new variable that will store the CounterLabel Label you’ve just added to the RobotCounter UI Document:
private Label m_RobotCounter;2. In the Start function, initialize the variable by retrieving the label from the RobotCounter UI Document:
2. In the Start function, initialize the variable by retrieving the label from the RobotCounter UI Document:3. Create the following new SetCounter function:
public void SetCounter(int current, int enemies)
{
m_RobotCounter.text = $"{current} / {enemies}";
}
Update the EnemyController script
1. Add the System library to your script:
using System;This line enables access to the Action type, which is necessary for creating events.
2. Declare a new Action event called OnFixed:
public event Action OnFixed;This action will be used to notify other scripts when each enemy gets fixed.
3. Inside the Fix function Invoke (call) the action:
OnFixed?.Invoke();Update the GameManager script:
1. Create a variable to track how many enemies have been fixed, starting at 0:
int enemiesFixed = 0;2. Create the following new HandleEnemyFixed function:
void HandleEnemyFixed()
{
enemiesFixed++;
uiHandler.SetCounter(enemiesFixed, enemies.Length);
}
3. In the Start function, subscribe the script to the OnFixed event in the following way:
foreach (var enemy in enemies)
{
enemy.OnFixed += HandleEnemyFixed;
}
uiHandler.SetCounter(0, enemies.Length);
This loop goes through every enemy in the scene and subscribes to their OnFixed event, so the GameManager gets notified each time an enemy is repaired. Then, it initializes the counter UI Label by setting the starting value to 0 and the total number of enemies in the level.
4. Win after speaking with the NPC
So far, the game ends the moment you fix all the enemies: once the last robot is repaired, the WinScreen appears automatically. However, since the NPC is the one who sends the player on this mission, it creates a stronger sense of closure if the player returns to talk to them before the game ends. You’ll need to slightly adjust the win logic so that the game only ends after all robots are fixed and the player speaks to the NPC again.
To implement the new logic to trigger the win condition, follow these high-level instructions:
Update the PlayerController script:
1. Add the System library to your script:
using System;This line enables access to the Action type, which is necessary for creating events.
2. Declare a new Action event called OnTalkedToNPC:
public event Action OnTalkedToNPC;This notifies other scripts when this enemy gets fixed.
3. Inside the if statement of the FindFriend function add the following line of code:
OnTalkedToNPC?.Invoke();4. Delete or comment (//) the previous instruction to display the DialogueWindow:
//UIHandler.instance.DisplayDialogue();Update the GameManager
1. In the Update function, search for the win condition that checks if AllEnemiesFixed and delete or comment it (//).
// Win condition
// if (AllEnemiesFixed())
// {
//    uiHandler.DisplayWinScreen();
//    Invoke(nameof(ReloadScene), 3f);
// }
2. Create the following new HandlePlayerTalkedToNPC function:
void HandlePlayerTalkedToNPC()
{
if (AllEnemiesFixed())
{
uiHandler.DisplayWinScreen();
       Invoke(nameof(ReloadScene), 3f);
}
else
{
UIHandler.instance.DisplayDialogue();
}
}
This function runs whenever the player talks to the NPC. First, it checks whether all enemies in the scene have already been fixed by calling AllEnemiesFixed().
- If they’re all fixed, the game triggers the win condition: it shows the WinScreen and reloads the scene after three seconds.
- If not all enemies are fixed, it simply opens the dialogue UI so the player can talk to the NPC again.
3. In the Start function, subscribe the script to the OnFixed event in the following way:
player.OnTalkedToNPC += HandlePlayerTalkedToNPC;5. Character selection screen
Another fundamental part of almost any complete game is the start menu, where players can enter the game, view controls, or access credits. In this project, we’ve provided a simple start menu that lets the player choose which theme level they want to play. This menu was created in a separate scene that contains a UI Document with the menu UI.
If you're curious to explore how it was built, we encourage you to inspect the UI Document and its elements. We also recommend checking out the Getting Started with UI Toolkit course for a deeper explanation of creating a main menu with UI Toolkit.
To explore the character selection screen menu, navigate to Assets > _2DAdventureGame > Tutorial_Demo > Demo_Scenes > Final and open the StartScreen scene.
In the scene, you’ll find a UI Document GameObject that contains two important components:
- A StartScene UI Document, which holds the background, title, and the three theme buttons.
- A StartScreen script, which controls what happens when each button is clicked. When the player selects one of the themes, this script loads the corresponding scene.
Change the aspect ratio
If the menu looks off in the Game view, it might be due to the aspect ratio. Up until now, you've been using Free Aspect, but the menu is designed for a specific resolution. To fix this, follow these instructions:
1. Select the Game view tab.
2. Select the Free Aspect to open the dropdown and select QHD (2560 x 1440).
The menu is now displayed correctly in the Game view.
Connect the StartScreen scene to your own scene
If you created a new custom scene for any of the themes, and you want the StartScene script to direct to yours instead, you need to update the Scene List. To do this, follow these instructions:
1. With the StartScreen scene open, go to File > Build Profiles.
2. Under Scene List, select Open Scene List.
3. Click on the Add Open Scenes button.
4. Remove the old theme scene from the list.
5. Drag the MainScene scene under the StartScreen scene, in the same position the old theme scene was using.
To ensure the scene you created is connected to the correct button in the StartScreen scene, make sure the scenes appear in this order in the Scenes in Build list:
0 – Start Screen Scene
1 – Ruby Scene
2 – Ducko Scene
3 – Sugar Land Scene
Note: If you want to learn how the change between scenes is managed, you can take a deeper look at the StartScreen script.
6. Continue building your game
You’ve implemented all the core components needed to create a great 2D adventure game. Throughout this course, you’ve also been able to add optional features to enhance your project.
Below are some final ideas you can try to implement on your own. You might need to search for additional information or explore other learning resources to complete them, which is an important part of being a Unity developer. Challenging yourself to solve problems and build new features is how you grow your skills. Good luck!
- Multiple levels: Expand your world by designing additional levels and connecting them.
- World personalization: Improve the environments by adding new art assets from other themes to bring each level to life.
- Boss encounter: Create a stronger enemy type that requires more projectile hits to fix.
- Enhanced UI and menus: Evolve your start screen into a multi-screen menu system, including character selection, level selection, and settings.
- Particle and VFX: Experiment with effects such as fog, waterfalls, sparks, or magic glows.
- NPC expansion: Add more NPCs with different roles or extend your existing NPC to offer different quests as the game progresses.
- Countdown mechanic: Implement a timed challenge where players must fix all enemies before time runs out.
- Scene machine effects: Explore additional Cinemachine features to add camera enhancements.
- Inventory system: Create a collection system for power-ups, tools, or keys that help the player progress inside the game.
- Minimap: If your world becomes large, add a minimap to help the player navigate and understand their surroundings.
7. Build and share your game
You’ve reached the end of this course and completed all the core functionalities of your 2D adventure game. Whether you stuck to the basics or experimented with the optional challenges and bonus features, we would love to see what you built.
To share your final project with others, you can upload your WebGL build to Unity Play. This platform lets you host your game online and easily share it with friends, classmates, or your community. Go to our tutorial on how to create a WebGL build and publish on Unity Play.
Please login to submit
8. Next steps
Congratulations, you’ve completed the 2D Adventure Game: Robot Repair course!
You should feel truly proud of yourself for completing this course and creating your own 2D adventure game. This was a significant amount of work, and along the way you learned valuable skills for designing, scripting, and polishing 2D projects in Unity.
If you want to continue growing as a Unity developer, here are the recommended next Learn courses:
- Create a 2D Roguelike Game: Dive into this fully updated course to learn how to design and build a complete 2D roguelike experience.
- 3D Stealth Game: Haunted House: Build your very own 3D stealth game from scratch. You’ll set up a player character, enemy AI, audio, UI, and all the gameplay elements needed to bring a haunted house to life.
If you’re looking for a more structured and comprehensive learning experience, consider exploring one of Unity’s learning pathways. These will guide you through a long-form curriculum and award a certification at the end:
- Junior Programmer Pathway: Ideal for learners who want to build coding skills or pursue an entry-level Unity programming role. This pathway assumes basic Unity familiarity and doesn’t require any prior coding knowledge.
- Creative Core Pathway: After completing Unity Essentials, follow this pathway to master the creative building blocks of Unity: VFX, lighting, animation, audio, UI, and more, no programming experience needed.
Complete this Tutorial
Submission Gallery
Ruby and the Trouble on the Island
Deal with the Machine Uprising. Controls: W, A, S, D or Arrow Keys. Press Space to shoot. Just don't wipe out all the local inhabitants.
2D Adventure Game: Ruby's Adventure
My submission for the 2D Adventure Game: Robot Repair Unity course. The game features a main menu and options menu with key rebinding and audio controls, along with both manual and automatic saving. Players can complete quests, interact with NPCs, and follow dialogue-driven objectives. Combat includes a dash ability, projectile attacks, and a health system, while a responsive UI keeps track of quest progress. The adventure spans three unique levels, each with its own visual style, NPCs, and enemies. The final level is an arena-style challenge where players must survive waves of enemies to beat the game.

2D Adventure Game Robot Repair
Unity Tutorial

my Robot Repair
May Two Game
A goose and a broken robots
use w s a d to move use spacebar to shoot cogs
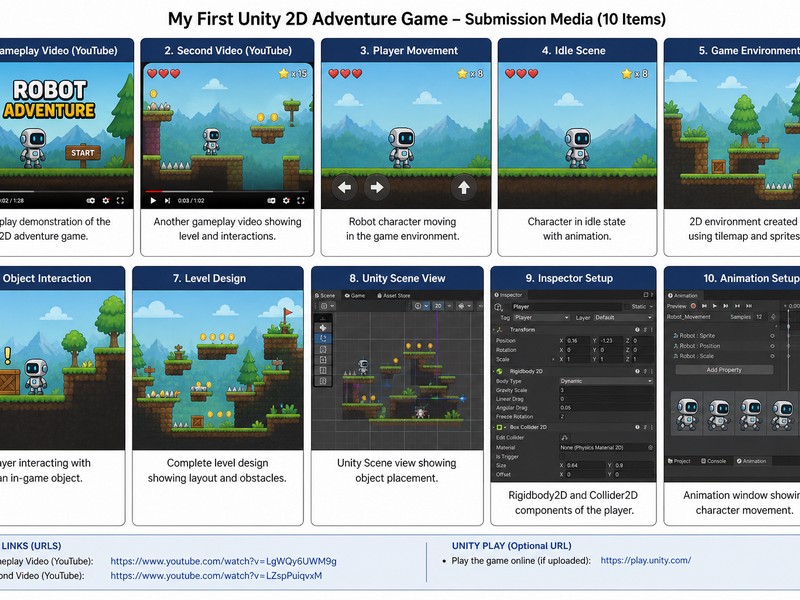
My First Unity 2D Adventure Game
This is a 2D adventure game created using Unity. The player controls a robot that moves around and interacts with objects to complete tasks. This project demonstrates basic game development concepts such as movement, collision, and simple game logic.